
camera hal之CameraProvider启动流程
3400 Words|Read in about 16 Min|本文总阅读量次
本文主要记录一些关于camera相关的camera hal之CameraProvider启动流程,包含从rc文件启动camera provider服务到最后打开供应商的so来完成初始化。
1Hal module架构
注意这里只进行依赖libhardware库这种方式实现,不讲解legacy方式
HAL module架构主要分为以下3个结构体:
- struct hw_module_t
- struct hw_module_methods_t
- struct hw_device_t
3个结构体是写这个标准方式hal的最关键部分,它们定义是在 hardware/libhardware/include/hardware/hardware.h
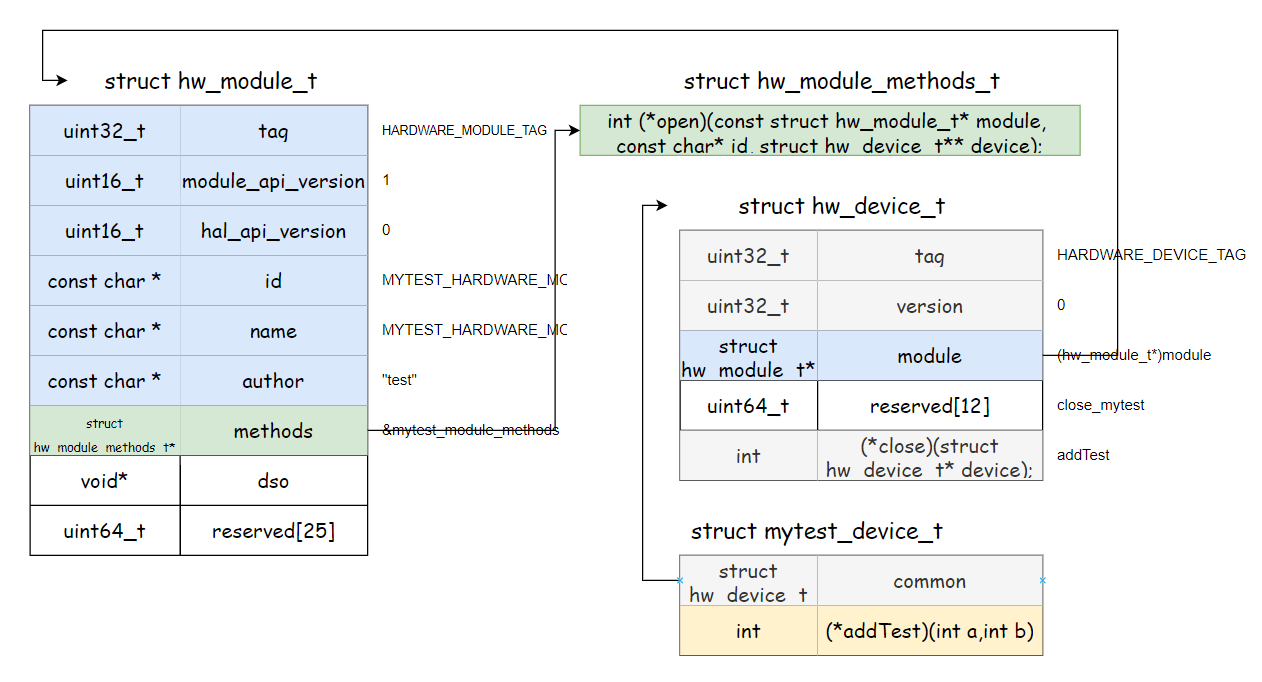
1.1struct hw_module_t
 1//struct hw_module_t
 2// hardware/libhardware/include/hardware/hardware.h
 3/*
 4每个硬件模块都必须有一个名为HAL_MODULE_INFO_SYM的数据结构,该数据结构的字段必须以hw_module_t开始,后面是模块相关信息。
 5*/
 6typedef struct hw_module_t {
 7    uint32_t tag;
 8    uint16_t module_api_version;
 9#define version_major module_api_version
10    uint16_t hal_api_version;
11#define version_minor hal_api_version
12    const char *id;
13    const char *name;
14    const char *author;
15    struct hw_module_methods_t* methods;
16    void* dso;
17
18#ifdef __LP64__
19    uint64_t reserved[32-7];
20#else
21    uint32_t reserved[32-7];
22#endif
23
24} hw_module_t;
1、每一个hardware硬件抽象模块必须定义有一个模块结构体,名字是HAL_MODULE_INFO_SYM,即HMI,这个模块结构体第一个成员变量类型必须是hw_module_t
2、hw_module_t的tag的值必须为HARDWARE_MODULE_TAG,这个就是来标识是硬件抽象的结构体
3、id这个属性代表这个module的唯一性,即每个硬件抽象模块都会有自己的id
4、methods这个代表每个硬件抽象模块对应的方法结构体,类型hw_module_methods_t
举一个实例化例子
 1//实例化HAL_MODULE_INFO_SYM:
 2
 3/* every module must have HAL_MODULE_INFO_SYM */
 4struct mytest_module_t HAL_MODULE_INFO_SYM = {
 5    .common = {
 6        .tag = HARDWARE_MODULE_TAG,
 7        .version_major = 1,
 8        .version_minor = 0,
 9        .id = MYTEST_HARDWARE_MODULE_ID,
10        .name = MYTEST_HARDWARE_MODULE_ID,
11        .author = "test",
12        .methods = &mytest_module_methods,
13    },
14};
1.2struct hw_module_methods_t
1// hardware/libhardware/include/hardware/hardware.h
2typedef struct hw_module_methods_t {
3    /** Open a specific device */
4    int (*open)(const struct hw_module_t* module, const char* id,
5            struct hw_device_t** device);
6
7} hw_module_methods_t;
在结构体 hw_module_methods_t 中只有一个成员,它是一个函数指针,名字是open,它主要作用就是用来打开硬件抽象层中给的硬件设备。因为一个硬件抽象模块module可以包含多个设备device,所以这里需要指定id。
- moudlue:代表打开硬件设备设备所属模块
- id:代表打开设备的id
- device:这个双重指针,一般是输出内容到这个参数里面,即返回值,用来描述一个打开的硬件设备
1.3struct hw_device_t
 1// hardware/libhardware/include/hardware/hardware.h
 2/**
 3每个设备数据结构都必须以hw_device_t开始
 4后面是特定于模块的公共方法和属性
 5 */
 6typedef struct hw_device_t {
 7    uint32_t tag;
 8    uint32_t version;
 9    struct hw_module_t* module;
10#ifdef __LP64__
11    uint64_t reserved[12];
12#else
13    uint32_t reserved[12];
14#endif
15    int (*close)(struct hw_device_t* device);
16} hw_device_t;
其实这个和前面的hw_module_t高度相识,只不过一个代表整个模块一个代表模块的设备 同样总结一下hw_device_t:
1、每个硬件设备都必须自定义一个硬件设备的结构体,第一个成员变量为hw_device_t
2、tag必须为所在的硬件模块HARDWARE_DEVICE_TAG,代表他是个硬件设备结构体
3、会有一个close的函数指针,主要是关闭一个硬件设备
4、自定义设备结构体,除了第一个成员hw_device_t外,最重要就是会定义其他成员方法指针,这些方法就是用来对外提供操作硬件设备的
1.4实例
自定义hw_device_t
1struct mytest_device_t {
2    struct hw_device_t common; //第一成员必须为hw_device_t
3       int(*addTest)(int a,int b);
4};
然后进行初始化赋值操作
1struct mytest_device_t * device = NULL;
2device = ( struct mytest_device_t * )malloc(sizeof(*device));
3memset(device, 0, sizeof(*device));
4device->common.tag = HARDWARE_DEVICE_TAG;
5device->common.version = 0;
6device->common.module = (hw_module_t*)module;
7device->common.close = close_mytest;
8device->addTest = addTest;
上面最重要就是把hw_device_t构造出,而且给成员变量test赋值了具体方法,后面获取了这个hw_device_t就可以调用真正的hal实现方法了
2hardware.c源码流程
2.1hw_get_module
 1//hardware/libhardware/hardware.c
 2int hw_get_module(const char *id, const struct hw_module_t **module)
 3{
 4    return hw_get_module_by_class(id, NULL, module);
 5}
 6//这里第二个参数为NULL,即inst为NULL
 7int hw_get_module_by_class(const char *class_id, const char *inst,
 8                           const struct hw_module_t **module)
 9{
10    int i = 0;
11    char prop[PATH_MAX] = {0};
12    char path[PATH_MAX] = {0};
13    char name[PATH_MAX] = {0};
14    char prop_name[PATH_MAX] = {0};
15
16
17    if (inst)
18        snprintf(name, PATH_MAX, "%s.%s", class_id, inst);
19    else
20        //name就为传入的class_id
21        strlcpy(name, class_id, PATH_MAX);
22
23
24    /*
25     这里我们依赖于多次调用dlopen相同的so,将简单地增加一个refcount(而不是加载库的新副本)。
26     我们还假设dlopen()是线程安全的。
27    */
28    //获取属性比如ro.hardware.camera 一般对应会显示厂商mtk,rk,amlogic等
29    snprintf(prop_name, sizeof(prop_name), "ro.hardware.%s", name);
30    if (property_get(prop_name, prop, NULL) > 0) {
31        if (hw_module_exists(path, sizeof(path), name, prop) == 0) {
32            goto found;
33        }
34    }
35    //以此获取下面几个属性值,"ro.hardware"、"ro.product.board"、"ro.board.platform"、"ro.arch"
36    for (i=0 ; i<HAL_VARIANT_KEYS_COUNT; i++) {
37        if (property_get(variant_keys[i], prop, NULL) == 0) {
38            continue;
39        }
40        if (hw_module_exists(path, sizeof(path), name, prop) == 0) {
41            goto found;
42        }
43    }
44
45    //如果上述属性还是没有对应值,那么加载默认的so,比如default
46    if (hw_module_exists(path, sizeof(path), name, "default") == 0) {
47        goto found;
48    }
49
50    return -ENOENT;
51
52found:
53    //这里开始加载so
54    return load(class_id, path, module);
55}
- hw_module_exists会根据传递进来的name,subname,然后去拼出一个so的文件名字
- load会开始加载对应so,来进行初始化调用
2.2hw_module_exists
检查具有给定名称和子名称的HAL是否存在,如果存在则返回0,否则返回0;否则返回负值。成功之路将包含通往HAL的路径。
 1//hardware/libhardware/hardware.c
 2#if defined(__LP64__)
 3#define HAL_LIBRARY_PATH1 "/system/lib64/hw"
 4#define HAL_LIBRARY_PATH2 "/vendor/lib64/hw"
 5#define HAL_LIBRARY_PATH3 "/odm/lib64/hw"
 6#else
 7#define HAL_LIBRARY_PATH1 "/system/lib/hw"
 8#define HAL_LIBRARY_PATH2 "/vendor/lib/hw"
 9#define HAL_LIBRARY_PATH3 "/odm/lib/hw"
10#endif
11
12static int hw_module_exists(char *path, size_t path_len, const char *name,
13                            const char *subname)
14{
15    //遍历odm路径的so,比如camera.default.so
16    snprintf(path, path_len, "%s/%s.%s.so",
17             HAL_LIBRARY_PATH3, name, subname);
18    if (path_in_path(path, HAL_LIBRARY_PATH3) && access(path, R_OK) == 0)
19        return 0;
20    //遍历vendor路径的so,比如camera.default.so
21    snprintf(path, path_len, "%s/%s.%s.so",
22             HAL_LIBRARY_PATH2, name, subname);
23    if (path_in_path(path, HAL_LIBRARY_PATH2) && access(path, R_OK) == 0)
24        return 0;
25
26#ifndef __ANDROID_VNDK__
27    snprintf(path, path_len, "%s/%s.%s.so",
28             HAL_LIBRARY_PATH1, name, subname);
29    if (path_in_path(path, HAL_LIBRARY_PATH1) && access(path, R_OK) == 0)
30        return 0;
31#endif
32
33    return -ENOENT;
34}
如果不存在,直接返回错误,标识无法加载对应的hal的so;如果存在,那么加载对应的so,比如/vendor/lib/hw/camera.default.so
2.3load
 1//hardware/libhardware/hardware.c
 2/ * *
 3*如果成功,加载变量定义的文件
 4*返回dlopen 句柄和hmi。
 5* @return 0 =成功,!0 =失败。
 6* /
 7static int load(const char *id,
 8        const char *path,
 9        const struct hw_module_t **pHmi)
10{
11    int status = -EINVAL;
12    void *handle = NULL;
13    struct hw_module_t *hmi = NULL;
14#ifdef __ANDROID_VNDK__
15    const bool try_system = false;
16#else
17    const bool try_system = true;
18#endif
19    //加载so,方法是android封装了dlopen
20    //特别注意:加载so的时候,如果so中有全局变量会优先构造或者初始化
21    handle = android_load_sphal_library(path, RTLD_NOW);
22    if (handle == NULL) {
23        char const *err_str = dlerror();
24        ALOGE("load: module=%s\n%s", path, err_str?err_str:"unknown");
25        status = -EINVAL;
26        goto done;
27    }
28
29    //加载完so,寻找struct hal_module_info,并且持有hmi句柄
30    const char *sym = HAL_MODULE_INFO_SYM_AS_STR;
31    hmi = (struct hw_module_t *)dlsym(handle, sym);
32    if (hmi == NULL) {
33        ALOGE("load: couldn't find symbol %s", sym);
34        status = -EINVAL;
35        goto done;
36    }
37
38    //传入的id和so定义的id是否一致,不一致说明加载错误
39    if (strcmp(id, hmi->id) != 0) {
40        ALOGE("load: id=%s != hmi->id=%s", id, hmi->id);
41        status = -EINVAL;
42        goto done;
43    }
44
45    hmi->dso = handle;
46
47    /* success */
48    status = 0;
49
50    done:
51    if (status != 0) {
52        hmi = NULL;
53        if (handle != NULL) {
54            dlclose(handle);
55            handle = NULL;
56        }
57    } else {
58        //走到这里,hmi句柄不会释放,一直持有
59        ALOGV("loaded HAL id=%s path=%s hmi=%p handle=%p",
60                id, path, hmi, handle);
61    }
62
63    *pHmi = hmi;
64
65    return status;
66}
特别注意:加载so的时候,如果so中有全局变量会优先构造或者初始化
dlopen()是一个强大的库函数。该函数将打开一个新库,并把它装入内存。该函数主要用来加载库中的符号,这些符号在编译的时候是不知道的。dlsym是一个计算机函数,功能是根据动态链接库操作句柄与符号,返回符号对应的地址,不但可以获取函数地址,也可以获取变量地址。

2.4实例说明
以笔者努比亚Z50SP手机为例
 1-?????????  ? ?    ?           ?                ? audio.bluetooth_qti.default.so
 2-?????????  ? ?    ?           ?                ? audio.primary.default.so
 3-?????????  ? ?    ?           ?                ? audio.primary.kalama.so
 4-?????????  ? ?    ?           ?                ? audio.r_submix.default.so
 5-?????????  ? ?    ?           ?                ? audio.usb.default.so
 6-?????????  ? ?    ?           ?                ? camera.qcom.so
 7-?????????  ? ?    ?           ?                ? com.dsi.ant@1.0-impl.so
 8-?????????  ? ?    ?           ?                ? com.qti.chi.offline.so
 9-?????????  ? ?    ?           ?                ? com.qti.chi.override.so
10-?????????  ? ?    ?           ?                ? consumerir.zte.so
11-rw-r--r--  1 root root    11056 2009-01-01 08:00 gralloc.default.so
12-?????????  ? ?    ?           ?                ? local_time.default.so
13-?????????  ? ?    ?           ?                ? power.default.so
可以看出camera使用的是高通的so,audio使用的是kalama,另外的usbaudio,gralloc和power使用的是默认的so
对应属性查看,跟上面的so加载对应上了
 1PQ82A02:/ $ getprop |grep ro.board.platform
 2[ro.board.platform]: [kalama]
 3PQ82A02:/ $ getprop |grep ro.arch
 41|PQ82A02:/ $ getprop |grep ro.hardware.camera
 51|PQ82A02:/ $ getprop |grep ro.hardware
 6[ro.hardware]: [qcom]
 7[ro.hardware.consumerir]: [zte]
 8[ro.hardware.egl]: [adreno]
 9[ro.hardware.keystore_desede]: [true]
10[ro.hardware.vulkan]: [adreno]
11PQ82A02:/ $ getprop |grep ro.product.board
12[ro.product.board]: [kalama]
13PQ82A02:/ $ getprop |grep ro.board.platform
14[ro.board.platform]: [kalama]
15PQ82A02:/ $ getprop |grep ro.arch
161|PQ82A02:/ $
3HAL module流程
上面只是一个个的定义好硬件抽象模块的步骤,接下来是要要怎么使用上面的hardware接口进行调用到相关的hal方法呢?
- 通过hw_get_module(char* id, struct hw_module_t ** module) 方法**获取一个硬件抽象模块的指针**
- 通过模块调用module->common.methods->open()方法获取一个硬件抽象即hw_device_t的指针
- 使用硬件抽象设备的hw_device_t指针调用具体的hal实现方法,比如上面 mytest_dev->addTest
相关调用hal的代码如下:
 1mytest_module_t* module;
 2//1.获取hw_module_t
 3if (0 == hw_get_module(MYTEST_HARDWARE_MODULE_ID, (const hw_module_t**)&module) ) {
 4    //2.调用methods的open方法,目的获取hw_device_t的指针
 5    if (0 == ((hw_module_t*)module)->methods->open((hw_module_t*)module,
 6                                                   MYTEST_HARDWARE_MODULE_ID,
 7                                                   (struct hw_device_t**)&mytest_device)) {
 8        //3.利用获取的mytest_device,调用对于的方法
 9        int result = mytest_device->addTest(1,2);
10    }
11}
4CameraProvider
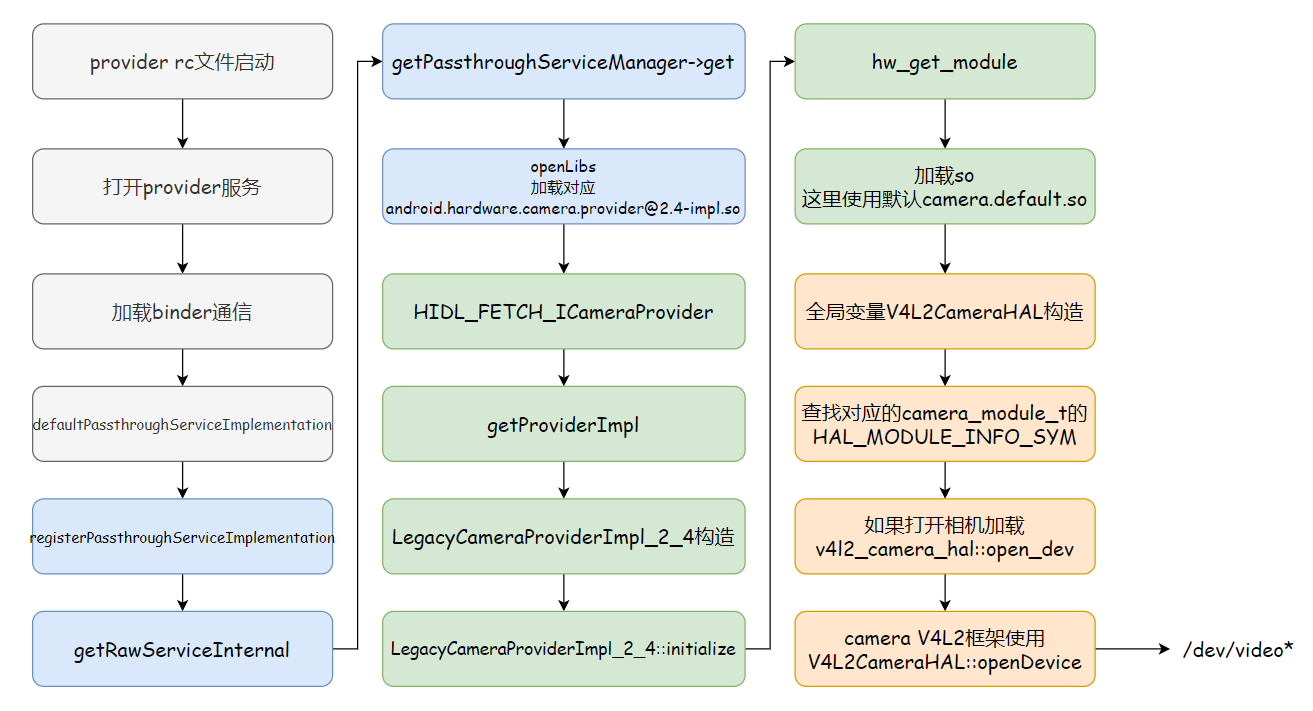
Camera HAL运行在CameraProvider进程当中,目前已经到2.7版本,但是使用最多的是2.4版本,2.4是加入Treble机制后CameraProvider进程的第一个版本,所以我们先从这里开始。
4.1rc启动cameraprovider service
CameraProvider进程是一个native服务,通过init.rc启动
 1# hardware/interfaces/camera/provider/2.4/default/android.hardware.camera.provider@2.4-service_64.rc
 2#真正的进程名称是android.hardware.camera.provider@2.4-service_64
 3service vendor.camera-provider-2-4 /vendor/bin/hw/android.hardware.camera.provider@2.4-service_64
 4    interface android.hardware.camera.provider@2.4::ICameraProvider legacy/0
 5    class hal
 6    user cameraserver
 7    group audio camera input drmrpc
 8    ioprio rt 4
 9    capabilities SYS_NICE
10    task_profiles CameraServiceCapacity MaxPerformance
由上可以看出,进程启动时执行的时二进制/vendor/bin/hw/android.hardware.camera.provider@2.4-service_64
4.2查找进程的入口
下面我们从Android.bp中找到该二进制的入口文件和入口函数。
 1// hardware/interfaces/camera/provider/2.4/default/Android.bp
 2...
 3cc_binary {
 4    name: "android.hardware.camera.provider@2.4-service_64",
 5    defaults: ["camera_service_defaults"],
 6    compile_multilib: "64",
 7    init_rc: ["android.hardware.camera.provider@2.4-service_64.rc"],
 8}
 9cc_defaults {
10    name: "camera_service_defaults",
11    defaults: ["hidl_defaults"],
12    proprietary: true,
13    relative_install_path: "hw",
14    srcs: ["service.cpp"], // 二进制入口肯定时service.cpp里面的main函数
15    shared_libs: [
16        "android.hardware.camera.common@1.0",
17        "android.hardware.camera.device@1.0",
18        "android.hardware.camera.device@3.2",
19        "android.hardware.camera.device@3.3",
20        "android.hardware.camera.device@3.4",
21        "android.hardware.camera.device@3.5",
22        "android.hardware.camera.provider@2.4",
23        "android.hardware.graphics.mapper@2.0",
24        "android.hardware.graphics.mapper@3.0",
25        "android.hardware.graphics.mapper@4.0",
26        "android.hidl.allocator@1.0",
27        "android.hidl.memory@1.0",
28        "libbinder",
29        "libcamera_metadata",
30        "libcutils",
31        "libhardware",
32        "libhidlbase",
33        "liblog",
34        "libutils",
35    ],
36    static_libs: [
37        "android.hardware.camera.common@1.0-helper",
38    ],
39    header_libs: [
40        "camera.device@3.4-external-impl_headers",
41        "camera.device@3.4-impl_headers",
42        "camera.device@3.5-external-impl_headers",
43        "camera.device@3.5-impl_headers",
44    ],
45}
46...
从以上Android.bp文件中可以看出,/vendor/bin/hw/android.hardware.camera.provider@2.4-service_64只包含了一个源文件service.cpp,那么入口函数肯定就是这个cpp里面的main函数了。
 1// hardware/interfaces/camera/provider/2.4/default/service.cpp
 2int main()
 3{
 4    ALOGI("CameraProvider@2.4 legacy service is starting.");
 5    // /dev/vndbinder
 6    // 这里表示Camera hal可以跟其他 vendor hal进程通过binder通信,否则不可以
 7    android::ProcessState::initWithDriver("/dev/vndbinder");
 8
 9    // b/166675194
10    if (property_get_bool("ro.vendor.camera.provider24.disable_mem_init", false)) {
11        if (mallopt(M_BIONIC_ZERO_INIT, 0) == 0) {
12            ALOGE("Disabling heap initialization failed.");
13        }
14    }
15
16    status_t status;
17    if (kLazyService) {
18        status = defaultLazyPassthroughServiceImplementation<ICameraProvider>("legacy/0",
19                                                                              /*maxThreads*/ 6);
20    } else {
21        // 启动时会执行下面的函数,这里记下这里的泛型类型为ICameraProvider,还有两个参数,后面有用
22        status = defaultPassthroughServiceImplementation<ICameraProvider>("legacy/0",
23                                                                          /*maxThreads*/ 6);
24    }
25    return status;
26}
4.3服务调用
defaultPassthroughServiceImplementation的实现如下
 1// system/libhidl/transport/include/hidl/LegacySupport.h
 2// 这里的两个泛型参数都为ICameraProvider
 3template <class Interface, class ExpectInterface = Interface>
 4__attribute__((warn_unused_result)) status_t defaultPassthroughServiceImplementation(
 5        const std::string& name, size_t maxThreads = 1) {
 6    // 设置该进程中binder通信线程池的最大线程数,这里maxThreads=6
 7    configureRpcThreadpool(maxThreads, true);
 8    // 注意这里的泛型类型为ICameraProvider, 参数name为legacy/0
 9    status_t result = registerPassthroughServiceImplementation<Interface, ExpectInterface>(name);
10
11    if (result != OK) {
12        return result;
13    }
14    // 把当前线程也就是主线程加入binder线程池
15    joinRpcThreadpool();
16    return UNKNOWN_ERROR;
17}
- 设置该进程中binder通信线程池的最大线程数,这里maxThreads=6
- 注册服务,使用泛型,name为legacy/0
- 把当前线程也就是主线程加入binder线程池
4.4注册服务
 1// system/libhidl/transport/include/hidl/LegacySupport.h
 2template <class Interface, class ExpectInterface = Interface>
 3__attribute__((warn_unused_result)) status_t registerPassthroughServiceImplementation(
 4        const std::string& name = "default") {
 5    // 这里Interface和ExpectInterface是ICameraProvider
 6    // ICameraProvider::descriptor为android.hardware.camera.provider@2.4::ICameraProvider
 7    // 至于ICameraProvider::descriptor的值哪里赋值的,后面细讲
 8    return registerPassthroughServiceImplementation(Interface::descriptor,
 9                                                    ExpectInterface::descriptor, name);
10}
11
12// system/libhidl/transport/LegacySupport.cpp
13__attribute__((warn_unused_result)) status_t registerPassthroughServiceImplementation(
14        const std::string& interfaceName, const std::string& expectInterfaceName,
15        const std::string& serviceName) {
16    // 这里前两个参数为android.hardware.camera.provider@2.4::ICameraProvider,
17    // 第三个参数为lambda表达式的一个函数,该函数传入两个参数,然后执行registerAsServiceInternal
18    // 第四个参数为legacy/0
19    return details::registerPassthroughServiceImplementation(
20            interfaceName, expectInterfaceName,
21            [](const sp<IBase>& service, const std::string& name) {
22                return details::registerAsServiceInternal(service, name);
23            },
24            serviceName);
25}
26
27
28__attribute__((warn_unused_result)) status_t registerPassthroughServiceImplementation(
29        const std::string& interfaceName, const std::string& expectInterfaceName,
30        RegisterServiceCb registerServiceCb, const std::string& serviceName) {
31    // 这是一个关键函数,第一个参数为android.hardware.camera.provider@2.4::ICameraProvider
32    // 第二个参数为 legacy/0
33    // 我们下面先分析这个函数,然后再继续
34    sp<IBase> service =
35            getRawServiceInternal(interfaceName, serviceName, true /*retry*/, true /*getStub*/);
36
37    // 这里我们把后面的代码先省略掉,等getRawServiceInternal函数讲完之后再继续往下分析
38    ...
39}
- 打开camera hal的so库,初始化Camera Hal,比如获取camera numbers,在getRawServiceInternal里实现
- 将camera hal注册为binder服务,在registerServiceCb里实现,也就是上一步的lamda函数,最终调用的是 registerAsServiceInternal
4.5获取原生内部服务
 1// system/libhidl/transport/ServiceManagement.cpp
 2// 第一个参数为android.hardware.camera.provider@2.4::ICameraProvider
 3//  第二个参数为 legacy/0
 4// 后两个参数都为true
 5sp<::android::hidl::base::V1_0::IBase> getRawServiceInternal(const std::string& descriptor,
 6                                                             const std::string& instance,
 7                                                             bool retry, bool getStub) {
 8    using Transport = IServiceManager1_0::Transport;
 9    sp<Waiter> waiter;
10
11    sp<IServiceManager1_1> sm;
12    Transport transport = Transport::EMPTY;
13    if (kIsRecovery) {
14        transport = Transport::PASSTHROUGH;
15    } else {
16        sm = defaultServiceManager1_1();
17        if (sm == nullptr) {
18            ALOGE("getService: defaultServiceManager() is null");
19            return nullptr;
20        }
21
22        // transport类型决定了当前HAL是绑定式还是直通式
23        Return<Transport> transportRet = sm->getTransport(descriptor, instance);
24
25        if (!transportRet.isOk()) {
26            ALOGE("getService: defaultServiceManager()->getTransport returns %s",
27                  transportRet.description().c_str());
28            return nullptr;
29        }
30        transport = transportRet;
31    }
32
33    const bool vintfHwbinder = (transport == Transport::HWBINDER); // true
34    const bool vintfPassthru = (transport == Transport::PASSTHROUGH); // false
35    const bool trebleTestingOverride = isTrebleTestingOverride(); // false
36    const bool allowLegacy = !kEnforceVintfManifest || (trebleTestingOverride && isDebuggable()); // false
37    const bool vintfLegacy = (transport == Transport::EMPTY) && allowLegacy; // false
38
39    // 因为参数getStub为true,所以这里的for循环不进入,不执行
40    ...
41
42    // getStub为true,进入这里的if语句
43    if (getStub || vintfPassthru || vintfLegacy) {
44        // getPassthroughServiceManager 返回new PassthroughServiceManager()
45        const sp<IServiceManager1_0> pm = getPassthroughServiceManager();
46        if (pm != nullptr) {
47            // 下面单独分析PassthroughServiceManager的get函数
48            sp<IBase> base = pm->get(descriptor, instance).withDefault(nullptr);
49            // getStub为true, trebleTestingOverride为false,这里的if进不去
50            if (!getStub || trebleTestingOverride) {
51                base = wrapPassthrough(base);
52            }
53            return base;
54        }
55    }
56
57    return nullptr;
58}
-
getTransport,会读取/vendor/etc/vintf/manifest.xml文件来获取当前transport类型, transport类型决定了当前HAL是绑定式还是直通式
// 这里最终会去读取/vendor/etc/vintf/manifest.xml文件来获取当前transport类型 // 初始文件在device/xxx/manifest.xml,编译时跟其他manifest // 一起写入/vendor/etc/vintf/manifest.xml,定义如下:
1<!--/vendor/etc/vintf/manifest.xml --> 2 <manifest version="1.0" type="device" target-level="3"> 3 <hal format="hidl"> 4 <name>android.hardware.camera.provider</name> 5 <transport>hwbinder</transport> 6 <fqname>@2.4::ICameraProvider/legacy/0</fqname> 7 </hal> 8 </manifest> -
getPassthroughServiceManager,获取对应服务的代理对象
-
PassthroughServiceManager.get,会打开对应的lib,即android.hardware.camera.provider@2.4-impl.so
4.6打开对应的lib
  1// system/libhidl/transport/ServiceManagement.cpp
  2// descriptor: android.hardware.camera.provider@2.4::ICameraProvider
  3// instance:  legacy/0
  4sp<IBase> base = pm->get(descriptor, instance)
  5Return<sp<IBase>> get(const hidl_string& fqName,
  6                        const hidl_string& name) override {
  7    sp<IBase> ret = nullptr;
  8
  9    // 主要就是执行了openLibs函数,我们先把参数理一下,然后在进入openLibs函数进行分析
 10    // 第一个参数fqName: android.hardware.camera.provider@2.4::ICameraProvider
 11    // 第二个参数是一个lamda函数,这个函数有三个参数,这里主要是这个lamda函数的实现,
 12    openLibs(fqName, [&](void* handle, const std::string &lib, const std::string &sym) {
 13    ...
 14    }
 15}
 16
 17// openLibs函数实现
 18static void openLibs(
 19    // fqName:  android.hardware.camera.provider@2.4::ICameraProvider
 20    const std::string& fqName,
 21    // eachLib: 就是上面提到的lamda函数
 22    const std::function<bool /* continue */ (void* /* handle */, const std::string& /* lib */,
 23                                                const std::string& /* sym */)>& eachLib) {
 24    //fqName looks like android.hardware.foo@1.0::IFoo
 25    // 用::符号将参数分割为android.hardware.camera.provider@2.4和ICameraProvider
 26    size_t idx = fqName.find("::");
 27
 28    if (idx == std::string::npos ||
 29            idx + strlen("::") + 1 >= fqName.size()) {
 30        LOG(ERROR) << "Invalid interface name passthrough lookup: " << fqName;
 31        return;
 32    }
 33
 34    // 这里拿到的就是android.hardware.camera.provider@2.4
 35    std::string packageAndVersion = fqName.substr(0, idx);
 36    // 这里拿到的就是 ICameraProvider
 37    std::string ifaceName = fqName.substr(idx + strlen("::"));
 38
 39    // prefix为android.hardware.camera.provider@2.4-impl
 40    const std::string prefix = packageAndVersion + "-impl";
 41    // sym为 HIDL_FETCH_ICameraProvider
 42    const std::string sym = "HIDL_FETCH_" + ifaceName;
 43
 44    // 到此,上面参数已经解析完毕,下面根据prefix和sym来执行
 45
 46    constexpr int dlMode = RTLD_LAZY;
 47    void* handle = nullptr;
 48
 49    dlerror(); // clear
 50
 51    static std::string halLibPathVndkSp = details::getVndkSpHwPath();
 52    //这里的变量分别为"/odm/lib64/hw/", "/vendor/lib64/hw/", "/apex/com.android.vndk.v33/lib64/hw/"
 53    std::vector<std::string> paths = {
 54        HAL_LIBRARY_PATH_ODM, HAL_LIBRARY_PATH_VENDOR, halLibPathVndkSp,
 55#ifndef __ANDROID_VNDK__
 56        //这里的变量为"/system/lib64/hw/"
 57        HAL_LIBRARY_PATH_SYSTEM,
 58#endif
 59    };
 60
 61    // 条件为false,不进入
 62    if (details::isTrebleTestingOverride()) {
 63        // Load HAL implementations that are statically linked
 64        handle = dlopen(nullptr, dlMode);
 65        if (handle == nullptr) {
 66            const char* error = dlerror();
 67            LOG(ERROR) << "Failed to dlopen self: "
 68                        << (error == nullptr ? "unknown error" : error);
 69        } else if (!eachLib(handle, "SELF", sym)) {
 70            return;
 71        }
 72    }
 73    // 在paths的几个路径中寻找android.hardware.camera.provider@2.4-impl.so文件
 74    // 我们到设备里查看一下,发现在/vendor/lib64/hw目录下,因为是64位系统,所以/vendor/lib/hw/是不会遍历的
 75    for (const std::string& path : paths) {
 76        std::vector<std::string> libs = findFiles(path, prefix, ".so");
 77
 78        for (const std::string &lib : libs) {
 79            // fullPath=/vendor/lib64/hw/android.hardware.camera.provider@2.4-impl.so
 80            const std::string fullPath = path + lib;
 81
 82            if (kIsRecovery || path == HAL_LIBRARY_PATH_SYSTEM) {
 83                handle = dlopen(fullPath.c_str(), dlMode);
 84            } else {
 85#if !defined(__ANDROID_RECOVERY__) && defined(__ANDROID__)
 86                // 最终执行这里,load so库,拿到handle
 87                handle = android_load_sphal_library(fullPath.c_str(), dlMode);
 88#endif
 89            }
 90
 91            if (handle == nullptr) {
 92                const char* error = dlerror();
 93                LOG(ERROR) << "Failed to dlopen " << lib << ": "
 94                            << (error == nullptr ? "unknown error" : error);
 95                continue;
 96            }
 97            // 还记得eachLib函数吗,就是上面省略掉的lamda回调函数,下面开始分析
 98            if (!eachLib(handle, lib, sym)) {
 99                return;
100            }
101        }
102    }
103}
- 分割传入的字符串fqName,packageAndVersion为android.hardware.camera.provider@2.4,ifaceName为ICameraProvider
- 拼接字符串prefix为android.hardware.camera.provider@2.4-impl,sym为HIDL_FETCH_ICameraProvider
- 查找几个目录下对应的so文件,分别为"/odm/lib64/hw/", “/vendor/lib64/hw/”, “/apex/com.android.vndk.v33/lib64/hw/”
- 打开对应的so文件,拿到对应的句柄,获取sym的变量,即为HIDL_FETCH_ICameraProvider
4.7openLib回调匿名内部函数
 1// system/libhidl/transport/ServiceManagement.cpp
 2// fqName: android.hardware.camera.provider@2.4::ICameraProvider
 3// name:  legacy/0
 4Return<sp<IBase>> get(const hidl_string& fqName,
 5                      const hidl_string& name) override {
 6    sp<IBase> ret = nullptr;
 7    // 这里的handle为dlopen /vendor/lib64/hw/android.hardware.camera.provider@2.4-impl.so后的handle
 8    // lib参数为android.hardware.camera.provider@2.4-impl.so
 9    // sym参数为HIDL_FETCH_ICameraProvider
10    openLibs(fqName, [&](void* handle, const std::string &lib, const std::string &sym) {
11        IBase* (*generator)(const char* name);
12        // 通过dlsym在android.hardware.camera.provider@2.4-impl.so中找到HIDL_FETCH_ICameraProvider的地址
13        *(void **)(&generator) = dlsym(handle, sym.c_str());
14        if(!generator) {
15            const char* error = dlerror();
16            LOG(ERROR) << "Passthrough lookup opened " << lib << " but could not find symbol "
17                << sym << ": " << (error == nullptr ? "unknown error" : error)
18                << ". Keeping library open.";
19
20            // dlclose too problematic in multi-threaded environment
21            // dlclose(handle);
22
23            return true;  // continue
24        }
25        // 执行HIDL_FETCH_ICameraProvider函数,参数为legacy/0
26        ret = (*generator)(name.c_str());
27
28        using ::android::hardware::details::getDescriptor;
29        std::string actualFqName = getDescriptor(ret.get());
30        CHECK(actualFqName.size() > 0);
31        registerReference(actualFqName, name);
32        return false;
33    });
34
35    return ret;
36}
执行HIDL_FETCH_ICameraProvider函数,参数为legacy/0,并将其注册到sm服务中
4.8HIDL_FETCH_ICameraProvider函数
so调用用于获取对应ICameraProvider入口,调用CameraProvider构造函数
 1// hardware/interfaces/camera/provider/2.4/default/CameraProvider_2_4.cpp
 2// 参数name为legacy/0
 3ICameraProvider* HIDL_FETCH_ICameraProvider(const char* name) {
 4    using namespace android::hardware::camera::provider::V2_4::implementation;
 5    ICameraProvider* provider = nullptr;
 6    if (strcmp(name, kLegacyProviderName) == 0) {
 7        // 执行这里
 8        provider = getProviderImpl<LegacyCameraProviderImpl_2_4>();
 9    } else if (strcmp(name, kExternalProviderName) == 0) {
10        provider = getProviderImpl<ExternalCameraProviderImpl_2_4>();
11    } else {
12        ALOGE("%s: unknown instance name: %s", __FUNCTION__, name);
13    }
14
15    return provider;
16}
17
18// 创建CameraProvider对象并返回,在CameraProvider的构造函数中,会执行IMPL的构造函数,
19// 也就是LegacyCameraProviderImpl_2_4的构造函数
20template<typename IMPL>
21CameraProvider<IMPL>* getProviderImpl() {
22    CameraProvider<IMPL> *provider = new CameraProvider<IMPL>();
23    if (provider == nullptr) {
24        ALOGE("%s: cannot allocate camera provider!", __FUNCTION__);
25        return nullptr;
26    }
27    if (provider->isInitFailed()) {
28        ALOGE("%s: camera provider init failed!", __FUNCTION__);
29        delete provider;
30        return nullptr;
31    }
32    return provider;
33}
LegacyCameraProviderImpl_2_4的构造函数实现
 1// hardware/interfaces/camera/provider/2.4/default/CameraProvider_2_4.h
 2template<typename IMPL>
 3struct CameraProvider : public ICameraProvider {
 4    CameraProvider() : impl() {}
 5};
 6// hardware/interfaces/camera/provider/2.4/default/LegacyCameraProviderImpl_2_4.cpp
 7LegacyCameraProviderImpl_2_4::LegacyCameraProviderImpl_2_4() :
 8        camera_module_callbacks_t({sCameraDeviceStatusChange,
 9                                   sTorchModeStatusChange}) {
10    mInitFailed = initialize();
11}
这里开始camera provider真是实现的初始化操作
上面创建了LegacyCameraProviderImpl_2_4对象,并执行了其初始化函数initialize()。
总结一句其实就是CameraProvider进程启动时加载android.hardware.camera.provider@2.4-impl.so库并执行LegacyCameraProviderImpl_2_4的初始化函数。
4.9LegacyCameraProviderImpl初始化
 1// hardware/interfaces/camera/provider/2.4/default/LegacyCameraProviderImpl_2_4.cpp
 2// initialize()函数的实现
 3bool LegacyCameraProviderImpl_2_4::initialize() {
 4    camera_module_t *rawModule;
 5    // 通过hw_get_module加载对应的so库,这个库是由厂商提供的,一般只以so库的方式提供,
 6    // 不过也有情况会提供so库的源码,不过核心的地方还是会封装在别的so库中。
 7    int err = hw_get_module(CAMERA_HARDWARE_MODULE_ID,
 8            (const hw_module_t **)&rawModule);
 9    if (err < 0) {
10        ALOGE("Could not load camera HAL module: %d (%s)", err, strerror(-err));
11        return true;
12    }
13    ...
14}
上面的hw_get_module是不是比较眼熟,就是上面2小结里面的流程
关于camera里面的load补充一下
 1// hardware/libhardware/include/hardware/camera_common.h
 2// 别忘了参数值:
 3 // id: camera
 4 // path: 上面找到的路径,假设为 /vendor/lib64/hw/
 5static int load(const char *id,
 6        const char *path,
 7        const struct hw_module_t **pHmi)
 8{
 9    ...
10    handle = android_load_sphal_library(path, RTLD_NOW);
11
12    //这里是重中之重
13    const char *sym = HAL_MODULE_INFO_SYM_AS_STR;
14    hmi = (struct hw_module_t *)dlsym(handle, sym);
15    if (hmi == NULL) {
16        ALOGE("load: couldn't find symbol %s", sym);
17        status = -EINVAL;
18        goto done;
19    }
20
21    /* Check that the id matches */
22    if (strcmp(id, hmi->id) != 0) {
23        ALOGE("load: id=%s != hmi->id=%s", id, hmi->id);
24        status = -EINVAL;
25        goto done;
26    }
27
28    hmi->dso = handle;
29
30    /* success */
31    status = 0;
32
33    done:
34    if (status != 0) {
35        hmi = NULL;
36        if (handle != NULL) {
37            dlclose(handle);
38            handle = NULL;
39        }
40    } else {
41        ALOGV("loaded HAL id=%s path=%s hmi=%p handle=%p",
42                id, path, hmi, handle);
43    }
44
45    // 返回hmi,这个是名称为“HMI”的结构体变量在so库中的地址,类型为hw_module_t
46    // 但是结构体定义的地方却是camera_module_t类型的,那么这两者有啥关系呢
47    // 通过查看定义就知道camera_module_t结构体的第一个成员就是hw_module_t common
48    // 这样是为了方便直接调用.common.methods.open函数吧
49    *pHmi = hmi;
50
51    return status;
52}
关于打开对应so之后
 1// 上面的无非就是load so,拿到handle,接下来就是关键之处了
 2/* Get the address of the struct hal_module_info. */
 3// HAL_MODULE_INFO_SYM_AS_STR的定义如下
 4// #define HAL_MODULE_INFO_SYM_AS_STR  "HMI"
 5// 所以sym也为 "HMI”
 6// 注意这个值是固定的,是实现hw_get_module实现的一个标准
 7// 厂商定义hal的时候,在so库里面必须定义一个结构体名称为“HMI”
 8// 这里是调用so库的入口
 9// 我们以Google的默认 camera hal so为例看下
10// 这里定义了一个类型为camera_module_t,名称为HAL_MODULE_INFO_SYM的结构体
11// 而HAL_MODULE_INFO_SYM的名称就是 “HMI”
12// 找到这里后会调用该结构体变量的.common.methods.open函数
13// 对应到这里的话就是v4l2_module_methods.open
14// 最终会调用v4l2_camera_hal::open_dev,如下
15// static hw_module_methods_t v4l2_module_methods = {
16//     .open = v4l2_camera_hal::open_dev};
17// camera_module_t HAL_MODULE_INFO_SYM __attribute__((visibility("default"))) = {
18//     .common =
19//         {
20//             .tag = HARDWARE_MODULE_TAG,
21//             .module_api_version = CAMERA_MODULE_API_VERSION_2_4,
22//             .hal_api_version = HARDWARE_HAL_API_VERSION,
23//             .id = CAMERA_HARDWARE_MODULE_ID,
24//             .name = "V4L2 Camera HAL v3",
25//             .author = "The Android Open Source Project",
26//             .methods = &v4l2_module_methods,
27//             .dso = nullptr,
28//             .reserved = {0},
29//         },
30//     .get_number_of_cameras = v4l2_camera_hal::get_number_of_cameras,
31//     .get_camera_info = v4l2_camera_hal::get_camera_info,
32//     .set_callbacks = v4l2_camera_hal::set_callbacks,
33//     .get_vendor_tag_ops = v4l2_camera_hal::get_vendor_tag_ops,
34//     .open_legacy = v4l2_camera_hal::open_legacy,
35//     .set_torch_mode = v4l2_camera_hal::set_torch_mode,
36//     .init = nullptr,
37//     .get_physical_camera_info = nullptr,
38//     .reserved = {nullptr, nullptr}
39//};
可以看到对应的camera_module_t,而里面出现了一个HAL_MODULE_INFO_SYM,正好对应宏定义的HMI
这个结构体除了本身熟悉的hw_module_t之后,剩下的就是camera本身的客制化的函数指针
 1//hardware/libhardware/include/hardware/hardware.h
 2#define HAL_MODULE_INFO_SYM_AS_STR  "HMI"
 3#define HAL_MODULE_INFO_SYM         HMI
 4
 5// hardware/libhardware/include/hardware/camera_common.h
 6typedef struct camera_module {
 7    hw_module_t common;
 8    int (*get_number_of_cameras)(void);
 9    int (*get_camera_info)(int camera_id, struct camera_info *info);
10    int (*set_callbacks)(const camera_module_callbacks_t *callbacks);
11    void (*get_vendor_tag_ops)(vendor_tag_ops_t* ops);
12    int (*open_legacy)(const struct hw_module_t* module, const char* id,
13            uint32_t halVersion, struct hw_device_t** device);
14    int (*set_torch_mode)(const char* camera_id, bool enabled);
15    int (*init)();
16    int (*get_physical_camera_info)(int physical_camera_id,
17            camera_metadata_t **static_metadata);
18    int (*is_stream_combination_supported)(int camera_id,
19            const camera_stream_combination_t *streams);
20    void (*notify_device_state_change)(uint64_t deviceState);
21    void* reserved[2];
22} camera_module_t;
也就是so打开会找对应的HMI,即HAL_MODULE_INFO_SYM所在的实例化结构体。
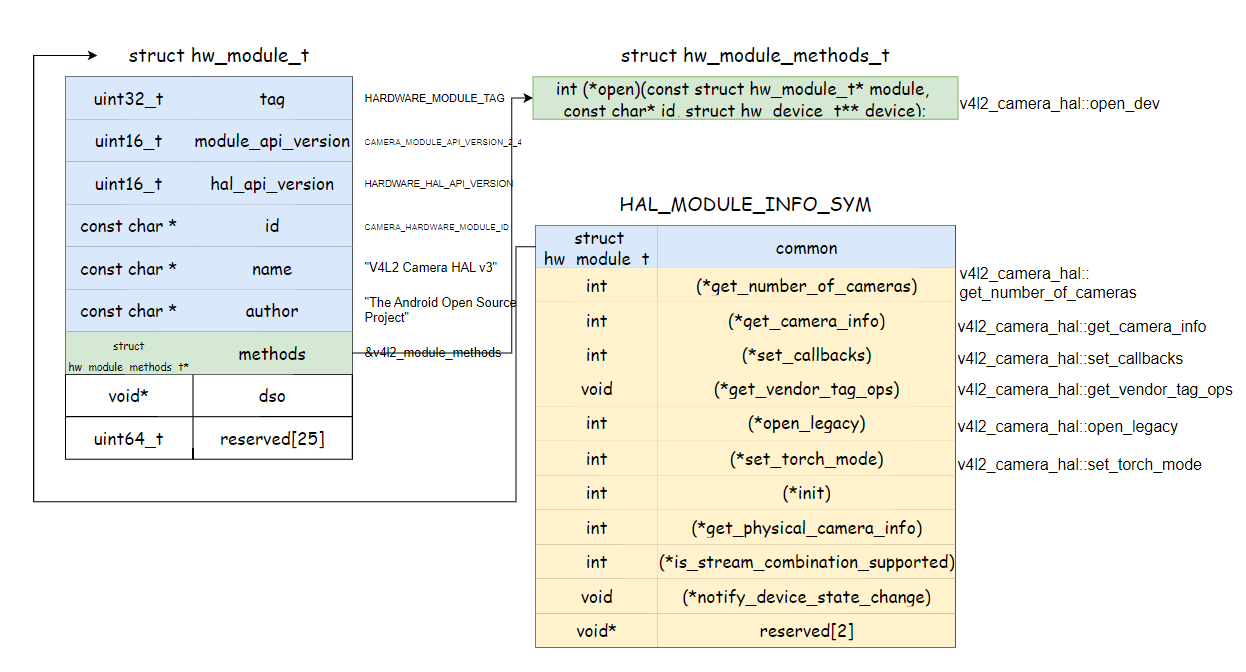
4.10v4l2_module_methods
这里没有厂商现成的代码,只能先看google原生的代码,即camera.default.so
 1//hardware/libhardware/modules/camera/3_4/v4l2_camera_hal.cpp
 2static int open_dev(const hw_module_t* module,
 3                    const char* name,
 4                    hw_device_t** device) {
 5  return gCameraHAL.openDevice(module, name, device);
 6}
 7
 8}  // namespace v4l2_camera_hal
 9
10static hw_module_methods_t v4l2_module_methods = {
11    .open = v4l2_camera_hal::open_dev};
然后通过传入的id号,打开对应的设备,这里的设备通常是/dev/video0~/dev/video10之间的有效设备
 1//hardware/libhardware/modules/camera/3_4/v4l2_camera_hal.cpp
 2int V4L2CameraHAL::openDevice(const hw_module_t* module,
 3                              const char* name,
 4                              hw_device_t** device) {
 5  HAL_LOG_ENTER();
 6
 7  if (module != &HAL_MODULE_INFO_SYM.common) {
 8    HAL_LOGE(
 9        "Invalid module %p expected %p", module, &HAL_MODULE_INFO_SYM.common);
10    return -EINVAL;
11  }
12
13  int id;
14  if (!android::base::ParseInt(name, &id, 0, getNumberOfCameras() - 1)) {
15    return -EINVAL;
16  }
17  // TODO(b/29185945): Hotplugging: return -EINVAL if unplugged.
18  return mCameras[id]->openDevice(module, device);
19}
这里逻辑比较简单,主要是比对传入的module和当前so里面的对比,然后就会加载对应的camera设备
补充一下V4L2CameraHAL的构造,这个构造会更早,打卡camera.default.so的时候会去加载全局变量,这个时候就会被构造
 1//hardware/libhardware/modules/camera/3_4/v4l2_camera_hal.cpp
 2//这个是静态全局变量
 3static V4L2CameraHAL gCameraHAL;
 4V4L2CameraHAL::V4L2CameraHAL() : mCameras(), mCallbacks(NULL) {
 5  HAL_LOG_ENTER();
 6  // Adds all available V4L2 devices.
 7  // List /dev nodes.
 8  DIR* dir = opendir("/dev");
 9  if (dir == NULL) {
10    HAL_LOGE("Failed to open /dev");
11    return;
12  }
13  // 构造函数的时候就会寻找可用的/dev/video*的设备
14  dirent* ent;
15  std::vector<std::string> nodes;
16  while ((ent = readdir(dir))) {
17    std::string desired = "video";
18    size_t len = desired.size();
19    if (strncmp(desired.c_str(), ent->d_name, len) == 0) {
20      if (strlen(ent->d_name) > len && isdigit(ent->d_name[len])) {
21        // ent is a numbered video node.
22        nodes.push_back(std::string("/dev/") + ent->d_name);
23        HAL_LOGV("Found video node %s.", nodes.back().c_str());
24      }
25    }
26  }
27  // 测试对V4L2的支持和惟一性.
28  std::unordered_set<std::string> buses;
29  std::string bus;
30  v4l2_capability cap;
31  int fd;
32  int id = 0;
33  for (const auto& node : nodes) {
34    // 这里会打开一次设备
35    fd = TEMP_FAILURE_RETRY(open(node.c_str(), O_RDWR));
36    if (fd < 0) {
37      HAL_LOGE("failed to open %s (%s).", node.c_str(), strerror(errno));
38      continue;
39    }
40    // Read V4L2 capabilities.
41    if (TEMP_FAILURE_RETRY(ioctl(fd, VIDIOC_QUERYCAP, &cap)) != 0) {
42      HAL_LOGE(
43          "VIDIOC_QUERYCAP on %s fail: %s.", node.c_str(), strerror(errno));
44    } else if (!(cap.capabilities & V4L2_CAP_VIDEO_CAPTURE)) {
45      HAL_LOGE("%s is not a V4L2 video capture device.", node.c_str());
46    } else {
47      // If the node is unique, add a camera for it.
48      bus = reinterpret_cast<char*>(cap.bus_info);
49      if (buses.insert(bus).second) {
50        HAL_LOGV("Found unique bus at %s.", node.c_str());
51        std::unique_ptr<V4L2Camera> cam(V4L2Camera::NewV4L2Camera(id++, node));
52        if (cam) {
53          mCameras.push_back(std::move(cam));
54        } else {
55          HAL_LOGE("Failed to initialize camera at %s.", node.c_str());
56        }
57      }
58    }
59    close(fd);
60  }
61}
- 遍历/dev/videoX节点
- 尝试open节点并查询video能力
- 构建V4L2Camera对象,放入mCameras
源码下载
本文对应的源码,
libhardware可以点击这里
interfaces_camera可以点击这里
参考
[1] 无限无羡. Android 13 Camera HAL启动流程(1), 2023.
[2] 无限无羡. Android 13 Camera HAL启动流程(2), 2023.
[3] 千里马. Android 经典hal开发实战-千里马android framework车载车机手机系统开发, 2023.