
一文带你了解SElinux那点事
12800 Words|Read in about 60 Min|本文总阅读量次
SELinux(Security Enhanced Linux)是一个Linux内核模块,也是一个安全子系统。用于最大限度地减小系统中服务进程可访问的资源(最小权限原则)。
1介绍
SELinux(Security Enhanced Linux是一个Linux内核模块,也是Linux的一个安全子系统 SELinux主要作用: 最大限度地减小系统中服务进程可访问的资源(最小权限原则)
SELinux存在的意义是什么? 更安全吧,即使某个进程被黑了或者直接被获取了root权限,也没有拥有所有权限,没有在te策略文件里面声明的权限都不允许
前面提到了即使被root了,也不一定有权限操作,但是我们在板子上su获取root之后,不是拥有权限setenforce吗,直接关了SELinux不就完了? 在userdebug版本中,为了方便调试,Google原生是有给su足够的权限去操作很多事情的,基本上root就是无敌的存在,所以我们可以直接用setenforce命令去关闭SELinux
user版本中,权限收紧,即使是su获取了root权限,有很多命令都是没有权限执行的,也就是说user版本的系统打开SELinux之后才是最安全的
1.1DAC 和 MAC
正如很多文章都会提到的两个概念:DAC 和 MAC
DAC:Discretionary Access Control 自主访问控制
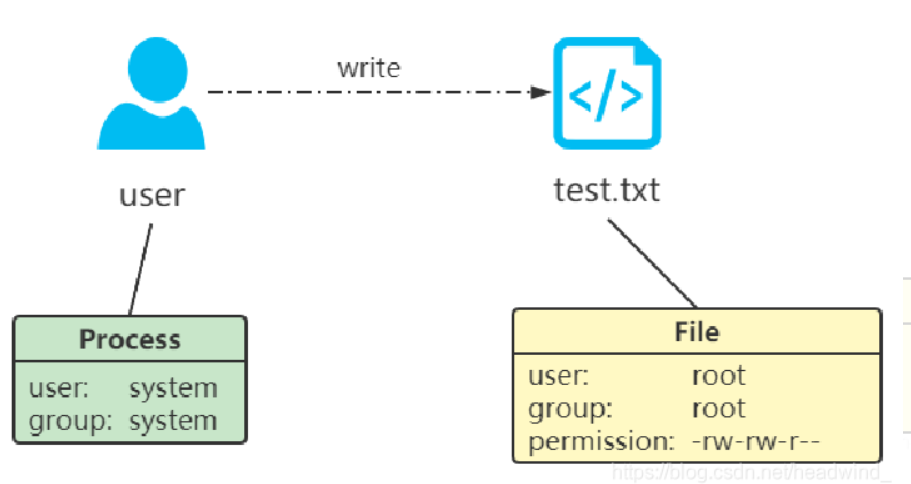
进程理论上所拥有的权限与执行它的用户的权限相同,只要获得root权限,几乎无所不能
比如上面的图片,user是没有权限写入test.txt的
但是可以获取root权限,接着就能写入了
MAC:Mandatory Access Control 强制访问控制
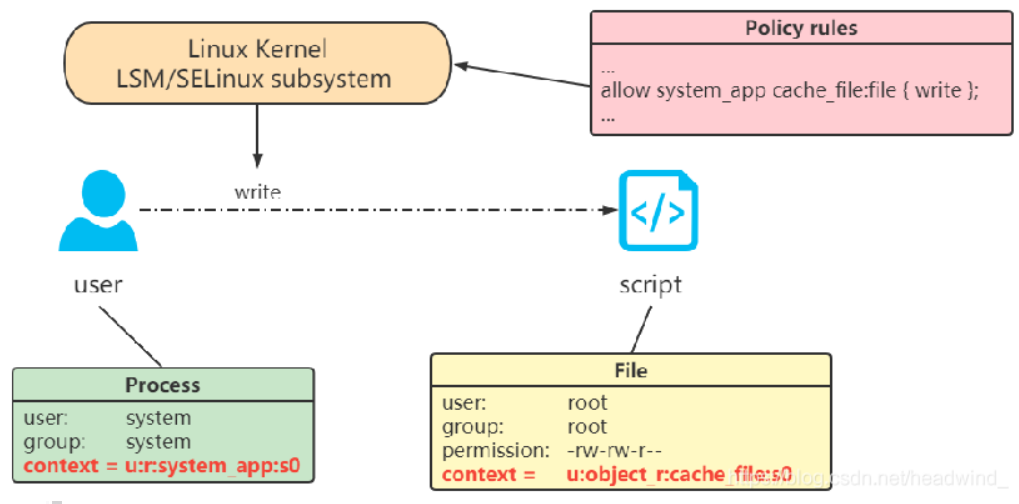
相比DAC,这里进程和文件都被打上了安全上下文,user在写入test.txt的时候,除了要拥有写权限,同时也要在规则库里面声明权限,才能正常写入。
任何进程想在 SELinux 系统上干任何事情,都必须在安全策略文件中赋予权限,凡是没有出现在安全策略文件中的权限都不拥有;即使你是root,也不一定拥有权限操作,这个并不能做到防御一切攻击,但是能将损失降到最小
1.2SElinux规则
1.2.1安全上下文(Security Context)
完整的 Security Context 字符串为:
1user:role:type[:range]
SELinux给每一个文件、进程、属性、服务都给打上一个标签,叫安全上下文(Security Context)
用下面的命令可以分别查看对应的安全上下文
- id -Z 查看当前进程的scontext
1picasso:/ $ id -Z
2context=u:r:shell:s0
3
4picasso:/ # id -Z
5context=u:r:su:s0
- ls -Z 查看文件的scontext
1picasso:/ # ps -AZ | grep surface
2u:r:surfaceflinger:s0          system        2930     1   67104  12856 SyS_epoll_wait      0 S surfaceflinger
- getprop -Z 查看属性的scontext
1picasso:/ # getprop -Z | grep selinux
2[ro.boot.selinux]: [u:object_r:default_prop:s0]
3[ro.boottime.init.selinux]: [u:object_r:boottime_prop:s0]
4[selinux.restorecon_recursive]: [u:object_r:restorecon_prop:s0]
- user:用户,Android里面就一个 u
- role:角色,进程用 r ,文件用 object_r
- type :类型,对进程而言也通常叫域,都是一个概念
- range,也就是上面的s0,是Multi-Level Security(MLS)的等级,这个有个概念就行了,MLS 将系统的进程和文件进行了分级,不同级别的资源需要对应级别的进程才能访问
安全上下文其实就是一个字符串,我们最需要关注的就是type,MAC基本管理单位是TEAC(Type Enforcement Accesc Control)
1.2.2TE (Type Enforcement)
1.2.2.1 SELinux策略规则语句格式
1rules domains types:classes permissions;
-
rules 包括的规则有四个:allow、neverallow、dontaudit、auditallow
allow : 允许主体对客体进行操作
neverallow :拒绝主体对客体进行操作
dontaudit : 表示不记录某条违反规则的决策信息
auditallow :记录某项决策信息,通常 SElinux 只记录失败的信息,应用这条规则后会记录成功的决策信息
-
domains 一个进程或一组进程的标签。也称为域类型,因为它只是指进程的类型
-
types 一个对象(例如:文件、属性)或一组对象的标签
-
classes 要访问的对象(例如:文件、属性)的类型
-
permissions 要执行的操作(例如:读、写)
规则库以白名单的形式存在,要求所有允许的操作都必须要用allow规则来定义,不然都会被禁止操作
domains、types、classes、permissions都可以是单独的一个,也可以是一个集合,用花括号括起来
其中的domains和types,既可以指定一个type,也可以指定一组type(也就是attribute),这些定义在te文件里面
classes的定义在/android/system/sepolicy/private/security_classes
permissions的定义在/android/system/sepolicy/private/access_vectors
上面这些规则我们用最多的就是allow和neverallow,搞清楚这两个之后其他的规则是一样的道理
1.2.2.2type和attribute
1、type的定义规则
1type type_name [alias alias_set] [, attribute_set] ;
比如system_app.te里面定义:
1type system_app, domain;
type的名字是system_app
alias定义的是别名,在Android里面这个基本没有用到,见不到它的身影
逗号后面的是属性(attribute),也就是说domain是一个属性,type可以关联多个属性,后面用逗号分割,比如:
1type traced_probes, domain, coredomain, mlstrustedsubject;
表示traced_probes这个type关联上了domain、coredomain、mlstrustedsubject这三个属性
如果在type定义的时候没有关联属性,后面也可以通过typeattribute关键字来关联
1typeattribute type_name attribute_name;
2、attribute的定义规则
1attribute attribute_name;
代码里面属性的定义在:
/android/system/sepolicy/public/attributes
 1# All types used for processes.
 2attribute domain;
 3
 4# All types used for files that can exist on a labeled fs.
 5# Do not use for pseudo file types.
 6# On change, update CHECK_FC_ASSERT_ATTRS
 7# definition in tools/checkfc.c.
 8attribute file_type;
 9
10# All types used for domain entry points.
11attribute exec_type;
12
13# All types used for /data files.
14attribute data_file_type;
15expandattribute data_file_type false;
16# All types in /data, not in /data/vendor
17attribute core_data_file_type;
18expandattribute core_data_file_type false;
19# All types in /vendor
20attribute vendor_file_type;
21......
3、type和attribute的区别
关于type和attribute,一开始接触,很难理解这两个的区别
它们两个有很多类似的点,但是又不大一样:
- type和attribute都是不能重复定义的,它们位于同一个命令空间,也就意味着定义一个type之后,就不能定义一个同名的attribute
1下面的都会定义会报错提示,重复定义
2
3type system_app, domain;
4attribute system_app;
5
6
7type system_app, domain;
8type system_app, coredomain, mlstrustedsubject;
- type就是一个类型;attribute可以找到所有关联了这个属性的type,可以把它当成一个集合、组、标签
attribute其实就是为了方便书写te规则,我们可以用attribute找到所有关联了属性的type集合,而不用每一个都写出来
1.2.2.3例子
上面的概念比较抽象,通常我们能比较快理解的是如何在te文件里使用allow语句添加权限,但是对于neverallow语句所表达的意思就很难理解了
下面我用例子来解释(提到的权限只是示例,并不一定是代码里面的,也有可能违反neverallow规则)
1、假如有几个文件,以及它们的安全上下文:
1picasso:/ # ls -Z /data/test.txt
2u:object_r:system_data_file:s0 /data/test.txt
3
4picasso:/ # ls -Z /data/vendor/log_test.txt
5u:object_r:vendor_data_file:s0 /data/vendor/log_test.txt
6
7picasso:/ # ls -Z /data/media/media_test.txt
8u:object_r:media_rw_data_file:s0 /data/media/media_test.txt
2、有如下几个脚本,内容都一样
/system/bin/testA.sh
/vendor/bin/testB.sh
/vendor/bin/testC.sh
1echo "hello world" > /data/test.txt
2echo "hello world" > /data/vendor/log_test.txt
3echo "hello world" > /data/media/media_test.txt
3、init.rc里面的定义如下:
 1service testA /system/bin/testA.sh
 2    user root
 3    group root
 4    disabled
 5    oneshot
 6    seclabel u:r:testA:s0
 7
 8service testB /vendor/bin/testB.sh
 9    user root
10    group root
11    disabled
12    oneshot
13    seclabel u:r:testB:s0
14
15service testC /vendor/bin/testC.sh
16    user root
17    group root
18    disabled
19    oneshot
20    seclabel u:r:testC:s0
4、假设系统里面定义的type和attribute只有下面这些:
 1type system_server, coredomain, domain;
 2type testA, domain;
 3type testB, domain;
 4type performanced, domain, coredomain;
 5type kernel, domain, data_between_core_and_vendor_violators;
 6type testC, domain;
 7type init, domain, data_between_core_and_vendor_violators;
 8
 9type system_data_file, file_type, data_file_type, core_data_file_type;
10type vendor_data_file, file_type, data_file_type;
11type media_rw_data_file, file_type, data_file_type, core_data_file_type;
12
13attribute domain;
14attribute coredomain;
15attribute data_between_core_and_vendor_violators;
16attribute file_type;
17attribute data_file_type;
18attribute core_data_file_type;
正如前面提到的概念:
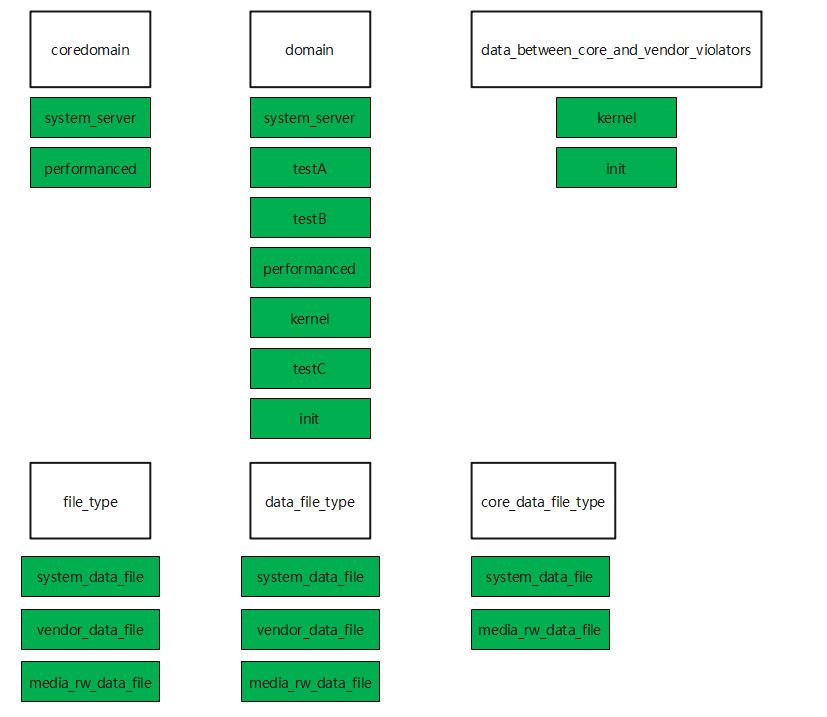
11、属性domain是type集合 : { system_server testA testB performanced kernel testC init }
22、属性coredomain是type集合 : { system_server performanced }
33、属性data_between_core_and_vendor_violators是type集合 : { kernel init }
44、属性file_type是type集合 :{ system_data_file vendor_data_file media_rw_data_file }
55、属性data_file_type是type集合 : { system_data_file vendor_data_file media_rw_data_file }
66、属性core_data_file_type是type集合 : { system_data_file media_rw_data_file }
脚本testA.sh运行起来之后,脚本的进程所在的安全上下文是u:r:testA:s0
如果要想写文件 /data/test.txt,就要给它足够的权限才行:
1allow testA system_data_file:file { read write open create };
这句话的意思是type为testA的进程,拥有对type为system_data_file的文件(file)的read write open create权限
此时写第二个文件 /data/vendor/log_test.txt 就没有权限了,因为文件log_test.txt的type是vendor_data_file
同样的得添加权限
1allow testA vendor_data_file:file { read write open create };
同理,/data/media/media_test.txt也是一样的道理
1allow testA media_rw_data_file:file { read write open create };
上面的allow语句大家很容易理解
再比如:
1allow coredomain data_file_type:file { read write open create };
这里coredomain和data_file_type是一个属性(一个type集合,而不仅仅是一个type了),等价于
1allow { system_server performanced } { system_data_file vendor_data_file media_rw_data_file }:file { read write open create };
当然,Android系统里面关联data_file_type这个属性的不止这三个,那么data_file_type其实就是所有关联了这个属性的type的集合
domain是所有进程type的总和,因为所有的进程type都要关联属性domain,不然脚本都没有办法运行起来
5、neverallow规则
再看看neverallow规则,其实和allow规则是一样格式的
1假如:
2neverallow {
3  domain
4  -coredomain
5  -data_between_core_and_vendor_violators
6} {
7  core_data_file_type
8}:file { create open };
减号 - 代表去掉一个type或者一组type
还有几个:
*号表示所有内容
~号表示取反,剩下的所有内容
1{ domain -coredomain -data_between_core_and_vendor_violators } 等于
2{ system_server testA testB performanced kernel testC init } - { system_server performanced } - { kernel init }
3也就是: { testA testB testC }
上面的neverallow语句等价于:
1neverallow { testA testB testC } { system_data_file vendor_data_file media_rw_data_file }:file { create open };
整理成这样之后,就会发现和前面提到的规则是一模一样的:
- rules : neverallow
- domains : { testA testB testC }
- types : { system_data_file vendor_data_file media_rw_data_file }
- classes : file
- permissions : { create open }
neverallow语句的意思是:不允许testA testB testC这些type的进程,对type为system_data_file vendor_data_file media_rw_data_file的file,有create和open权限
如果我们添加了这样的权限,将会报错:
1allow testA system_data_file:file create;
之所以说neverallow和allow的书写规则是一样的,是因为如果把neverallow换成allow之后,就是允许给testA testB testC添加对类型为core_data_file_type的file的create和open权限
neverallow就是反过来,不允许你给它们这些权限
6、题外话
我们在添加脚本的时候,通常对应的te会有类似下面的三句:
1type testA, domain;
2type testA_exec, exec_type, vendor_file_type, file_type;
3
4init_daemon_domain(testA)
第一个是testA.sh脚本运行起来之后,进程的type,它的安全上下文是 u:r:testA:s0
第二个是testA.sh这个文件的type,它的安全上下文是 u:object_r:testA_exec:s0
第三个是域转移,我们这些脚本都是init进程启动的,如果没有域转移,那么脚本运行起来它的安全上下文就是 u:r:init:s0了,显然没有细分出来
那这里的意思就是type为init的进程,在运行type为testA_exec的脚本时,会把域切换到testA来
init_daemon_domain的定义在/system/sepolicy/public/te_macros
1#####################################
2# init_daemon_domain(domain)
3# Set up a transition from init to the daemon domain
4# upon executing its binary.
5define(`init_daemon_domain', `
6domain_auto_trans(init, $1_exec, $1)
7tmpfs_domain($1)
8')
1.3SELinux 配置
1.3.1开关SELinux
SELinux的状态有两个
- enforcing 权限拒绝事件会被记录下来并强制执行
- permissive 权限拒绝事件会被记录下来,但不会被强制执行 (当然有些还会有disable作为第三个状态,就是彻底关闭的状态)
进入系统后,可以使用setenforce命令来开关
1#关闭:
2picasso:/ $ setenforce 0
3#打开:
4picasso:/ $ setenforce 1
但如果要开机阶段也是关闭的状态,那就要修改到bootargs的参数了
1#打开
2androidboot.selinux=enforcing
3
4#关闭
5androidboot.selinux=permissive
这里面还需要注意一点,一个宏: ALLOW_PERMISSIVE_SELINUX
/android/system/core/init/Android.mk
 1ifneq (,$(filter userdebug eng,$(TARGET_BUILD_VARIANT)))
 2init_options += \
 3    -DALLOW_LOCAL_PROP_OVERRIDE=1 \
 4    -DALLOW_PERMISSIVE_SELINUX=1 \
 5    -DREBOOT_BOOTLOADER_ON_PANIC=1 \
 6    -DWORLD_WRITABLE_KMSG=1 \
 7    -DDUMP_ON_UMOUNT_FAILURE=1
 8else
 9init_options += \
10    -DALLOW_LOCAL_PROP_OVERRIDE=0 \
11    -DALLOW_PERMISSIVE_SELINUX=0 \
12    -DREBOOT_BOOTLOADER_ON_PANIC=0 \
13    -DWORLD_WRITABLE_KMSG=0 \
14    -DDUMP_ON_UMOUNT_FAILURE=0
15endif
/android/system/core/init/selinux.cpp
 1EnforcingStatus StatusFromCmdline() {
 2    EnforcingStatus status = SELINUX_ENFORCING;
 3
 4    import_kernel_cmdline(false,
 5                          [&](const std::string& key, const std::string& value, bool in_qemu) {
 6                              if (key == "androidboot.selinux" && value == "permissive") {
 7                                  status = SELINUX_PERMISSIVE;
 8                              }
 9                          });
10
11    return status;
12}
13
14bool IsEnforcing() {
15    if (ALLOW_PERMISSIVE_SELINUX) {
16        return StatusFromCmdline() == SELINUX_ENFORCING;
17    }
18    return true;
19}
对于user版本,是没有办法通过bootargs的androidboot.selinux来关闭的,一直都是enforcing状态的
上面的方法只适用于eng和userdebug版本,在user版本上,权限收缩管控得非常严格
不仅改bootargs没有作用,进入系统后,即使你是root用户,setenforce也没有权限操作
1picasso:/ $ setenforce 0
2setenforce: Couldn't set enforcing status to '0': Permission denied
3[ 4427.467459@3] type=1404 audit(1623583196.490:218): enforcing=1 old_enforcing=0 auid=4294967295 ses=4294967295
4[ 4427.477347@3] type=1400 audit(1623583199.930:219): avc: denied { setenforce } for pid=4412 comm="setenforce" scontext=u:r:shell:s0 tcontext=u:object_r:kernel:s0 tclass=security permissive=0
所以user版本要想关闭SELinux,只能修改代码逻辑了
1.3.2策略文件配置
Google原生的te在/android/system/sepolicy目录下
设备制造商客制化部分的策略文件te可以通过变量BOARD_SEPOLICY_DIRS来指定,是对/android/system/sepolicy/vendor目录的拓展
这是个很关键的变量,通过这个变量就可以找到你要添加的te在哪个路径
比如:
1//对应设备目录/vendor/etc/selinux
2BOARD_SEPOLICY_DIRS += device/google/marlin/sepolicy
3BOARD_SEPOLICY_DIRS += device/google/marlin/sepolicy/verizon
事实上除了上述之外,芯片厂商可能还会定制其他分区,比如product分区
1//对应设备目录/product/etc/selinux
2PRODUCT_PRIVATE_SEPOLICY_DIRS += device/google/marlin/sepolicy/private
3PRODUCT_PUBLIC_SEPOLICY_DIRS += device/google/marlin/sepolicy/public
还有两个变量也是对策略文件拓展,这个大家会比较陌生
1BOARD_PLAT_PUBLIC_SEPOLICY_DIR    #对PLAT_PUBLIC_POLICY的拓展  即对/android/system/sepolicy/public目录的拓展
2BOARD_PLAT_PRIVATE_SEPOLICY_DIR   #对PLAT_PRIVATE_POLICY的拓展 即对/android/system/sepolicy/private目录的拓展
private代表目录下面的文件,只对BOARD平台策略可见/system/sepolicy,通常为这个目录
public代表目录下面所有的策略都可见,非平台的目录在/device下面,可以看到/system/sepolicy/public目录下面定义的策略
1.4判断是否为SELinux导致的权限问题
判断是否为SELinux导致的权限问题很简单
- 打开SELinux情况下必现问题
- 关闭SELinux之后如果问题消失,那基本上就可以认定是权限问题导致的
接着重要的就是抓取avc报错信息,添加权限
kernel log
1picasso:/ $ dmesg | grep avc
2[ 8839.922581@3] type=1400 audit(1623587612.374:455): avc: denied { setattr } for pid=4570 comm="chmod" name="video" dev="mmcblk0p21" ino=384 scontext=u:r:system_app:s0 tcontext=u:object_r:system_data_file:s0 tclass=dir permissive=0
Andriod log
1picasso:/ $ logcat | grep avc
201-01 08:00:09.652  3259  3259 I init    : type=1400 audit(0.0:17): avc: denied { entrypoint } for path="/vendor/bin/testA.sh" dev="mmcblk0p16" ino=705 scontext=u:r:testA:s0 tcontext=u:object_r:vendor_file:s0 tclass=file permissive=1
如果是SELinux权限问题,那必然是100%必现的
前面提到的会出现第一次开机有权限问题,后面开机就没有问题了
找了很久的原因,发现是其他脚本会操作SELinux的开关,没有复现的情况刚好被关掉了
2开机初始化与策略文件编译过程
2.1SELinux开机初始化
2.1.1init.cpp
代码路径:android/system/core/init/init.cpp
main函数:
 1if (is_first_stage) {  // 第一阶段初始化
 2    ...
 3
 4    // Set up SELinux, loading the SELinux policy.
 5    SelinuxSetupKernelLogging();
 6    SelinuxInitialize();
 7
 8    ...
 9}
10
11
12// Now set up SELinux for second stage.
13SelinuxSetupKernelLogging();
14SelabelInitialize();
15SelinuxRestoreContext();
2.1.2selinux.cpp
代码路径:android/system/core/init/selinux.cpp
2.1.2.1SelinuxSetupKernelLogging
设置log callback,可以调用selinux_log把log写入到kmsg里面
2.1.2.2SelinuxInitialize
selinux 初始化,从二进制策略文件里面读取策略,加载到内核
 1void SelinuxInitialize() {
 2    Timer t;
 3
 4    LOG(INFO) << "Loading SELinux policy";
 5    if (!LoadPolicy()) { // 加载SELinux策略
 6        LOG(FATAL) << "Unable to load SELinux policy";
 7    }
 8
 9    bool kernel_enforcing = (security_getenforce() == 1); // 从kernel获取SELinux的状态,和getenforce的实现一样
10    bool is_enforcing = IsEnforcing();  // 从bootargs里面获取
11    if (kernel_enforcing != is_enforcing) {
12        if (security_setenforce(is_enforcing)) { // 如果kernel里面的SELinux状态和bootargs的不一致,要设置成bootargs里面传过来的值
13            PLOG(FATAL) << "security_setenforce(%s) failed" << (is_enforcing ? "true" : "false");
14        }
15    }
16
17    if (auto result = WriteFile("/sys/fs/selinux/checkreqprot", "0"); !result) {  // 由内核强制执行检查保护
18        LOG(FATAL) << "Unable to write to /sys/fs/selinux/checkreqprot: " << result.error();
19    }
20
21    // init's first stage can't set properties, so pass the time to the second stage.
22    setenv("INIT_SELINUX_TOOK", std::to_string(t.duration().count()).c_str(), 1);
23}
24
25bool LoadPolicy() { // 从Android8.0之后,因为Project Treble,system和vendor策略分离,所以Android P上走的是LoadSplitPolicy
26    return IsSplitPolicyDevice() ? LoadSplitPolicy() : LoadMonolithicPolicy();
27}
IsEnforcing 从bootargs里面的androidboot.selinux取值; security_getenforce 从kernel取值,这个值和getenforce拿到的是一样的
2.1.2.3 checkreqprot
设置"checkreqprot"标记的初始值。
“0"表示由内核强制执行检查保护(包括其中隐含的所有执行保护)
“1"表示由应用程序自己主动请求执行检查保护
默认值由内核在编译时确定,也可以在运行时通过/sys/fs/selinux/checkreqprot修改
2.1.2.4 LoadPolicy
policy的分割是从Android 8.0之后开始的,
Android低版本用的是LoadMonolithicPolicy,8.0之后调用的是LoadSplitPolicy
sepolicy分离
#public - policy exported on which non-platform policy developers may write #additional policy. types and attributes are versioned and included in #delivered non-platform policy, which is to be combined with platform policy. 导出的策略,非平台策略开发人员可以在其上编写附加策略 类型和属性被版本化并包含在交付的非平台策略中,该策略将与平台策略相结合 使用BOARD_PLAT_PUBLIC_SEPOLICY_DIR来添加拓展
types和attributes生成在vendor分区的会带上版本,比如bootanim_30_0,实现在cil_android_attributize
#private - platform-only policy required for platform functionality but which #is not exported to vendor policy developers and as such may not be assumed #to exist. 平台功能所需的纯平台策略,但不会导出到供应商策略开发人员,因此可能不存在。
#vendor - vendor-only policy required for vendor functionality. This policy can #reference the public policy but cannot reference the private policy. This #policy is for components which are produced from the core/non-vendor tree and #placed into a vendor partition. 供应商功能所需的供应商专用策略。此策略可以引用公共策略,但不能引用私有策略。此策略适用于从核心/非供应商树生成并放置到供应商分区中的组件。
#mapping - This contains policy statements which map the attributes #exposed in the public policy of previous versions to the concrete types used #in this policy to ensure that policy targeting attributes from public #policy from an older platform version continues to work. 它包含策略语句,这些语句将以前版本的公共策略中公开的属性映射到此策略中使用的具体类型,以确保来自较旧平台版本的公共策略的策略目标属性继续工作。
2.1.2.5LoadSplitPolicy
  1bool LoadSplitPolicy() {
  2    std::string precompiled_sepolicy_file;
  3    if (FindPrecompiledSplitPolicy(&precompiled_sepolicy_file)) { // 先找odm分区,再找vendor分区
  4        unique_fd fd(open(precompiled_sepolicy_file.c_str(), O_RDONLY | O_CLOEXEC | O_BINARY));  // open file
  5        if (fd != -1) {
  6            if (selinux_android_load_policy_from_fd(fd, precompiled_sepolicy_file.c_str()) < 0) { // 加载到kernel
  7                LOG(ERROR) << "Failed to load SELinux policy from " << precompiled_sepolicy_file;
  8                return false;
  9            }
 10            return true;
 11        }
 12    }
 13    // No suitable precompiled policy could be loaded
 14
 15    LOG(INFO) << "Compiling SELinux policy";
 16
 17    // Determine the highest policy language version supported by the kernel
 18    set_selinuxmnt("/sys/fs/selinux");
 19    int max_policy_version = security_policyvers();
 20    if (max_policy_version == -1) {
 21        PLOG(ERROR) << "Failed to determine highest policy version supported by kernel";
 22        return false;
 23    }
 24
 25    // We store the output of the compilation on /dev because this is the most convenient tmpfs
 26    // storage mount available this early in the boot sequence.
 27    char compiled_sepolicy[] = "/dev/sepolicy.XXXXXX";
 28    unique_fd compiled_sepolicy_fd(mkostemp(compiled_sepolicy, O_CLOEXEC));
 29    if (compiled_sepolicy_fd < 0) {
 30        PLOG(ERROR) << "Failed to create temporary file " << compiled_sepolicy;
 31        return false;
 32    }
 33
 34    // Determine which mapping file to include
 35    std::string vend_plat_vers;
 36    if (!GetVendorMappingVersion(&vend_plat_vers)) {
 37        return false;
 38    }
 39    std::string mapping_file("/system/etc/selinux/mapping/" + vend_plat_vers + ".cil");
 40
 41    // vendor_sepolicy.cil and plat_pub_versioned.cil are the new design to replace
 42    // nonplat_sepolicy.cil.
 43    std::string plat_pub_versioned_cil_file("/vendor/etc/selinux/plat_pub_versioned.cil");
 44    std::string vendor_policy_cil_file("/vendor/etc/selinux/vendor_sepolicy.cil");
 45
 46    if (access(vendor_policy_cil_file.c_str(), F_OK) == -1) {
 47        // For backward compatibility.
 48        // TODO: remove this after no device is using nonplat_sepolicy.cil.
 49        vendor_policy_cil_file = "/vendor/etc/selinux/nonplat_sepolicy.cil";
 50        plat_pub_versioned_cil_file.clear();
 51    } else if (access(plat_pub_versioned_cil_file.c_str(), F_OK) == -1) {
 52        LOG(ERROR) << "Missing " << plat_pub_versioned_cil_file;
 53        return false;
 54    }
 55
 56    // odm_sepolicy.cil is default but optional.
 57    std::string odm_policy_cil_file("/odm/etc/selinux/odm_sepolicy.cil");
 58    if (access(odm_policy_cil_file.c_str(), F_OK) == -1) {
 59        odm_policy_cil_file.clear();
 60    }
 61    const std::string version_as_string = std::to_string(max_policy_version);
 62
 63    // clang-format off
 64    std::vector<const char*> compile_args {
 65        "/system/bin/secilc",
 66        plat_policy_cil_file,
 67        "-m", "-M", "true", "-G", "-N",
 68        // Target the highest policy language version supported by the kernel
 69        "-c", version_as_string.c_str(),
 70        mapping_file.c_str(),
 71        "-o", compiled_sepolicy,
 72        // We don't care about file_contexts output by the compiler
 73        "-f", "/sys/fs/selinux/null",  // /dev/null is not yet available
 74    };
 75    // clang-format on
 76
 77    if (!plat_pub_versioned_cil_file.empty()) {
 78        compile_args.push_back(plat_pub_versioned_cil_file.c_str());
 79    }
 80    if (!vendor_policy_cil_file.empty()) {
 81        compile_args.push_back(vendor_policy_cil_file.c_str());
 82    }
 83    if (!odm_policy_cil_file.empty()) {
 84        compile_args.push_back(odm_policy_cil_file.c_str());
 85    }
 86    compile_args.push_back(nullptr);
 87
 88    if (!ForkExecveAndWaitForCompletion(compile_args[0], (char**)compile_args.data())) {
 89        unlink(compiled_sepolicy);
 90        return false;
 91    }
 92    unlink(compiled_sepolicy);
 93
 94    LOG(INFO) << "Loading compiled SELinux policy";
 95    if (selinux_android_load_policy_from_fd(compiled_sepolicy_fd, compiled_sepolicy) < 0) {
 96        LOG(ERROR) << "Failed to load SELinux policy from " << compiled_sepolicy;
 97        return false;
 98    }
 99
100    return true;
101}
LoadSplitPolicy 加载selinux 策略时,首先从预先编译好的二进制文件precompiled_sepolicy读取
如果没有找到的话,再用secilc命令编译所有的cil,重新得到一个二进制策略文件
2.1.2.6FindPrecompiledSplitPolicy
这个函数会查找两个地方,/odm/etc/selinux和/vendor/etc/selinux
- /vendor/etc/selinux/precompiled_sepolicy
- /odm/etc/selinux/precompiled_sepolicy
如果有odm分区,precompiled_sepolicy会放在odm分区,否则在vendor分区,因此读取的时候也是先找odm再找vendor
 1bool FindPrecompiledSplitPolicy(std::string* file) {
 2    file->clear();
 3    // If there is an odm partition, precompiled_sepolicy will be in
 4    // odm/etc/selinux. Otherwise it will be in vendor/etc/selinux.
 5    static constexpr const char vendor_precompiled_sepolicy[] =
 6        "/vendor/etc/selinux/precompiled_sepolicy";
 7    static constexpr const char odm_precompiled_sepolicy[] =
 8        "/odm/etc/selinux/precompiled_sepolicy";
 9    if (access(odm_precompiled_sepolicy, R_OK) == 0) {
10        *file = odm_precompiled_sepolicy;
11    } else if (access(vendor_precompiled_sepolicy, R_OK) == 0) {
12        *file = vendor_precompiled_sepolicy;
13    } else {
14        PLOG(INFO) << "No precompiled sepolicy";
15        return false;
16    }
17
18        // 接下来下面会对哈希值做校验,分别是:
19    // /system/etc/selinux/plat_and_mapping_sepolicy.cil.sha256
20    // /vendor/etc/selinux/precompiled_sepolicy.plat_and_mapping.sha256
21    std::string actual_plat_id;
22    if (!ReadFirstLine("/system/etc/selinux/plat_and_mapping_sepolicy.cil.sha256", &actual_plat_id)) {
23        PLOG(INFO) << "Failed to read "
24                      "/system/etc/selinux/plat_and_mapping_sepolicy.cil.sha256";
25        return false;
26    }
27
28    std::string precompiled_plat_id;
29    std::string precompiled_sha256 = *file + ".plat_and_mapping.sha256";
30    if (!ReadFirstLine(precompiled_sha256.c_str(), &precompiled_plat_id)) {
31        PLOG(INFO) << "Failed to read " << precompiled_sha256;
32        file->clear();
33        return false;
34    }
35    if ((actual_plat_id.empty()) || (actual_plat_id != precompiled_plat_id)) {
36        file->clear();
37        return false;
38    }
39    return true;
40}
最后面会对哈希值做一个校验,这两个文件都是编译阶段生成的
后面我们局部编译SELinux策略文件时,一定要注意只替换precompiled_sepolicy就行了
千万不要同时替换precompiled_sepolicy 和 precompiled_sepolicy.plat_and_mapping.sha256,而忘记了/system/etc/selinux/plat_and_mapping_sepolicy.cil.sha256,这个会导致你替换的策略文件不生效
2.2SELinux Policy编译
2.2.1二进制策略文件的生成过程
本节涉及的代码集中在:
- android/system/sepolicy/Android.mk
- android/external/selinux/secilc
- android/external/selinux/checkpolicy
- android/external/selinux/libselinux
- android/external/selinux/libsepol
其中Android mk中的一些变量:
1PLAT_PUBLIC_POLICY=system/sepolicy/public
2PLAT_PRIVATE_POLICY=system/sepolicy/private
3PLAT_VENDOR_POLICY=system/sepolicy/vendor
4REQD_MASK_POLICY=system/sepolicy/reqd_mask
5BOARD_PLAT_PUBLIC_SEPOLICY_DIR    #对PLAT_PUBLIC_POLICY的拓展
6BOARD_PLAT_PRIVATE_SEPOLICY_DIR   #对PLAT_PRIVATE_POLICY的拓展
7
8BOARD_SEPOLICY_DIRS  #设备制造商客制化部分的策略文件
2.2.1.1 precompiled_sepolicy是如何生成的?
先看总的流程:
1)如果定义了BOARD_ODM_SEPOLICY_DIRS,那么还会有一个odm_sepolicy.cil,当然前提还要有odm分区
1ifdef BOARD_ODM_SEPOLICY_DIRS
2    all_cil_files += $(built_odm_cil)
3endif
在 android/system/sepolicy/Android.mk 的注释里面,提到了SELinux策略文件编译成二进制策略文件的过程
这里面主要包含设置的几种类型文件,context和xml文件,其中xml是加了密的文件,通常会放到设备的类似/system/etc/selinux,/vendor/etc/selinux,/product/etc/selinux等。
context名称 含义 file_contexts 系统中所有file_contexts上下文 genfs_contexts 虚拟文件的安全上下文 seapp_contexts app安全上下文 property_contexts 属性安全上下文 service_contexts 服务文件安全上下文
2)第二步,是针对30.0.cil、plat_pub_versioned.cil、vendor_sepolicy.cil,而plat_sepolicy.cil不需要
并且,只有在system/sepolicy/public、system/sepolicy/private下定义的types和attributes才会有加上这个版本后缀
调用过程 (build_sepolicy -> ) version_policy -> cil_android_attributize
 1# build process for device:
 2# 1) convert policies to CIL:
 3#    - private + public platform policy to CIL
 4#    - mapping file to CIL (should already be in CIL form)
 5#    - non-platform public policy to CIL
 6#    - non-platform public + private policy to CIL
 7# 2) attributize policy
 8#    - run script which takes non-platform public and non-platform combined
 9#      private + public policy and produces attributized and versioned
10#      non-platform policy
11# 3) combine policy files
12#    - combine mapping, platform and non-platform policy.
13#    - compile output binary policy file
ACP描述的是一个Android专用的cp命令,在生成system.img镜像文件的过程中是需要用到的。普通的cp命令在不同的平台(Mac OSX、MinGW/Cygwin和Linux)的实现略有差异,并且可能会导致一些问题,于是Android编译系统就重写了自己的cp命令,使得它在不同平台下执行具有统一的行为,并且解决普通cp命令可能会出现的问题。例如,在Linux平台上,当我们把一个文件从NFS文件系统拷贝到本地文件系统时,普通的cp命令总是会认为在NFS文件系统上的文件比在本地文件系统上的文件要新,因为前者的时间戳精度是微秒,而后者的时间戳精度不是微秒。Android专用的cp命令源码可以参考build/tools/acp目录。具体可以点击这里。
3)分析Android.mk文件: android/system/sepolicy/Android.mk
BOARD_USES_ODMIMAGE 在 BoardConfig.mk 里面定义
这个是决定是否有odm分区,如果带odm分区,那么路径就在odm分区
 1LOCAL_MODULE := precompiled_sepolicy
 2LOCAL_MODULE_CLASS := ETC
 3LOCAL_MODULE_TAGS := optional
 4LOCAL_PROPRIETARY_MODULE := true
 5
 6ifeq ($(BOARD_USES_ODMIMAGE),true)
 7LOCAL_MODULE_PATH := $(TARGET_OUT_ODM)/etc/selinux
 8else
 9LOCAL_MODULE_PATH := $(TARGET_OUT_VENDOR)/etc/selinux
10endif
首先它依赖的是这些cil文件(CIL : Common Intermediate Language,通用中间语言)
- /system/etc/selinux/plat_sepolicy.cil
- /system/etc/selinux/mapping/30.0.cil
- /vendor/etc/selinux/plat_pub_versioned.cil
- /vendor/etc/selinux/vendor_sepolicy.cil
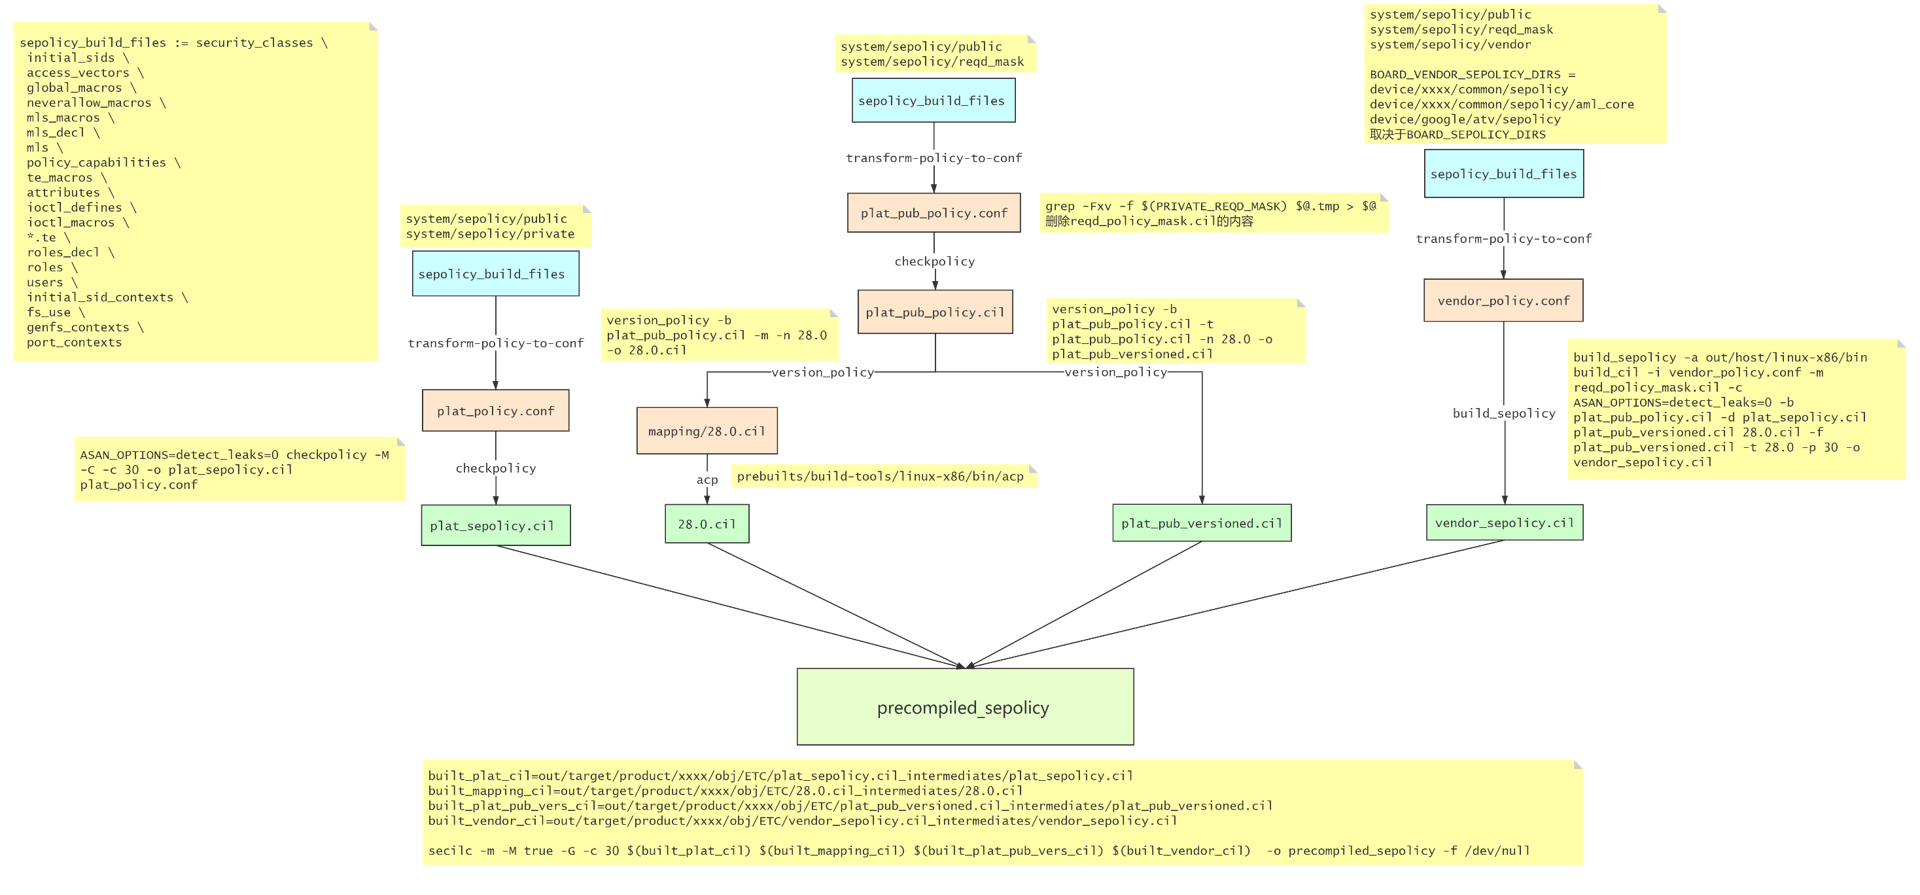
4)接着是通过secilc命令来生成precompiled_sepolicy
1built_device=xxxx
2built_plat_cil=out/target/product/${built_device}/obj/ETC/plat_sepolicy.cil_intermediates/plat_sepolicy.cil
3built_mapping_cil=out/target/product/${built_device}/obj/ETC/30.0.cil_intermediates/30.0.cil
4built_plat_pub_vers_cil=out/target/product/${built_device}/obj/ETC/plat_pub_versioned.cil_intermediates/plat_pub_versioned.cil
5built_vendor_cil=out/target/product/${built_device}/obj/ETC/vendor_sepolicy.cil_intermediates/vendor_sepolicy.cil
6
7secilc -m -M true -G -c 30 ${built_plat_cil} ${built_mapping_cil} ${built_plat_pub_vers_cil} ${built_vendor_cil} -o precompiled_sepolicy -f /dev/null
secilc的源码在:android/external/selinux/secilc
secilc是用来编译cil中间文件的,将其生成二进制文件的
代码中有文档,其中有一张图片对于理解secilc非常重要
android/external/selinux/secilc/docs/cil_design.jpeg

The parse tree consists of open parenthesis nodes and nodes for each symbol or quoted strings. An open parenthesis is the parent of the symbols or quoted strings that follow it, until a closed parenthesis is reached.Close parenthesis and comments do not make it into the parse tree.
解析树由开放的括号节点和每个符号或带引号的字符串的节点组成。开括号是紧随其后的符号或带引号的字符串的父代,直到达到闭括号为止。闭括号和注释不将其放入语法分析树中。
The cil_build_ast function walks the parse tree and creates the ast. The first node in each list is checked for keywords,and ast nodes are created containing the data structures corresponding to the keyword. Only declarations are handled in this step.Delared symbols are add to symtabs for each node flavor, and in local or global namespace symtabs.Strings for symbols that are references(not declarations) are copied into the ast, and will be resolved later.The parse tree should be destroyed following this step. cil_build_ast
函数遍历解析树并创建ast。检查每个列表中的第一个节点是否包含关键字,并创建包含与关键字相对应的数据结构的ast节点。 在此步骤中仅处理声明。对于每个节点类型,将符号添加到符号表中,并在本地或全局名称空间中将符号表添加。将引用(非声明)符号的字符串复制到ast中,稍后将对其进行解析。此步骤之后,应该销毁解析树。
5)每一个cil是如何生成的 拿其中一个来看看:plat_sepolicy.cil
 1include $(CLEAR_VARS)
 2
 3LOCAL_MODULE := plat_sepolicy.cil
 4LOCAL_MODULE_CLASS := ETC
 5LOCAL_MODULE_TAGS := optional
 6LOCAL_MODULE_PATH := $(TARGET_OUT)/etc/selinux
 7
 8include $(BUILD_SYSTEM)/base_rules.mk
 9
10plat_policy.conf := $(intermediates)/plat_policy.conf
11$(plat_policy.conf): PRIVATE_MLS_SENS := $(MLS_SENS)
12$(plat_policy.conf): PRIVATE_MLS_CATS := $(MLS_CATS)
13$(plat_policy.conf): PRIVATE_TARGET_BUILD_VARIANT := $(TARGET_BUILD_VARIANT)
14$(plat_policy.conf): PRIVATE_TGT_ARCH := $(my_target_arch)
15$(plat_policy.conf): PRIVATE_TGT_WITH_ASAN := $(with_asan)
16$(plat_policy.conf): PRIVATE_ADDITIONAL_M4DEFS := $(LOCAL_ADDITIONAL_M4DEFS)
17$(plat_policy.conf): PRIVATE_SEPOLICY_SPLIT := $(PRODUCT_SEPOLICY_SPLIT)
18$(plat_policy.conf): PRIVATE_COMPATIBLE_PROPERTY := $(PRODUCT_COMPATIBLE_PROPERTY)
19$(plat_policy.conf): $(call build_policy, $(sepolicy_build_files), \
20$(PLAT_PUBLIC_POLICY) $(PLAT_PRIVATE_POLICY))
21	$(transform-policy-to-conf)
22    $(hide) sed '/dontaudit/d' $@ > $@.dontaudit
23
24$(LOCAL_BUILT_MODULE): PRIVATE_ADDITIONAL_CIL_FILES := \
25  $(call build_policy, $(sepolicy_build_cil_workaround_files), $(PLAT_PRIVATE_POLICY))
26$(LOCAL_BUILT_MODULE): PRIVATE_NEVERALLOW_ARG := $(NEVERALLOW_ARG)
27$(LOCAL_BUILT_MODULE): $(plat_policy.conf) $(HOST_OUT_EXECUTABLES)/checkpolicy \
28  $(HOST_OUT_EXECUTABLES)/secilc \
29  $(call build_policy, $(sepolicy_build_cil_workaround_files), $(PLAT_PRIVATE_POLICY)) \
30  $(built_sepolicy_neverallows)
31	@mkdir -p $(dir $@)
32	$(hide) $(CHECKPOLICY_ASAN_OPTIONS) $(HOST_OUT_EXECUTABLES)/checkpolicy -M -C -c \
33        $(POLICYVERS) -o $@ $<
34    $(hide) cat $(PRIVATE_ADDITIONAL_CIL_FILES) >> $@
35    $(hide) $(HOST_OUT_EXECUTABLES)/secilc -m -M true -G -c $(POLICYVERS) $(PRIVATE_NEVERALLOW_ARG) $@ -o /dev/null -f /dev/null
36
37built_plat_cil := $(LOCAL_BUILT_MODULE)
38plat_policy.conf :=
sepolicy_build_files 包含了所有的te文件,这个是我们最熟悉的部分
还包括其他必需的文件,如宏定义global_macros 、 te_macros等
 1sepolicy_build_files := security_classes \
 2                        initial_sids \
 3                        access_vectors \
 4                        global_macros \
 5                        neverallow_macros \
 6                        mls_macros \
 7                        mls_decl \
 8                        mls \
 9                        policy_capabilities \
10                        te_macros \
11                        attributes \
12                        ioctl_defines \
13                        ioctl_macros \
14                        *.te \
15                        roles_decl \
16                        roles \
17                        users \
18                        initial_sid_contexts \
19                        fs_use \
20                        genfs_contexts \
21                        port_contexts
然后调用transform-policy-to-conf将策略文件转成conf文件,生成plat_policy.conf
 1define transform-policy-to-conf
 2@mkdir -p $(dir $@)
 3$(hide) m4 $(PRIVATE_ADDITIONAL_M4DEFS) \
 4    -D mls_num_sens=$(PRIVATE_MLS_SENS) -D mls_num_cats=$(PRIVATE_MLS_CATS) \
 5    -D target_build_variant=$(PRIVATE_TARGET_BUILD_VARIANT) \
 6    -D target_with_dexpreopt=$(WITH_DEXPREOPT) \
 7    -D target_arch=$(PRIVATE_TGT_ARCH) \
 8    -D target_with_asan=$(PRIVATE_TGT_WITH_ASAN) \
 9    -D target_full_treble=$(PRIVATE_SEPOLICY_SPLIT) \
10    -D target_compatible_property=$(PRIVATE_COMPATIBLE_PROPERTY) \
11    $(PRIVATE_TGT_RECOVERY) \
12    -s $^ > $@
13endef
14.KATI_READONLY := transform-policy-to-conf
关于mk相关的一些语法
1#目标,:前面的变量
2$@
3#所有依赖,:后面的所有变量
4$^
5#第一个依赖,:的第一个变量
6$<
Linux中的sed使用
 1sed '/^\s*dontaudit.*;/d' $@ | sed '/^\s*dontaudit/,/;/d' > $@.dontaudit
 2# 分成两部分
 3#Example1: sed '/^\s*dontaudit.*;/d' $@
 4#Example2: sed '/^\s*dontaudit/,/;/d' > $@.dontaudit
 5#其中sed '/string/d' ,表示到匹配到string的字符串的行数删除
 6# sed '/string1/,/string2/d',表示匹配到string1开头,string2结尾的这一段字符串全部删除
 7# \s 在正则中表示一个空白字符(可能是空格、制表符、其他空白)
 8# \s* 在正则中表示匹配0个或多个空白字符,会尽可能多的匹配
 9# ^\s* 在正则中表示匹配0个或多个非空白字符,会尽可能多的匹配
10# Example1表示在$@文件中去除包含dontaudit字符的行数,这里主要是dontaudit前后的括号且占单行
11# Example2表示在$@文件中去除包含dontaudit字符的行数,这里主要是dontaudit前后的括号且占多行
把上面的变量替换之后就是
 1policy_files := $(call build_policy, $(sepolicy_build_files), \
 2  $(PLAT_PUBLIC_POLICY) $(PLAT_PRIVATE_POLICY))
 3plat_policy.conf := out/target/product/xxx/obj/ETC/plat_sepolicy.cil_intermediates/plat_policy.conf
 4$(plat_policy.conf): PRIVATE_MLS_SENS := 1
 5$(plat_policy.conf): PRIVATE_MLS_CATS := 1024
 6$(plat_policy.conf): PRIVATE_TARGET_BUILD_VARIANT := userdebug
 7$(plat_policy.conf): PRIVATE_TGT_ARCH := arm
 8$(plat_policy.conf): PRIVATE_TGT_WITH_ASAN := false
 9$(plat_policy.conf): PRIVATE_TGT_WITH_NATIVE_COVERAGE := false
10$(plat_policy.conf): PRIVATE_ADDITIONAL_M4DEFS :=
11$(plat_policy.conf): PRIVATE_SEPOLICY_SPLIT := true
12$(plat_policy.conf): PRIVATE_COMPATIBLE_PROPERTY := true
13$(plat_policy.conf): PRIVATE_TREBLE_SYSPROP_NEVERALLOW := true
14$(plat_policy.conf): PRIVATE_POLICY_FILES := $(policy_files)
15$(plat_policy.conf): $(policy_files) $(M4)
16	$(transform-policy-to-conf)
17	$(hide) sed '/^\s*dontaudit.*;/d' plat_policy.conf | sed '/^\s*dontaudit/,/;/d' > plat_policy.conf.dontaudit
18
19$(LOCAL_BUILT_MODULE): PRIVATE_ADDITIONAL_CIL_FILES := \
20  system/sepolicy/private/technical_debt.cil
21$(LOCAL_BUILT_MODULE): PRIVATE_NEVERALLOW_ARG :=
22$(LOCAL_BUILT_MODULE): out/target/product/xxx/obj/ETC/plat_sepolicy.cil_intermediates/plat_policy.conf out/target/product/xxx/obj/EXECUTABLES/secilc_intermediates/checkpolicy \
23 out/target/product/xxx/obj/EXECUTABLES/secilc_intermediates/secilc \
24  system/sepolicy/private/technical_debt.cil \
25  out/target/product/xxx/obj/FAKE/sepolicy_neverallows_intermediates/sepolicy_neverallows
26	@mkdir -p $(dir plat_sepolicy.cil)
27	$(hide) detect_leaks=0 out/target/product/xxx/obj/EXECUTABLES/checkpolicy -M -C -c \
28		30 -o plat_sepolicy.cil.tmp out/target/product/xxx/obj/ETC/plat_sepolicy.cil_intermediates/plat_policy.conf
29	$(hide) cat system/sepolicy/private/technical_debt.cil >> plat_sepolicy.cil.tmp
30	$(hide) out/target/product/xxx/obj/EXECUTABLES/secilc_intermediates/secilc -m -M true -G -c 30 plat_sepolicy.cil.tmp -o /dev/null -f /dev/null
31	$(hide) mv plat_sepolicy.cil.tmp plat_sepolicy.cil
32
33built_plat_cil := out/target/product/xxx/obj/ETC/plat_sepolicy.cil_intermediates/plat_sepolicy.cil
34plat_policy.conf :=
其中$(transform-policy-to-conf)又是一个宏,展开显示
 1@mkdir -p $(dir $@)
 2$(hide) $(M4) --fatal-warnings  \
 3	-D mls_num_sens=1 -D mls_num_cats=1024 \
 4	-D target_build_variant=userdebug \
 5	-D target_with_dexpreopt=true \
 6	-D target_arch=arm \
 7	-D target_with_asan=false \
 8	-D target_with_native_coverage=false \
 9	-D target_full_treble=true \
10	-D target_compatible_property=true \
11	-D target_treble_sysprop_neverallow=true \
12	-D target_exclude_build_test= \
13	-D target_requires_insecure_execmem_for_swiftshader= \
14	-s $(policy_files) > plat_policy.conf
其他的cil也是类似的过程,会有一些差异,但是跟着mk来分析就行了
2.2.1.2案例-策略文件编译生成cil
2.2.1.2.1原始的testA.te
 1type testA, domain, binder_in_vendor_violators, vendor_executes_system_violators;
 2type testA_exec, exec_type, vendor_file_type, file_type;
 3
 4init_daemon_domain(testA)
 5
 6allow testA picasso_device:chr_file rw_file_perms;
 7allow testA testA_exec:file { execute_no_trans };
 8allow testA vendor_toolbox_exec:file { execute_no_trans };
 9allow testA vendor_data_file:dir create_dir_perms;
10allow testA vendor_data_file:file create_file_perms;
11allow testA vendor_file:file { execute_no_trans };
12allow testA mnt_media_rw_file:dir { search };
13allow testA vfat:file { getattr read open };
14allow testA vfat:dir { search };
15allow testA block_device:dir { search };
16allow testA activity_service:service_manager { find };
17allow testA system_server:binder { call transfer };
18binder_use(testA)
19allow testA shell_exec:file { read execute };
20allow testA system_file:file { execute_no_trans };
2.2.1.2.2conf文件
经过m4宏处理器处理后,所有的宏都被替换展开了
 1#line 1 "device/xxxx/common/sepolicy/testA.te"
 2type testA, domain, binder_in_vendor_violators, vendor_executes_system_violators;
 3type testA_exec, exec_type, vendor_file_type, file_type;
 4
 5
 6#line 4
 7
 8#line 4
 9# Allow the necessary permissions.
10#line 4
11
12#line 4
13# Old domain may exec the file and transition to the new domain.
14#line 4
15allow init testA_exec:file { getattr open read execute map };
16#line 4
17allow init testA:process transition;
18#line 4
19# New domain is entered by executing the file.
20#line 4
21allow testA testA_exec:file { entrypoint open read execute getattr map };
22#line 4
23# New domain can send SIGCHLD to its caller.
24#line 4
25
26#line 4
27# Enable AT_SECURE, i.e. libc secure mode.
28#line 4
29dontaudit init testA:process noatsecure;
30#line 4
31# XXX dontaudit candidate but requires further study.
32#line 4
33allow init testA:process { siginh rlimitinh };
34#line 4
35
36#line 4
37# Make the transition occur by default.
38#line 4
39type_transition init testA_exec:process testA;
40#line 4
41
42#line 4
43
44#line 4
45type testA_tmpfs, file_type;
46#line 4
47type_transition testA tmpfs:file testA_tmpfs;
48#line 4
49allow testA testA_tmpfs:file { read write getattr map };
50#line 4
51allow testA tmpfs:dir { getattr search };
52#line 4
53
54#line 4
55
56
57allow testA picasso_device:chr_file { { getattr open read ioctl lock map } { open append write lock map } };
58allow testA testA_exec:file { execute_no_trans };
59allow testA vendor_toolbox_exec:file { execute_no_trans };
60allow testA vendor_data_file:dir { create reparent rename rmdir setattr { { open getattr read search ioctl lock } { open search write add_name remove_name lock } } };
61allow testA vendor_data_file:file { create rename setattr unlink { { getattr open read ioctl lock map } { open append write lock map } } };
62allow testA vendor_file:file { execute_no_trans };
63allow testA mnt_media_rw_file:dir { search };
64allow testA vfat:file { getattr read open };
65allow testA vfat:dir { search };
66allow testA block_device:dir { search };
67
68
69allow testA activity_service:service_manager { find };
70allow testA system_server:binder { call transfer };
71
72#line 22
73# Call the servicemanager and transfer references to it.
74#line 22
75allow testA servicemanager:binder { call transfer };
76#line 22
77# servicemanager performs getpidcon on clients.
78#line 22
79allow servicemanager testA:dir search;
80#line 22
81allow servicemanager testA:file { read open };
82#line 22
83allow servicemanager testA:process getattr;
84#line 22
85# rw access to /dev/binder and /dev/ashmem is presently granted to
86#line 22
87# all domains in domain.te.
88#line 22
89
90allow testA shell_exec:file { read execute };
91allow testA system_file:file { execute_no_trans };
2.2.1.2.3 cil文件
接着使用checkpolicy命令,将conf文件转成cil文件:
1ASAN_OPTIONS=detect_leaks=0 checkpolicy -M -C -c 30 -o plat_sepolicy.cil plat_policy.conf
这个过程中,checkpolicy还会检查是否策略文件是否存在问题,比如是否违反neverallow,语法错误,方案自定义策略文件访问平台私有策略等等;check_assertions检查是否有违反neverallow的规则。
checkpolicy源码在:android/external/selinux/checkpolicy
违反neverallow:
 1[  6% 3/47] build out/target/product/xxxx/obj/ETC/sepolicy_neverallows_intermediates/sepolicy_neverallows
 2FAILED: out/target/product/xxxx/obj/ETC/sepolicy_neverallows_intermediates/sepolicy_neverallows
 3/bin/bash -c "(rm -f out/target/product/xxxx/obj/ETC/sepolicy_neverallows_intermediates/sepolicy_neverallows ) && (ASAN_OPTIONS=detect_leaks=0 out/host/linux-x86/bin/checkpolicy -M -c           30 -o out/target/product/xxxx/obj/ETC/sepolicy_neverallows_intermediates/sepolicy_neverallows out/target/product/xxxx/obj/ETC/sepolicy_neverallows_intermediates/policy.conf )"
 4libsepol.report_failure: neverallow on line 671 of system/sepolicy/public/domain.te (or line 10586 of policy.conf) violated by allow testA servicemanager:binder { call transfer };
 5libsepol.report_failure: neverallow on line 638 of system/sepolicy/public/domain.te (or line 10522 of policy.conf) violated by allow testA activity_service:service_manager { find };
 6libsepol.check_assertions: 2 neverallow failures occurred
 7Error while expanding policy
 8out/host/linux-x86/bin/checkpolicy:  loading policy configuration from out/target/product/xxxx/obj/ETC/sepolicy_neverallows_intermediates/policy.conf
 9ninja: build stopped: subcommand failed.
1001:32:50 ninja failed with: exit status 1
语法错误:
 1[  6% 3/47] build out/target/product/xxxx/obj/ETC/sepolicy_neverallows_intermediates/sepolicy_neverallows
 2FAILED: out/target/product/xxxx/obj/ETC/sepolicy_neverallows_intermediates/sepolicy_neverallows
 3/bin/bash -c "(rm -f out/target/product/xxxx/obj/ETC/sepolicy_neverallows_intermediates/sepolicy_neverallows ) && (ASAN_OPTIONS=detect_leaks=0 out/host/linux-x86/bin/checkpolicy -M -c           30 -o out/target/product/xxxx/obj/ETC/sepolicy_neverallows_intermediates/sepolicy_neverallows out/target/product/xxxx/obj/ETC/sepolicy_neverallows_intermediates/policy.conf )"
 4device/xxxxxx/common/sepolicy/testA.te:11:ERROR 'syntax error' at token 'allow' on line 47452:
 5allow testA system_server { call transfer };
 6allow testA activity_service:service_manager { find }
 7checkpolicy:  error(s) encountered while parsing configuration
 8out/host/linux-x86/bin/checkpolicy:  loading policy configuration from out/target/product/xxxx/obj/ETC/sepolicy_neverallows_intermediates/policy.conf
 9ninja: build stopped: subcommand failed.
1010:17:55 ninja failed with: exit status 1
方案自定义策略文件访问平台私有策略:
 1FAILED: out/target/product/xxxx/obj/ETC/vendor_sepolicy.cil_intermediates/vendor_sepolicy.cil
 2/bin/bash -c "out/host/linux-x86/bin/build_sepolicy -a out/host/linux-x86/bin build_cil                 -i out/target/product/xxxx/obj/ETC/vendor_sepolicy.cil_intermediates/vendor_policy.conf -m out/target/product/xxxx/obj/ETC/sepolicy_neverallows_intermediates/reqd_policy_mask.cil -c ASAN_OPTIONS=detect_leaks=0          -b out/target/product/xxxx/obj/ETC/sepolicy_neverallows_intermediates/plat_pub_policy.cil -d out/target/product/xxxx/obj/ETC/plat_sepolicy.cil_intermediates/plat_sepolicy.cil out/target/product/xxxx/obj/ETC/plat_pub_versioned.cil_intermediates/plat_pub_versioned.cil out/target/product/xxxx/obj/ETC/30.0.cil_intermediates/30.0.cil -f out/target/product/xxxx/obj/ETC/plat_pub_versioned.cil_intermediates/plat_pub_versioned.cil                 -t 30.0 -p 30 -o out/target/product/xxxx/obj/ETC/vendor_sepolicy.cil_intermediates/vendor_sepolicy.cil"
 3device/xxxxxx/common/sepolicy/testA.te:18:ERROR 'unknown type storaged' at token ';' on line 34318:
 4allow hal_memtrack_default storaged:dir { search };
 5#allow hal_memtrack_default rootdaemon:dir { search };
 6checkpolicy:  error(s) encountered while parsing configuration
 7out/host/linux-x86/bin/checkpolicy:  loading policy configuration from out/target/product/xxxx/obj/ETC/vendor_sepolicy.cil_intermediates/vendor_policy.conf
 8build_sepolicy - failed to run command: 'ASAN_OPTIONS=detect_leaks=0 out/host/linux-x86/bin/checkpolicy -C -M -c 30 -o out/target/product/xxxx/obj/ETC/vendor_sepolicy.cil_intermediates/vendor_policy_raw.cil out/target/product/xxxx/obj/ETC/vendor_sepolicy.cil_intermediates/vendor_policy.conf' (ret:1)
 9ninja: build stopped: subcommand failed.
1010:24:07 ninja failed with: exit status 1
转出来cil之后:
 1(type testA)
 2(roletype object_r testA)
 3(type testA_exec)
 4(roletype object_r testA_exec)
 5(type testA_tmpfs)
 6(roletype object_r testA_tmpfs)
 7
 8(typeattributeset file_type (...... testA_exec testA_tmpfs ......))
 9(typeattributeset exec_type (...... testA_exec ......))
10(typeattributeset vendor_file_type (...... testA_exec ......))
11(typeattributeset binder_in_vendor_violators (testA apkinstalldata xbug))
12(typeattributeset vendor_executes_system_violators (testA apkinstalldata))
13(typeattributeset domain (...... testA ......))
14
15(allow init_30_0 testA_exec (file (read getattr map execute open)))
16(allow init_30_0 testA (process (transition)))
17(allow testA testA_exec (file (read getattr map execute entrypoint open)))
18(dontaudit init_30_0 testA (process (noatsecure)))
19(allow init_30_0 testA (process (siginh rlimitinh)))
20(typetransition init_30_0 testA_exec process testA)
21(typetransition testA tmpfs_30_0 file testA_tmpfs)
22(allow testA testA_tmpfs (file (read write getattr map)))
23(allow testA tmpfs_30_0 (dir (getattr search)))
24(allow testA picasso_device_30_0 (chr_file (ioctl read write getattr lock append map open)))
25(allow testA testA_exec (file (execute_no_trans)))
26(allow testA vendor_toolbox_exec_30_0 (file (execute_no_trans)))
27(allow testA vendor_data_file_30_0 (dir (ioctl read write create getattr setattr lock rename add_name remove_name reparent search rmdir open)))
28(allow testA vendor_data_file_30_0 (file (ioctl read write create getattr setattr lock append map unlink rename open)))
29(allow testA vendor_file_30_0 (file (execute_no_trans)))
30(allow testA mnt_media_rw_file_30_0 (dir (search)))
31(allow testA vfat_30_0 (file (read getattr open)))
32(allow testA vfat_30_0 (dir (search)))
33(allow testA block_device_30_0 (dir (search)))
34(allow testA property_socket_30_0 (sock_file (write)))
35(allow testA init_30_0 (unix_stream_socket (connectto)))
36(allow testA activity_service_30_0 (service_manager (find)))
37(allow testA system_server_30_0 (binder (call transfer)))
38(allow testA servicemanager_30_0 (binder (call transfer)))
39(allow servicemanager_30_0 testA (dir (search)))
40(allow servicemanager_30_0 testA (file (read open)))
41(allow servicemanager_30_0 testA (process (getattr)))
42(allow testA shell_exec_30_0 (file (read execute)))
43(allow testA system_file_30_0 (file (execute_no_trans)))
2.2.1.2.4检查
在最后会用secilc编译一次cil文件,检查是否有问题
经历过上面的一个过程,编译出所有需要的cil,最后就会调用secilc命令编译所有的cil文件,生成二进制策略文件precompiled_sepolicy
简单的说,这个过程就是:
te -> conf -> cil -> precompiled_sepolicy
cil这个在很早的Android版本,比如5.1的时候是还没有的,是后面的版本才添加的
2.2.2将策略文件加载到kernel
接着回到加载selinux 策略的初始化过程
2.2.2.1selinux_android_load_policy_from_fd
android/external/selinux/libselinux/src/android/android_platform.c
 1int selinux_android_load_policy_from_fd(int fd, const char *description)
 2{
 3    int rc;
 4    struct stat sb;
 5    void *map = NULL;
 6    static int load_successful = 0;
 7
 8    /*
 9        * Since updating policy at runtime has been abolished
10        * we just check whether a policy has been loaded before
11        * and return if this is the case.
12        * There is no point in reloading policy.
13        */
14    if (load_successful){
15        selinux_log(SELINUX_WARNING, "SELinux: Attempted reload of SELinux policy!/n");
16        return 0;
17    }
18
19    set_selinuxmnt(SELINUXMNT);  //设置SELinux mount的位置  /sys/fs/selinux
20    if (fstat(fd, &sb) < 0) {
21        selinux_log(SELINUX_ERROR, "SELinux:  Could not stat %s:  %s\n",
22                description, strerror(errno));
23        return -1;
24    }
25    map = mmap(NULL, sb.st_size, PROT_READ, MAP_PRIVATE, fd, 0);
26    if (map == MAP_FAILED) {
27        selinux_log(SELINUX_ERROR, "SELinux:  Could not map %s:  %s\n",
28                description, strerror(errno));
29        return -1;
30    }
31
32    rc = security_load_policy(map, sb.st_size); //加载sepolicy
33    if (rc < 0) {
34        selinux_log(SELINUX_ERROR, "SELinux:  Could not load policy:  %s\n",
35                strerror(errno));
36        munmap(map, sb.st_size);
37        return -1;
38    }
39
40    munmap(map, sb.st_size);
41    selinux_log(SELINUX_INFO, "SELinux: Loaded policy from %s\n", description);
42    load_successful = 1;
43    return 0;
44}
2.2.2.2security_load_policy(libselinux)
android/external/selinux/libselinux/src/load_policy.c
 1int security_load_policy(void *data, size_t len)
 2{
 3    char path[PATH_MAX];
 4    int fd, ret;
 5
 6    if (!selinux_mnt) {
 7        errno = ENOENT;
 8        return -1;
 9    }
10
11    snprintf(path, sizeof path, "%s/load", selinux_mnt);
12    fd = open(path, O_RDWR | O_CLOEXEC);
13    if (fd < 0)
14        return -1;
15
16    ret = write(fd, data, len);
17    close(fd);
18    if (ret < 0)
19        return -1;
20    return 0;
21}
这里是把文件内容读取出来后,直接写入节点:/sys/fs/selinux/load
2.2.2.3/sys/fs/selinux/load
接着往下就要看kernel的代码了
android/common/security/selinux/selinuxfs.c
 1static struct tree_descr selinux_files[] = {
 2        [SEL_LOAD] = {"load", &sel_load_ops, S_IRUSR|S_IWUSR},
 3        [SEL_ENFORCE] = {"enforce", &sel_enforce_ops, S_IRUGO|S_IWUSR},
 4        [SEL_CONTEXT] = {"context", &transaction_ops, S_IRUGO|S_IWUGO},
 5        [SEL_ACCESS] = {"access", &transaction_ops, S_IRUGO|S_IWUGO},
 6        [SEL_CREATE] = {"create", &transaction_ops, S_IRUGO|S_IWUGO},
 7        [SEL_RELABEL] = {"relabel", &transaction_ops, S_IRUGO|S_IWUGO},
 8        [SEL_USER] = {"user", &transaction_ops, S_IRUGO|S_IWUGO},
 9        [SEL_POLICYVERS] = {"policyvers", &sel_policyvers_ops, S_IRUGO},
10        [SEL_COMMIT_BOOLS] = {"commit_pending_bools", &sel_commit_bools_ops, S_IWUSR},
11        [SEL_MLS] = {"mls", &sel_mls_ops, S_IRUGO},
12        [SEL_DISABLE] = {"disable", &sel_disable_ops, S_IWUSR},
13        [SEL_MEMBER] = {"member", &transaction_ops, S_IRUGO|S_IWUGO},
14        [SEL_CHECKREQPROT] = {"checkreqprot", &sel_checkreqprot_ops, S_IRUGO|S_IWUSR},
15        [SEL_REJECT_UNKNOWN] = {"reject_unknown", &sel_handle_unknown_ops, S_IRUGO},
16        [SEL_DENY_UNKNOWN] = {"deny_unknown", &sel_handle_unknown_ops, S_IRUGO},
17        [SEL_STATUS] = {"status", &sel_handle_status_ops, S_IRUGO},
18        [SEL_POLICY] = {"policy", &sel_policy_ops, S_IRUGO},
19        [SEL_VALIDATE_TRANS] = {"validatetrans", &sel_transition_ops,
20                    S_IWUGO},
21        /* last one */ {""}
22    };
23
24static const struct file_operations sel_load_ops = {
25    .write  = sel_write_load,
26    .llseek = generic_file_llseek,
27};
接着是 sel_write_load
 1static ssize_t sel_write_load(struct file *file, const char __user *buf,
 2                size_t count, loff_t *ppos)
 3
 4{
 5    ......
 6
 7    length = security_load_policy(data, count);
 8    if (length)
 9        goto out;
10
11    ......
12}
2.2.2.4security_load_policy(kernel)
android/common/security/selinux/ss/services.c
 1if (!ss_initialized) {
 2        avtab_cache_init();
 3        rc = policydb_read(&policydb, fp);
 4        if (rc) {
 5            avtab_cache_destroy();
 6            goto out;
 7        }
 8
 9        policydb.len = len;
10        rc = selinux_set_mapping(&policydb, secclass_map,
11                     ¤t_mapping,
12                     ¤t_mapping_size);
13        if (rc) {
14            policydb_destroy(&policydb);
15            avtab_cache_destroy();
16            goto out;
17        }
18
19        rc = policydb_load_isids(&policydb, &sidtab);
20        if (rc) {
21            policydb_destroy(&policydb);
22            avtab_cache_destroy();
23            goto out;
24        }
25
26        security_load_policycaps();
27        ss_initialized = 1;
28        seqno = ++latest_granting;
29        selinux_complete_init();
30        avc_ss_reset(seqno);
31        selnl_notify_policyload(seqno);
32        selinux_status_update_policyload(seqno);
33        selinux_netlbl_cache_invalidate();
34        selinux_xfrm_notify_policyload();
35        goto out;
36    }
通过policydb_read把数据读取保存到policydb这个数据结构里面
policydb是一个结构体
定义在:android/common/security/selinux/ss/policydb.h
 1struct policydb {
 2    int mls_enabled;
 3
 4    /* symbol tables */
 5    struct symtab symtab[SYM_NUM];
 6#define p_commons symtab[SYM_COMMONS]
 7#define p_classes symtab[SYM_CLASSES]
 8#define p_roles symtab[SYM_ROLES]
 9#define p_types symtab[SYM_TYPES]
10#define p_users symtab[SYM_USERS]
11#define p_bools symtab[SYM_BOOLS]
12#define p_levels symtab[SYM_LEVELS]
13#define p_cats symtab[SYM_CATS]
14
15    /* symbol names indexed by (value - 1) */
16    struct flex_array *sym_val_to_name[SYM_NUM];
17
18    /* class, role, and user attributes indexed by (value - 1) */
19    struct class_datum **class_val_to_struct;
20    struct role_datum **role_val_to_struct;
21    struct user_datum **user_val_to_struct;
22    struct flex_array *type_val_to_struct_array;
23
24    /* type enforcement access vectors and transitions */
25    struct avtab te_avtab;
26
27    /* role transitions */
28    struct role_trans *role_tr;
29
30    /* file transitions with the last path component */
31    /* quickly exclude lookups when parent ttype has no rules */
32    struct ebitmap filename_trans_ttypes;
33    /* actual set of filename_trans rules */
34    struct hashtab *filename_trans;
35
36    /* bools indexed by (value - 1) */
37    struct cond_bool_datum **bool_val_to_struct;
38    /* type enforcement conditional access vectors and transitions */
39    struct avtab te_cond_avtab;
40    /* linked list indexing te_cond_avtab by conditional */
41    struct cond_node *cond_list;
42
43    /* role allows */
44    struct role_allow *role_allow;
45
46    /* security contexts of initial SIDs, unlabeled file systems,
47       TCP or UDP port numbers, network interfaces and nodes */
48    struct ocontext *ocontexts[OCON_NUM];
49
50    /* security contexts for files in filesystems that cannot support
51       a persistent label mapping or use another
52       fixed labeling behavior. */
53    struct genfs *genfs;
54
55    /* range transitions table (range_trans_key -> mls_range) */
56    struct hashtab *range_tr;
57
58    /* type -> attribute reverse mapping */
59    struct flex_array *type_attr_map_array;
60
61    struct ebitmap policycaps;
62
63    struct ebitmap permissive_map;
64
65    /* length of this policy when it was loaded */
66    size_t len;
67
68    unsigned int policyvers;
69
70    unsigned int reject_unknown : 1;
71    unsigned int allow_unknown : 1;
72
73    u16 process_class;
74    u32 process_trans_perms;
75};
将安全策略从用户空间加载到 SELinux LSM 模块中去了,这个数据结构很复杂
te规则最后会保存在
1/* type enforcement access vectors and transitions */
2struct avtab te_avtab;
另外还有服务、属性等初始化,有兴趣可以结合大佬的博客一起看看:
还记得最开头有提到,在android/device/xxxxxx/common/sepolicy和android/system/sepolicy都要添加 xxx.te,而有些方案却不用?
分析mk之后,不难发现,是因为去掉了这个:
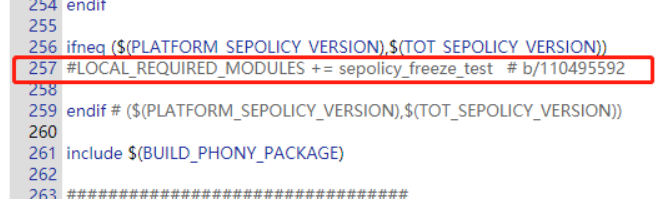
然后检查对比的动作没有做了
2.3总结
到这里,总结一下:
1、从Android8.0之后,加载的是 /(vendor|odm)/etc/selinux/precompiled_sepolicy ,以前的版本用的是 /sepolicy,如下图
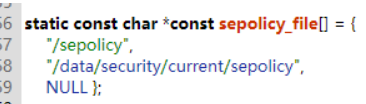
2、有些平台上有odm分区,因此用的是 /odm/etc/selinux/precompiled_sepolicy,这也就是为什么前面提到的编译替换/vendor/etc/selinux/和/system/etc/selinux/没有效果的原因
3权限检查原理与调试
我们在处理SELinux权限问题的时候,avc denied信息是最关键的,那么avc denied 的打印信息要怎么看、里面的内容每一个字段是什么意思?kernel log的avc denied信息是哪里打印出来的?
以前有个想法,我们系统的操作、命令都是有限的,那其实脚本写完之后需要什么权限都是确定的,那可不可能更快的加好te规则呢?
假设有如下脚本以及te规则
- /vendor/bin/testA.sh
1#!/vendor/bin/sh
2
3echo "hello world" > /data/vendor/test.txt
- /android/device/xxxx/common/sepolicy/file_contexts
1/vendor/bin/testA.sh u:object_r:testA_exec:s0
- /android/device/xxxx/common/sepolicy/testA.te
1type testA, domain;
2type testA_exec, exec_type, vendor_file_type, file_type;
3
4init_daemon_domain(testA)
5
6allow testA picasso_device:chr_file { write open getattr ioctl };
7allow testA vendor_toolbox_exec:file { execute_no_trans };
8allow testA vendor_data_file:dir { add_name };
执行脚本后,会有如下报错信息:
1[ 5424.996583@0]- type=1400 audit(1577887433.668:59): avc: denied { write } for pid=4021 comm="testA.sh"
2name="vendor" dev="mmcblk0p20" ino=7395 scontext=u:r:testA:s0 tcontext=u:object_r:vendor_data_file:s0 tclass=dir permissive=0
3.1权限检测原理
这部分的代码集中在两个部分
- kernel的代码,里面的security/selinux
- /android/external/selinux
一开始,/data/vendor/test.txt是不存在的;testA.sh脚本运行起来之后,它的安全上下文是u:r:testA:s0,type为testA的进程,要拥有对type为vendor_data_file的目录(dir)的写(write)权限,才能创建一个不存在的文件
权限检测其实就是针对进程访问对象的两个权限:拥有的权限和需要的权限,将两者进行计算得出结果,即允许还是拒绝
3.1.1拥有的权限
te规则定义的权限保存在哪里?
testA.te里面它拥有add_name权限,前面的文章有提到te策略文件的编译过程,这个规则最终会生成在二进制策略文件precompiled_sepolicy里面,而policydb这个数据结构是用来组织起所有数据的
其中te规则保存在这个成员里面
1/* type enforcement access vectors and transitions */
2avtab_t te_avtab;
这里面的数据结构比较复杂,里面主要需要理解几个数据结构:
- 位图ebitmap
- 链表
- 哈希表hashtab
- 符号表symtab
这里面的内容太多了,我只是简单分析了其中te规则一部分代码,有兴趣可以结合参考文章《Linux多安全策略和动态安全策 略框架模块代码分析报告》(见参考文章)来阅读源码深入了解
下面分析的一些结论,如有问题请指出:
testA这个type的进程,对type为vendor_data_file的dir(目录)所拥有的权限是用一个整数u32来表示的:
它的值是:
10x00120010
下面简单看看这个值是怎么生成的?
1(allow testA_30_0 vendor_data_file_30_0 (dir (add_name)))
接着看看 /android/external/selinux/libsepol/cil/src/cil_binary.c 里面的__cil_perms_to_datum函数
 1int __cil_perms_to_datum(struct cil_list *perms, class_datum_t *sepol_class, uint32_t *datum)
 2{
 3    int rc = SEPOL_ERR;
 4    char *key = NULL;
 5    struct cil_list_item *curr_perm;
 6    struct cil_perm *cil_perm;
 7    uint32_t data = 0;
 8
 9    cil_list_for_each(curr_perm, perms) {
10        cil_perm = curr_perm->data;
11        key = cil_perm->datum.fqn;
12
13        rc = __perm_str_to_datum(key, sepol_class, &data);
14        if (rc != SEPOL_OK) {
15            goto exit;
16        }
17    }
18
19    *datum = data;
20
21    return SEPOL_OK;
22
23exit:
24    return rc;
25}
26
27
28int __perm_str_to_datum(char *perm_str, class_datum_t *sepol_class, uint32_t *datum)
29{
30    int rc;
31    perm_datum_t *sepol_perm;
32    common_datum_t *sepol_common;
33
34    sepol_perm = hashtab_search(sepol_class->permissions.table, perm_str);
35    if (sepol_perm == NULL) {
36        sepol_common = sepol_class->comdatum;
37        sepol_perm = hashtab_search(sepol_common->permissions.table, perm_str);
38        if (sepol_perm == NULL) {
39            cil_log(CIL_ERR, "Failed to find datum for perm %s\n", perm_str);
40            rc = SEPOL_ERR;
41            goto exit;
42        }
43    }
44    *datum |= 1 << (sepol_perm->s.value - 1);
45
46    return SEPOL_OK;
47
48exit:
49    return rc;
50}
datum 里面保存的值就是0x00120010
看最关键的一句话:
1*datum |= 1 << (sepol_perm->s.value - 1);
上面的操作其实就是将对应的位置1,代表它拥有的权限,那每一个位对应的权限是什么呢? 这个要看:
/android/system/sepolicy/private/access_vectors
 1common file
 2{
 3    ioctl
 4    read
 5    write
 6    create
 7    getattr
 8    setattr
 9    lock
10    relabelfrom
11    relabelto
12    append
13    map
14    unlink
15    link
16    rename
17    execute
18    quotaon
19    mounton
20}
21
22class dir
23inherits file
24{
25    add_name
26    remove_name
27    reparent
28    search
29    rmdir
30    open
31    audit_access
32    execmod
33}
sepol_perm->s.value可以理解成是解析过程中某个权限在access_vectors定义的class里面的index值,它会用符号表和对应的字符串关联起来,比如add_name在集合里面的是第18个,对应的值是0x00020000
我们这里的是dir,将其合并下:
1{
2    ioctl,read,write,create,getattr,setattr,lock,relabelfrom,relabelto,append,map,unlink,
3    link,rename,execute,quotaon,mounton,add_name,remove_name,reparent,search,rmdir,open,
4    audit_access,execmod
5}
上面那句话的操作就是将datum的第18位置成1
那么最后计算出来的0x00120010就是:

翻译过来,是这个规则
1allow testA vendor_data_file:dir { search add_name getattr };
奇怪的是,这里怎么会多出来两个权限呢,我都没有加上去
原因是来自这条规则:
这个在domain.te里面
1allow domain vendor_data_file:dir { getattr search };
3.1.2需要的权限
要分析操作vendor_data_file:dir所需要的权限,借助打印堆栈信息来分析:
 1[ 5424.899991@1]d CPU: 1 PID: 4119 Comm: testA.sh Tainted: P           O    4.9.113 #14
 2[ 5424.907561@1]d Hardware name: Generic DT based system
 3[ 5424.912595@1]d [bc3c7a84+  16][<c020dc10>] show_stack+0x20/0x24
 4[ 5424.918447@1]d [bc3c7aa4+  32][<c05443ec>] dump_stack+0x90/0xac
 5[ 5424.924311@1]d [bc3c7aec+  72][<c04d5954>] slow_avc_audit+0x88/0xa8
 6[ 5424.930515@1]d [bc3c7b34+  72][<c04da498>] audit_inode_permission+0x80/0x88
 7[ 5424.937417@1]d [bc3c7bac+ 120][<c04daf20>] selinux_inode_permission+0x2d0/0x314
 8[ 5424.944664@1]d [bc3c7bcc+  32][<c04d1f44>] security_inode_permission+0x4c/0x68
 9[ 5424.951824@1]d [bc3c7bec+  32][<c03a5bc8>] __inode_permission2+0x50/0xf0
10[ 5424.958455@1]d [bc3c7bfc+  16][<c03a5cb0>] inode_permission2+0x20/0x54
11[ 5424.964930@1]d [bc3c7c84+ 136][<c03a9048>] path_openat+0xb30/0x118c
12[ 5424.971137@1]d [bc3c7d2c+ 168][<c03aabe4>] do_filp_open+0x7c/0xe0
13[ 5424.977179@1]d [bc3c7d7c+  80][<c0397b34>] do_sys_open+0x124/0x238
14[ 5424.983303@1]d [bc3c7d8c+  16][<c0397c90>] SyS_openat+0x1c/0x20
15[ 5424.989165@1]d [00000000+   0][<c02085c0>] ret_fast_syscall+0x0/0x48
16
17用addr2line看看对应的代码调用逻辑
181  show_stack c020dc10
19show_stack
20kernelcode/arch/arm/kernel/traps.c:263
21
222  dump_stack c05443ec
23dump_stack
24kernelcode/lib/dump_stack.c:53
25
263  slow_avc_audit c04d5954
27slow_avc_audit
28kernelcode/security/selinux/avc.c:775
29
304  audit_inode_permission c04da498
31audit_inode_permission
32kernelcode/security/selinux/hooks.c:3005
33
345  selinux_inode_permission c04daf20
35selinux_inode_permission
36kernelcode/security/selinux/hooks.c:3058
37
386  security_inode_permission c04d1f44
39security_inode_permission
40kernelcode/security/security.c:611 (discriminator 5)
41
427  __inode_permission2 c03a5bc8
43__inode_permission2
44kernelcode/fs/namei.c:436
45
468  inode_permission2 c03a5cb0
47inode_permission2
48kernelcode/fs/namei.c:486
49
509  path_openat c03a9048
51may_o_create
52kernelcode/fs/namei.c:3018
53
5410  do_filp_open c03aabe4
55do_filp_open
56kernelcode/fs/namei.c:3569
57
5811  do_sys_open c0397b34
59do_sys_open
60kernelcode/fs/open.c:1073
61
6212  SyS_openat c0397c90
63SyS_openat
64kernelcode/fs/open.c:1093
65
6613  ret_fast_syscall c02085c0
67ret_fast_syscall
68kernelcode/arch/arm/kernel/entry-common.S:37
堆栈打印添加在kernel代码里面:
kernelcode$ git diff security/selinux/avc.c
 1diff --git a/security/selinux/avc.c b/security/selinux/avc.c
 2index e60c79d..79cea20 100644
 3--- a/security/selinux/avc.c
 4+++ b/security/selinux/avc.c
 5@@ -771,7 +771,7 @@ noinline int slow_avc_audit(u32 ssid, u32 tsid, u16 tclass,
 6        sad.result = result;
 7
 8        a->selinux_audit_data = &sad;
 9-
10+       dump_stack();
11        common_lsm_audit(a, avc_audit_pre_callback, avc_audit_post_callback);
12        return 0;
13 }
跟着堆栈简单看一遍代码,不难发现,需要的权限是从这里来的
may_o_create
kernelcode/fs/namei.c:3018
 1static int may_o_create(const struct path *dir, struct dentry *dentry, umode_t mode)
 2{
 3    struct user_namespace *s_user_ns;
 4    int error = security_path_mknod(dir, dentry, mode, 0);
 5    if (error)
 6        return error;
 7
 8    s_user_ns = dir->dentry->d_sb->s_user_ns;
 9    if (!kuid_has_mapping(s_user_ns, current_fsuid()) ||
10        !kgid_has_mapping(s_user_ns, current_fsgid()))
11        return -EOVERFLOW;
12
13    error = inode_permission2(dir->mnt, dir->dentry->d_inode, MAY_WRITE | MAY_EXEC);
14    if (error)
15        return error;
16
17    return security_inode_create(dir->dentry->d_inode, dentry, mode);
18}
inode_permission2的第三个参数 MAY_WRITE | MAY_EXEC
会一直传递到 kernelcode/security/selinux/hooks.c
selinux_inode_permission这个函数的第二参数mask
 1static int selinux_inode_permission(struct inode *inode, int mask)
 2{
 3    const struct cred *cred = current_cred();
 4    u32 perms;
 5    bool from_access;
 6    unsigned flags = mask & MAY_NOT_BLOCK;
 7    struct inode_security_struct *isec;
 8    u32 sid;
 9    struct av_decision avd;
10    int rc, rc2;
11    u32 audited, denied;
12
13    from_access = mask & MAY_ACCESS;
14  //mask = MAY_WRITE | MAY_EXEC;
15    mask &= (MAY_READ|MAY_WRITE|MAY_EXEC|MAY_APPEND);
16
17    /* No permission to check.  Existence test. */
18    if (!mask)
19        return 0;
20
21    validate_creds(cred);
22
23    if (unlikely(IS_PRIVATE(inode)))
24        return 0;
25
26  //mask = MAY_WRITE | MAY_EXEC;
27  //perms = DIR__WRITE | DIR__SEARCH
28  //perms = 0x00400004
29    perms = file_mask_to_av(inode->i_mode, mask);
30
31    sid = cred_sid(cred);
32    isec = inode_security_rcu(inode, flags & MAY_NOT_BLOCK);
33    if (IS_ERR(isec))
34        return PTR_ERR(isec);
35
36  //主要是获取av_decision信息,里面包含了权限信息,先从avc cache里面获取,如果没有就从policydb里面计算得出
37    rc = avc_has_perm_noaudit(sid, isec->sid, isec->sclass, perms, 0, &avd);
38  //这个就是审计、裁决的动作了,计算拥有的权限avd和需要的权限perms,得出缺失的权限
39    audited = avc_audit_required(perms, &avd, rc,
40                     from_access ? FILE__AUDIT_ACCESS : 0,
41                     &denied);
42  //大部分情况下,如果没有权限问题,到这儿就结束了
43    if (likely(!audited))
44        return rc;
45  //再往下就要开始收集信息,打印avc denied信息了
46    rc2 = audit_inode_permission(inode, perms, audited, denied, rc, flags);
47    if (rc2)
48        return rc2;
49    return rc;
50}
这里面file_mask_to_av计算出来的perms就是我们现在操作dir所需要的权限
DIR__WRITE 、 DIR__SEARCH的定义是av_permissions.h头文件里面
不过不是这个 /android/external/selinux/libselinux/include/selinux/av_permissions.h
而是编译生成,路径在:/android/out/target/product/xxxxx/obj/KERNEL_OBJ/security/selinux/av_permissions.h
1#define DIR__WRITE                                0x00000004UL
2#define DIR__SEARCH                               0x00400000UL
也就是perms = 0x00400004
实际上,这里面这个权限也是每一位代表了一个权限,和上面的不同的是,这个是根据classmap.h里面定义的值来计算的
kernelcode/security/selinux/include/classmap.h
  1#define COMMON_FILE_SOCK_PERMS "ioctl", "read", "write", "create", \
  2    "getattr", "setattr", "lock", "relabelfrom", "relabelto", "append"
  3
  4#define COMMON_FILE_PERMS COMMON_FILE_SOCK_PERMS, "unlink", "link", \
  5    "rename", "execute", "quotaon", "mounton", "audit_access", \
  6    "open", "execmod"
  7
  8#define COMMON_SOCK_PERMS COMMON_FILE_SOCK_PERMS, "bind", "connect", \
  9    "listen", "accept", "getopt", "setopt", "shutdown", "recvfrom",  \
 10    "sendto", "name_bind"
 11
 12#define COMMON_IPC_PERMS "create", "destroy", "getattr", "setattr", "read", \
 13        "write", "associate", "unix_read", "unix_write"
 14
 15#define COMMON_CAP_PERMS  "chown", "dac_override", "dac_read_search", \
 16        "fowner", "fsetid", "kill", "setgid", "setuid", "setpcap", \
 17        "linux_immutable", "net_bind_service", "net_broadcast", \
 18        "net_admin", "net_raw", "ipc_lock", "ipc_owner", "sys_module", \
 19        "sys_rawio", "sys_chroot", "sys_ptrace", "sys_pacct", "sys_admin", \
 20        "sys_boot", "sys_nice", "sys_resource", "sys_time", \
 21        "sys_tty_config", "mknod", "lease", "audit_write", \
 22        "audit_control", "setfcap"
 23
 24#define COMMON_CAP2_PERMS  "mac_override", "mac_admin", "syslog", \
 25        "wake_alarm", "block_suspend", "audit_read"
 26
 27/*
 28 * Note: The name for any socket class should be suffixed by "socket",
 29 *   and doesn't contain more than one substr of "socket".
 30 */
 31struct security_class_mapping secclass_map[] = {
 32    { "security",
 33      { "compute_av", "compute_create", "compute_member",
 34        "check_context", "load_policy", "compute_relabel",
 35        "compute_user", "setenforce", "setbool", "setsecparam",
 36        "setcheckreqprot", "read_policy", "validate_trans", NULL } },
 37    { "process",
 38      { "fork", "transition", "sigchld", "sigkill",
 39        "sigstop", "signull", "signal", "ptrace", "getsched", "setsched",
 40        "getsession", "getpgid", "setpgid", "getcap", "setcap", "share",
 41        "getattr", "setexec", "setfscreate", "noatsecure", "siginh",
 42        "setrlimit", "rlimitinh", "dyntransition", "setcurrent",
 43        "execmem", "execstack", "execheap", "setkeycreate",
 44        "setsockcreate", NULL } },
 45    { "system",
 46      { "ipc_info", "syslog_read", "syslog_mod",
 47        "syslog_picasso", "module_request", "module_load", NULL } },
 48    { "capability",
 49      { COMMON_CAP_PERMS, NULL } },
 50    { "filesystem",
 51      { "mount", "remount", "unmount", "getattr",
 52        "relabelfrom", "relabelto", "associate", "quotamod",
 53        "quotaget", NULL } },
 54    { "file",
 55      { COMMON_FILE_PERMS,
 56        "execute_no_trans", "entrypoint", NULL } },
 57    { "dir",
 58      { COMMON_FILE_PERMS, "add_name", "remove_name",
 59        "reparent", "search", "rmdir", NULL } },
 60    { "fd", { "use", NULL } },
 61    { "lnk_file",
 62      { COMMON_FILE_PERMS, NULL } },
 63    { "chr_file",
 64      { COMMON_FILE_PERMS, NULL } },
 65    { "blk_file",
 66      { COMMON_FILE_PERMS, NULL } },
 67    { "sock_file",
 68      { COMMON_FILE_PERMS, NULL } },
 69    { "fifo_file",
 70      { COMMON_FILE_PERMS, NULL } },
 71    { "socket",
 72      { COMMON_SOCK_PERMS, NULL } },
 73    { "tcp_socket",
 74      { COMMON_SOCK_PERMS,
 75        "node_bind", "name_connect",
 76        NULL } },
 77    { "udp_socket",
 78      { COMMON_SOCK_PERMS,
 79        "node_bind", NULL } },
 80    { "rawip_socket",
 81      { COMMON_SOCK_PERMS,
 82        "node_bind", NULL } },
 83    { "node",
 84      { "recvfrom", "sendto", NULL } },
 85    { "netif",
 86      { "ingress", "egress", NULL } },
 87    { "netlink_socket",
 88      { COMMON_SOCK_PERMS, NULL } },
 89    { "packet_socket",
 90      { COMMON_SOCK_PERMS, NULL } },
 91    { "key_socket",
 92      { COMMON_SOCK_PERMS, NULL } },
 93    { "unix_stream_socket",
 94      { COMMON_SOCK_PERMS, "connectto", NULL } },
 95    { "unix_dgram_socket",
 96      { COMMON_SOCK_PERMS, NULL } },
 97    { "sem",
 98      { COMMON_IPC_PERMS, NULL } },
 99    { "msg", { "send", "receive", NULL } },
100    { "msgq",
101      { COMMON_IPC_PERMS, "enqueue", NULL } },
102    { "shm",
103      { COMMON_IPC_PERMS, "lock", NULL } },
104    { "ipc",
105      { COMMON_IPC_PERMS, NULL } },
106    { "netlink_route_socket",
107      { COMMON_SOCK_PERMS,
108        "nlmsg_read", "nlmsg_write", NULL } },
109    { "netlink_tcpdiag_socket",
110      { COMMON_SOCK_PERMS,
111        "nlmsg_read", "nlmsg_write", NULL } },
112    { "netlink_nflog_socket",
113      { COMMON_SOCK_PERMS, NULL } },
114    { "netlink_xfrm_socket",
115      { COMMON_SOCK_PERMS,
116        "nlmsg_read", "nlmsg_write", NULL } },
117    { "netlink_selinux_socket",
118      { COMMON_SOCK_PERMS, NULL } },
119    { "netlink_iscsi_socket",
120      { COMMON_SOCK_PERMS, NULL } },
121    { "netlink_audit_socket",
122      { COMMON_SOCK_PERMS,
123        "nlmsg_read", "nlmsg_write", "nlmsg_relay", "nlmsg_readpriv",
124        "nlmsg_tty_audit", NULL } },
125    { "netlink_fib_lookup_socket",
126      { COMMON_SOCK_PERMS, NULL } },
127    { "netlink_connector_socket",
128      { COMMON_SOCK_PERMS, NULL } },
129    { "netlink_netfilter_socket",
130      { COMMON_SOCK_PERMS, NULL } },
131    { "netlink_dnrt_socket",
132      { COMMON_SOCK_PERMS, NULL } },
133    { "association",
134      { "sendto", "recvfrom", "setcontext", "polmatch", NULL } },
135    { "netlink_kobject_uevent_socket",
136      { COMMON_SOCK_PERMS, NULL } },
137    { "netlink_generic_socket",
138      { COMMON_SOCK_PERMS, NULL } },
139    { "netlink_scsitransport_socket",
140      { COMMON_SOCK_PERMS, NULL } },
141    { "netlink_rdma_socket",
142      { COMMON_SOCK_PERMS, NULL } },
143    { "netlink_crypto_socket",
144      { COMMON_SOCK_PERMS, NULL } },
145    { "appletalk_socket",
146      { COMMON_SOCK_PERMS, NULL } },
147    { "packet",
148      { "send", "recv", "relabelto", "forward_in", "forward_out", NULL } },
149    { "key",
150      { "view", "read", "write", "search", "link", "setattr", "create",
151        NULL } },
152    { "dccp_socket",
153      { COMMON_SOCK_PERMS,
154        "node_bind", "name_connect", NULL } },
155    { "memprotect", { "mmap_zero", NULL } },
156    { "peer", { "recv", NULL } },
157    { "capability2",
158      { COMMON_CAP2_PERMS, NULL } },
159    { "kernel_service", { "use_as_override", "create_files_as", NULL } },
160    { "tun_socket",
161      { COMMON_SOCK_PERMS, "attach_queue", NULL } },
162    { "binder", { "impersonate", "call", "set_context_mgr", "transfer",
163              NULL } },
164    { "cap_userns",
165      { COMMON_CAP_PERMS, NULL } },
166    { "cap2_userns",
167      { COMMON_CAP2_PERMS, NULL } },
168    { "bpf",
169      {"map_create", "map_read", "map_write", "prog_load", "prog_run"} },
170    { NULL }
171  };
把dir所对应的展开一下:
1{ "dir",
2  { "ioctl", "read", "write", "create", "getattr", "setattr",
3        "lock", "relabelfrom", "relabelto", "append", "unlink", "link",
4    "rename", "execute", "quotaon", "mounton", "audit_access",
5    "open", "execmod","add_name", "remove_name",
6    "reparent", "search", "rmdir", NULL }
7},
其实这里对应的就是权限:“write"和"search”
也就是说,这一次权限检查,要检查的权限是对type为vendor_data_file的目录(dir)的"write"和"search"权限
其他的其实也是一样的道理,kernel里面的代码规定了进程在访问某些对象的时候所需要的权限
再比如:
 1mkdir /data/testdir
 2
 3[ 2336.839823@1] type=1400 audit(1230741525.976:909): avc: denied { getattr } for pid=18561 comm="mkdir"
 4path="/data/testdir" dev="mmcblk0p21" ino=1149 scontext=u:r:testA:s0 tcontext=u:object_r:system_data_file:s0 tclass=dir permissive=0
 5
 6[ 2336.754088@3] [bc6e5b7c+  16][<c020e3c0>] show_stack+0x20/0x24
 7[ 2336.759889@3] [bc6e5b9c+  32][<c05daf0c>] dump_stack+0x90/0xac
 8[ 2336.765696@3] [bc6e5bf4+  88][<c055e978>] slow_avc_audit+0x108/0x128
 9[ 2336.772019@3] [bc6e5c74+ 128][<c055f040>] avc_has_perm+0x13c/0x170
10[ 2336.778172@3] [bc6e5c8c+  24][<c0560334>] inode_has_perm+0x48/0x5c
11[ 2336.784326@3] [bc6e5cb4+  40][<c0562b00>] selinux_inode_getattr+0x6c/0x74
12[ 2336.791085@3] [bc6e5cd4+  32][<c055ab40>] security_inode_getattr+0x4c/0x68
13[ 2336.797934@3] [bc6e5cec+  24][<c03a1ff4>] vfs_getattr+0x20/0x38
14[ 2336.803826@3] [bc6e5d24+  56][<c03a20d4>] vfs_fstatat+0x70/0xb0
15[ 2336.809718@3] [bc6e5d8c+ 104][<c03a2804>] SyS_fstatat64+0x24/0x40
16[ 2336.815787@3] [00000000+   0][<c0208680>] ret_fast_syscall+0x0/0x48
17
18inode_has_perm
19kernelcode/security/selinux/hooks.c:1705
20
21selinux_inode_getattr
22kernelcode/security/selinux/hooks.c:3089
23
24security_inode_getattr
25kernelcode/security/security.c:631 (discriminator 5)
26
27vfs_getattr
28kernelcode/fs/stat.c:70
29
30vfs_fstatat
31kernelcode/fs/stat.c:110
32
33SYSC_fstatat64
34kernelcode/fs/stat.c:440
首先检查的需要的权限是:getattr
1static int selinux_inode_getattr(const struct path *path)
2{
3    return path_has_perm(current_cred(), path, FILE__GETATTR);
4}
5
6#define FILE__GETATTR                             0x00000010UL
3.1.3裁决
前面的分析,我们知道了需要的权限是0x00400004,拥有的权限是0x00120010
那代码是怎么来判断权限是否都ok呢?
先看看权限是怎么从policydb里面读取,然后转换的
 1inline int avc_has_perm_noaudit(u32 ssid, u32 tsid,
 2             u16 tclass, u32 requested,
 3             unsigned flags,
 4             struct av_decision *avd)
 5{
 6    ......
 7    node = avc_lookup(ssid, tsid, tclass);
 8    if (unlikely(!node))
 9        node = avc_compute_av(ssid, tsid, tclass, avd, &xp_node);
10    else
11        memcpy(avd, &node->ae.avd, sizeof(*avd));
12    ......
13}
首先从avc cache里面找看看有没有缓存值,这个是为了提高运行效率的,系统里面成千上万条规则,如果每一次判断权限都要从文件里面读取然后计算结果,这将会是一个巨大的工作量
所以采用了内存里面缓存之前计算的结果,如果没有的话那就调用avc_compute_av函数计算一次
接着调用security_compute_av
kernelcode/security/selinux/ss/services.c
 1void security_compute_av(u32 ssid,
 2             u32 tsid,
 3             u16 orig_tclass,
 4             struct av_decision *avd,
 5             struct extended_perms *xperms)
 6{
 7    ......
 8    context_struct_compute_av(scontext, tcontext, tclass, avd, xperms);
 9    map_decision(orig_tclass, avd, policydb.allow_unknown);
10  ......
11}
函数比较长,这里只看最重要的两句
context_struct_compute_av是从policydb里面读取出来的权限值,在这里就是0x00120010
map_decision会将权限值做一个映射关系,如果认真对比classmap.h和access_vectors里面dir权限的顺序,会发现其实不是完全一样的
 1static void map_decision(u16 tclass, struct av_decision *avd,
 2             int allow_unknown)
 3{
 4    if (tclass < current_mapping_size) {
 5        unsigned i, n = current_mapping[tclass].num_perms;
 6        u32 result;
 7
 8        for (i = 0, result = 0; i < n; i++) {
 9            if (avd->allowed & current_mapping[tclass].perms[i])
10                result |= 1<<i;
11            if (allow_unknown && !current_mapping[tclass].perms[i])
12                result |= 1<<i;
13        }
14        avd->allowed = result;
15
16        ......
17    }
18}
19
20//current_mapping 初始化的时候,是从classmap.h的secclass_map读取的
21rc = selinux_set_mapping(&policydb, secclass_map,
22                     ¤t_mapping,
23                     ¤t_mapping_size);
这里会将0x00120010转成0x00480010
和上面一样的道理:
10x00480010
2
3二进制表示:
40000 0000 0100 1000 0000 0000 0001 0000
5
6这里的每一个位代表着不同的权限,1是有权限,0是没有权限
那么0x00480010对应的权限:

和前面的权限是一致的,这里没有搞清楚为什么要有一个映射关系,感觉直接搞成一样的顺序不是更方便吗?
那接下来要比较的权限就是0x00480010(拥有的权限)和0x00400004(需要的权限)
找到0x00400004(需要的权限)为1 但是 0x00480010(拥有的权限)不为 1的那一位,就是缺少权限的
计算方法可以看看函数:
 1static inline u32 avc_audit_required(u32 requested,
 2                  struct av_decision *avd,
 3                  int result,
 4                  u32 auditdeny,
 5                  u32 *deniedp)
 6{
 7    u32 denied, audited;
 8  //最重要的就是这个计算
 9    denied = requested & ~avd->allowed;
10    ......
11}
那么最后计算的结果就是
0x00400004 & ~0x00480010 = 0x00000004
根据前面的描述,这个权限就是 “write”
所以会看到avc denied信息里面会提示你缺少write权限
1[ 5424.996583@0]- type=1400 audit(1577887433.668:59): avc: denied { write } for pid=4021 comm="testA.sh"
2name="vendor" dev="mmcblk0p20" ino=7395 scontext=u:r:testA:s0 tcontext=u:object_r:vendor_data_file:s0 tclass=dir permissive=0
上面提到的只是一个简单的例子,其他的权限也可以用类似的方式分析
我们用一张图来总结下:
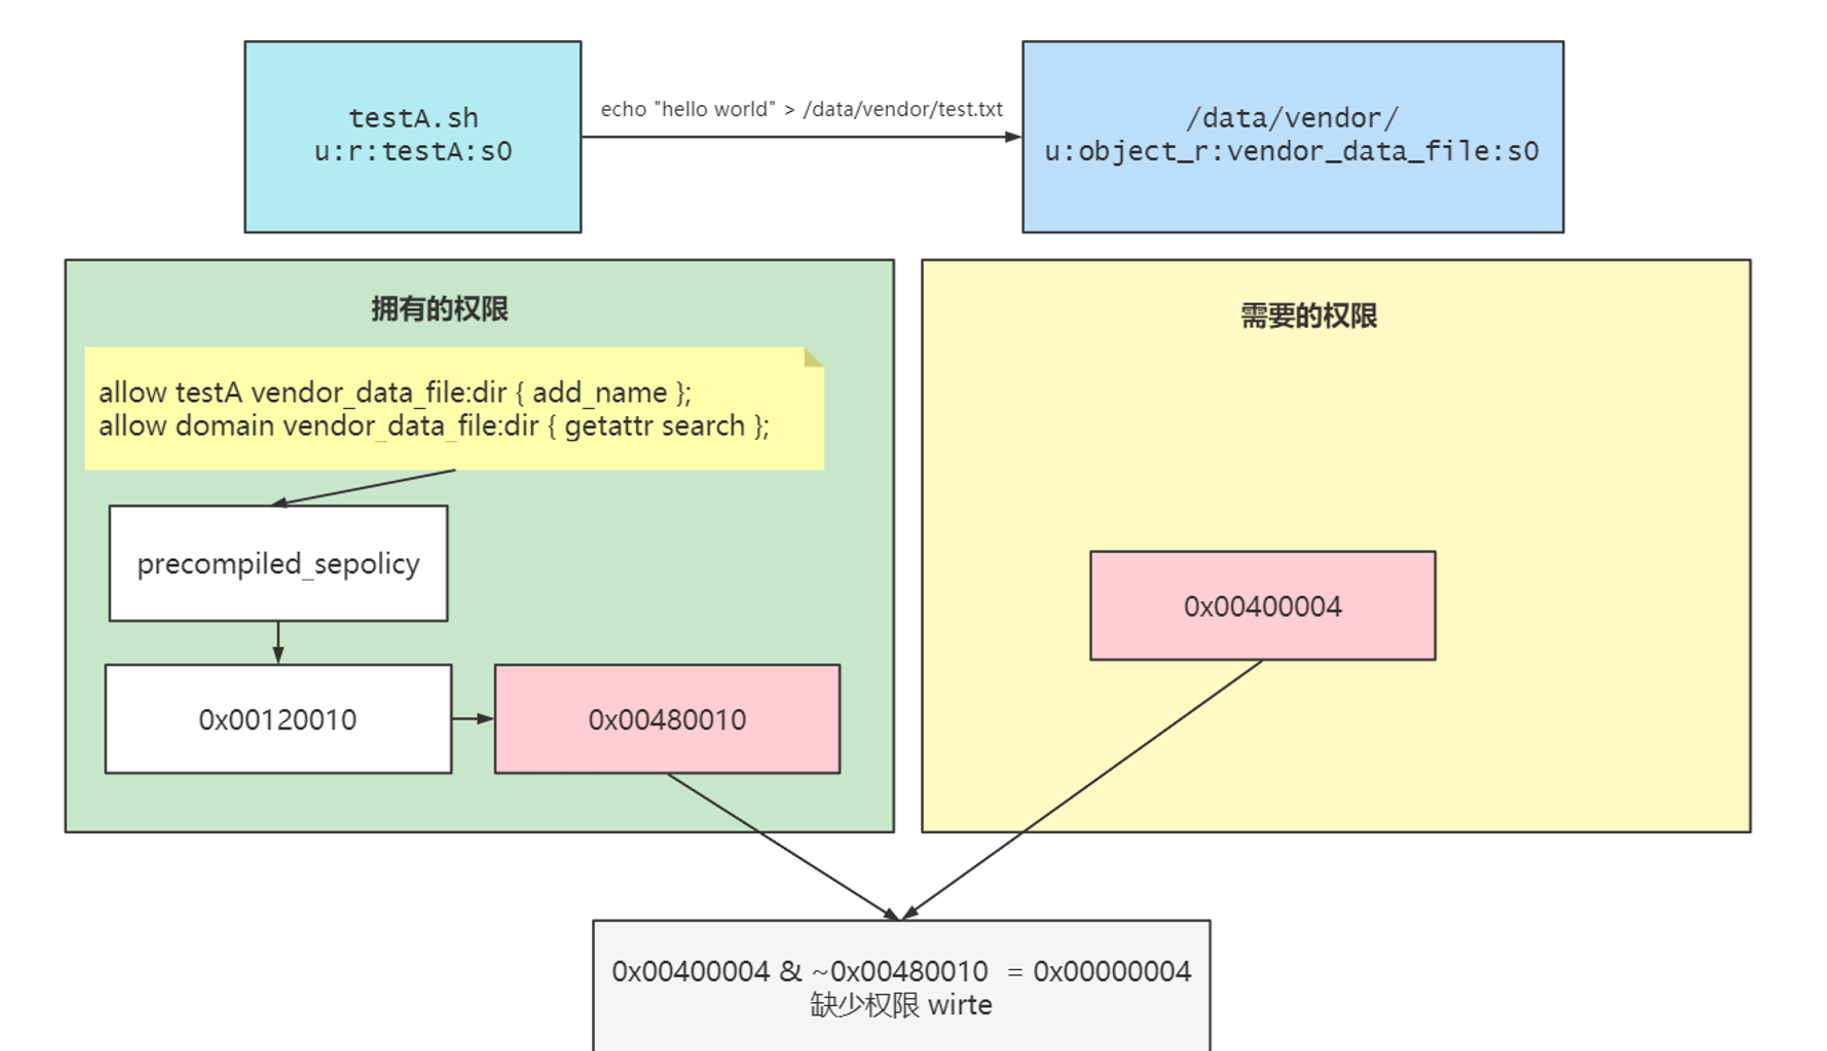
3.1.4其他
下面聊聊servicemanager里面一些权限的检查,这个是Android才有的,具体流程可以点击这里
我们在这直接看到svcmgr_handler
比较常看见的两个权限问题,find和add
 1case SVC_MGR_CHECK_SERVICE:
 2    s = bio_get_string16(msg, &len);
 3    if (s == NULL) {
 4        return -1;
 5    }
 6    handle = do_find_service(s, len, txn->sender_euid, txn->sender_pid);
 7    if (!handle)
 8        break;
 9    bio_put_ref(reply, handle);
10    return 0;
11
12case SVC_MGR_ADD_SERVICE:
13    s = bio_get_string16(msg, &len);
14    if (s == NULL) {
15        return -1;
16    }
17    handle = bio_get_ref(msg);
18    allow_isolated = bio_get_uint32(msg) ? 1 : 0;
19    dumpsys_priority = bio_get_uint32(msg);
20    if (do_add_service(bs, s, len, handle, txn->sender_euid, allow_isolated, dumpsys_priority,
21                       txn->sender_pid))
22        return -1;
23    break;
这里面的调用栈都会跑到kernel里面,和前面的分析都差不多的
1do_add_service -> svc_can_register -> check_mac_perms_from_lookup -> check_mac_perms ->
2selinux_check_access -> avc_has_perm -> avc_has_perm_noaudit
重点的这里的权限需要哪些,这个是在service_manager.c里面指定的
比如add 和 find :
 1static int svc_can_find(const uint16_t *name, size_t name_len, pid_t spid, uid_t uid)
 2{
 3    const char *perm = "find";
 4    return check_mac_perms_from_lookup(spid, uid, perm, str8(name, name_len)) ? 1 : 0;
 5}
 6
 7static int svc_can_register(const uint16_t *name, size_t name_len, pid_t spid, uid_t uid)
 8{
 9    const char *perm = "add";
10
11    if (multiuser_get_app_id(uid) >= AID_APP) {
12        return 0; /* Don't allow apps to register services */
13    }
14
15    return check_mac_perms_from_lookup(spid, uid, perm, str8(name, name_len)) ? 1 : 0;
16}
不过这里的打印不再是kernel log里面的了,而是logcat信息里面,那它的打印是怎么来的?
106-21 13:12:58.631 2832 2832 E SELinux : avc: denied { find } for service=activity pid=4138 uid=0 scontext=u:r:testA:s0 tcontext=u:object_r:activity_service:s0 tclass=service_manager permissive=1
在前面提到的avc_has_perm函数里面,还有一句
1rc2 = avc_audit(ssid, tsid, tclass, requested, &avd, rc, auditdata, 0);
/android/external/selinux/libselinux/src/avc.c
 1void avc_audit(security_id_t ssid, security_id_t tsid,
 2           security_class_t tclass, access_vector_t requested,
 3           struct av_decision *avd, int result, void *a)
 4{
 5    access_vector_t denied, audited;
 6
 7    denied = requested & ~avd->allowed;
 8    if (denied)
 9        audited = denied & avd->auditdeny;
10    else if (!requested || result)
11        audited = denied = requested;
12    else
13        audited = requested & avd->auditallow;
14    if (!audited)
15        return;
16#if 0
17    if (!check_avc_ratelimit())
18        return;
19#endif
20    /* prevent overlapping buffer writes */
21    avc_get_lock(avc_log_lock);
22    snprintf(avc_audit_buf, AVC_AUDIT_BUFSIZE,
23         "%s:  %s ", avc_prefix, (denied || !requested) ? "denied" : "granted");
24    avc_dump_av(tclass, audited);
25    log_append(avc_audit_buf, " for ");
26
27    /* get any extra information printed by the callback */
28    avc_suppl_audit(a, tclass, avc_audit_buf + strlen(avc_audit_buf),
29            AVC_AUDIT_BUFSIZE - strlen(avc_audit_buf));
30
31    log_append(avc_audit_buf, " ");
32    avc_dump_query(ssid, tsid, tclass);
33
34    if (denied)
35        log_append(avc_audit_buf, " permissive=%u", result ? 0 : 1);
36
37    log_append(avc_audit_buf, "\n");
38    avc_log(SELINUX_AVC, "%s", avc_audit_buf);
39
40    avc_release_lock(avc_log_lock);
41}
最后调用的是avc_log打印的,而这个其实这里是回调service_manager.c设置的callback函数
 1cb.func_audit = audit_callback;
 2selinux_set_callback(SELINUX_CB_AUDIT, cb);
 3cb.func_log = selinux_log_callback;
 4selinux_set_callback(SELINUX_CB_LOG, cb);
 5
 6
 7int selinux_log_callback(int type, const char *fmt, ...)
 8{
 9    va_list ap;
10    int priority;
11    char *strp;
12
13    switch(type) {
14    case SELINUX_WARNING:
15        priority = ANDROID_LOG_WARN;
16        break;
17    case SELINUX_INFO:
18        priority = ANDROID_LOG_INFO;
19        break;
20    default:
21        priority = ANDROID_LOG_ERROR;
22        break;
23    }
24
25    va_start(ap, fmt);
26    if (vasprintf(&strp, fmt, ap) != -1) {
27        LOG_PRI(priority, "SELinux", "%s", strp);
28        LOG_EVENT_STRING(AUDITD_LOG_TAG, strp);
29        free(strp);
30    }
31    va_end(ap);
32    return 0;
33}
关于Android里面的属性,也有相应的权限检查机制,有兴趣的可以看看相关代码~
3.2avc denied信息分析
kernel log中的avc denied来自于common_lsm_audit,还有函数avc_audit_pre_callback、avc_audit_post_callback,把avc denied的每一段信息拼接起来
最后是用printk打印到kernel log里面
kernelcode/security/selinux/avc.c
 1/* This is the slow part of avc audit with big stack footprint */
 2noinline int slow_avc_audit(u32 ssid, u32 tsid, u16 tclass,
 3        u32 requested, u32 audited, u32 denied, int result,
 4        struct common_audit_data *a,
 5        unsigned flags)
 6{
 7    ......
 8    common_lsm_audit(a, avc_audit_pre_callback, avc_audit_post_callback);
 9    return 0;
10}
下面针对几个关键的信息分析下
- { write } 缺失的权限,这个是本文讨论的核心部分
打印来自于函数 avc_dump_av (kernelcode/security/selinux/avc.c)
 1/**
 2 * avc_dump_av - Display an access vector in human-readable form.
 3 * @tclass: target security class
 4 * @av: access vector
 5 */
 6static void avc_dump_av(struct audit_buffer *ab, u16 tclass, u32 av)
 7{
 8    const char **perms;
 9    int i, perm;
10
11    if (av == 0) {
12        audit_log_format(ab, " null");
13        return;
14    }
15
16    BUG_ON(!tclass || tclass >= ARRAY_SIZE(secclass_map));
17    perms = secclass_map[tclass-1].perms;
18
19    audit_log_format(ab, " {");
20    i = 0;
21    perm = 1;
22    while (i < (sizeof(av) * 8)) {
23        if ((perm & av) && perms[i]) {
24            audit_log_format(ab, " %s", perms[i]);
25            av &= ~perm;
26        }
27        i++;
28        perm <<= 1;
29    }
30
31    if (av)
32        audit_log_format(ab, " 0x%x", av);
33
34    audit_log_format(ab, " }");
35}
分析avc_dump_av代码逻辑,其实就是在secclass_map数组里面找到权限对应的字符串,打印出来方便分析
和前面部分提到的内容是相关的
for pid=4021
进程ID
comm=“testA.sh”
进程的名称,但是这个字符串设计的是有长度限制的,所以经常看见一些apk的包名这里会打印不完整
1[ 5786.420602@3] type=1400 audit(1624264582.595:426): avc: denied { open } for pid=4686 comm="testA.launcher3" path="/proc/vmstat" dev="proc" ino=4026532002 scontext=u:r:untrusted_app:s0:c46,c256,c512,c768 tcontext=u:object_r:proc_vmstat:s0 tclass=file permissive=1
2
3实际上进程名是com.testA.launcher3
-
scontext=u:r:testA:s0 主体的安全上下文,这里就是脚本所在的进程testA.sh
-
tcontext=u:object_r:vendor_data_file:s0
被操作对象的安全上下文,这里是/data/vendor/目录的安全上下文,默认在这个目录下面创建的文件的安全上下文,都会继承这个父目录的安全上下文
-
tclass=dir 种类,dir是目录,file文件,这个也比较好理解
所以后面写te规则的时候,其实就是
1allow scontext tcontext:tclass perms;
2
3也就是:
4
5allow testA vendor_data_file:dir { write };
有个工具叫audit2allow,可以将报错信息自动生成te规则,其实讲实话我并不建议使用
首先,格式有要求,动不动转失败,还有转漏的;
其次,你都不清楚需要的权限是什么,就一顿操作,把所有报错信息都加上去了,可能加的一些权限和问题没有关联,结果还违反neverallow规则,改完以后根本追溯不了
我建议直接看log信息添加权限信息,结合SELinux的知识,添加的权限有理有据,也可以提升自己的能力
3.3调试
3.3.1快速编译和替换
3.3.1.1编译和替换
| 修改的内容 | 编译命令 | 替换方式 |
|---|---|---|
| *.te | make precompiled_sepolicy 或者 make selinux_policy | /vendor/etc/selinux/precompiled_sepolicy 或者 /odm/etc/selinux/precompiled_sepolicy |
| property_contexts | 可以直接板子上验证 | 直接到板子上改 /vendor/etc/selinux/vendor_property_contexts、 /system/etc/selinux/plat_property_contexts |
| file_contexts | 可以直接板子上验证 | 直接到板子上改 /vendor/etc/selinux/vendor_file_contexts、 /system/etc/selinux/plat_file_contexts |
| service_contexts | 可以直接板子上验证 | 直接到板子上改/vendor/etc/selinux/vendor_hwservice_contexts、/system/etc/selinux/plat_hwservice_contexts、/system/etc/selinux/plat_service_contexts |
有很多文章提到在Android 9.0上,编译策略文件要用make sepolicy然后替换/vendor/etc/selinux /system/etc/selinux 两个目录,其实这里是有问题的
1、make sepolicy之后,/vendor/etc/selinux /system/etc/selinux 目录下的产物是不会发生变化,因此替换整个目录是没有作用的(如果lunch的时候target发生变化,那也只是第一次会重新生成,后面再修改te也不会变)
2、system/sepolicy目录下, mma -j编译后,替换是可以的,因为这个相当于把android/system/sepolicy/Android.mk 的所有module都编译了一遍
讲讲由来:
从Android 8.0之后,因为Google project treble的影响,二进制策略文件不再是根目录的 /sepolicy (也就是make sepolicy 编译生成的产物 root/sepolicy)
而是 vendor/etc/selinux/precompiled_sepolicy (或者是odm/etc/selinux/precompiled_sepolicy)
相应的,编译的命令也有变化,修改了*.te,更正确的应该是使用make precompiled_sepolicy
生成 vendor/etc/selinux/precompiled_sepolicy 替换到板子即可 (如果存在odm分区,生成在 odm/etc/selinux/precompiled_sepolicy,替换到板子的路径也是对应的)
那make sepolicy和make precompiled_sepolicy 有什么区别?
编译出来的产物其实内容是一样的,但是生成路径不一样
之所以说有误解,是因为我们没有搞清楚真正要替换的是什么
make selinux_policy 我比较常使用,因为这个编译范围把需要的都编译了,在对应目录下的文件都会更新
这里还需要注意一下,修改/vendor 、 /system下面文件的安全上下文(在/vendor/etc/selinux/vendor_file_contexts、/system/etc/selinux/plat_file_contexts)时,
可能出现修改了没有生效的问题,要注意用restorecon命令恢复一下安全上下文,这些只读分区的文件是一开始编译的时候确定下来的,
所以会发现有些时候没有改成功,最关键的就是出现这些问题的时候,多用ls -Z、getprop -Z看看安全上下文
比如:
 1picasso:/ # ls -lZ /system/xbin/testB
 2-rwxr-xr-x 1 root shell u:object_r:system_file:s0 20380 2009-01-01 00:00 /system/xbin/testB
 3
 4修改了file_context
 5
 6picasso:/ # restorecon -R /system/xbin/testB
 7SELinux: Loaded file_contexts
 8picasso:/ #
 9picasso:/ # ls -lZ /system/xbin/testB
10-rwxr-xr-x 1 root shell u:object_r:testB_exec:s0 20380 2009-01-01 00:00 /system/xbin/testB
3.3.1.2load_policy
上面的方式在替换之后需要重启,开机会重新load新的二进制策略文件
还有一个命令也很方便:
load_policy
我们可以直接加载二进制策略文件
1load_policy /storage/xxxx/precompiled_sepolicy
不过只在本次开机才有效,重启就没有效果了,所以如果是开机过程的SELinux权限问题,还是得乖乖的替换文件
3.3.2尽量使用宏
对于一些文件和目录的操作,我们可以尽量使用宏
比如:
1allow testC vendor_data_file:dir { write add_name create getattr read setattr open remove_name rmdir };
2allow testC vendor_data_file:file { create read write open ioctl getattr lock append unlink setattr };
这里脚本的目的是要创建目录和文件
如果按我们现在的方式,等着系统一条一条的报权限问题,那这个过程会发现你得反复添加编译再替换到板子,很浪费时间
但其实可以直接添加下面的权限:
1allow testC vendor_data_file:dir create_dir_perms;
2allow testC vendor_data_file:file create_file_perms;
create_dir_perms和create_file_perms的定义在/android/system/sepolicy/public/global_macros
如果只是读取,那就直接用r_file_perms、r_dir_perms
使用宏会比较快的解决文件和目录相关的操作,这个也是遇到比较多的一种
还有一个宏定义的地方:
/android/system/sepolicy/public/te_macros
对于属性,通常用的是这两个
1get_prop(testC, system_prop)
2set_prop(testC, system_prop)
这里是有包含关系的,set_prop宏里面是包含了get_prop的,所以其实写了set_prop就不用写get_prop了
对于binder,这两个用的比较多
1binder_use
2binder_call
遇到一些权限问题的时候,可以先看看te_macros里面的,搜一搜,看看注释,会有很大帮助的
当然,还可以自定义宏,可以少写很多重复的规则,比如下面这个:
 1define(`testD_common_file_dir_r_perms', `
 2allow testD $1:file r_file_perms;
 3allow testD $1:dir r_dir_perms;
 4')
 5
 6然后使用:
 7testD_common_file_dir_r_perms(init)
 8testD_common_file_dir_r_perms(kernel)
 9testD_common_file_dir_r_perms(logd)
10testD_common_file_dir_r_perms(vold)
11testD_common_file_dir_r_perms(audioserver)
12testD_common_file_dir_r_perms(lmkd)
13testD_common_file_dir_r_perms(tee)
14testD_common_file_dir_r_perms(surfaceflinger)
15testD_common_file_dir_r_perms(hdmicecd)
16testD_common_file_dir_r_perms(hwservicemanager)
17testD_common_file_dir_r_perms(netd)
18testD_common_file_dir_r_perms(sdcardfs)
19testD_common_file_dir_r_perms(servicemanager)
3.3.3使用属性
如果出现下面这种一直报的同一类型和权限的 比如service_manager { find }
 1allow testD activity_service:service_manager { find };
 2allow testD package_service:service_manager { find };
 3allow testD window_service:service_manager { find };
 4allow testD meminfo_service:service_manager { find };
 5allow testD cpuinfo_service:service_manager { find };
 6allow testD mount_service:service_manager { find };
 7allow testD surfaceflinger_service:service_manager { find };
 8allow testD audioserver_service:service_manager { find };
 9allow testD secure_element_service:service_manager { find };
10allow testD contexthub_service:service_manager { find };
11allow testD netd_listener_service:service_manager { find };
12allow testD connmetrics_service:service_manager { find };
13allow testD bluetooth_manager_service:service_manager { find };
14allow testD imms_service:service_manager { find };
15allow testD cameraproxy_service:service_manager { find };
16allow testD slice_service:service_manager { find };
17allow testD media_projection_service:service_manager { find };
18allow testD crossprofileapps_service:service_manager { find };
19allow testD launcherapps_service:service_manager { find };
20allow testD shortcut_service:service_manager { find };
21allow testD media_router_service:service_manager { find };
22allow testD hdmi_control_service:service_manager { find };
23allow testD media_session_service:service_manager { find };
24allow testD restrictions_service:service_manager { find };
25allow testD graphicsstats_service:service_manager { find };
26allow testD dreams_service:service_manager { find };
27allow testD commontime_management_service:service_manager { find };
28allow testD network_time_update_service:service_manager { find };
29allow testD diskstats_service:service_manager { find };
30allow testD voiceinteraction_service:service_manager { find };
31allow testD appwidget_service:service_manager { find };
32allow testD backup_service:service_manager { find };
33allow testD trust_service:service_manager { find };
34allow testD voiceinteraction_service:service_manager { find };
35allow testD jobscheduler_service:service_manager { find };
36allow testD hardware_properties_service:service_manager { find };
37allow testD serial_service:service_manager { find };
38allow testD usb_service:service_manager { find };
39allow testD DockObserver_service:service_manager { find };
40allow testD audio_service:service_manager { find };
41allow testD wallpaper_service:service_manager { find };
42allow testD search_service:service_manager { find };
43allow testD country_detector_service:service_manager { find };
44allow testD location_service:service_manager { find };
45allow testD devicestoragemonitor_service:service_manager { find };
46allow testD notification_service:service_manager { find };
47allow testD updatelock_service:service_manager { find };
48allow testD system_update_service:service_manager { find };
49allow testD servicediscovery_service:service_manager { find };
50allow testD connectivity_service:service_manager { find };
51allow testD ethernet_service:service_manager { find };
52allow testD wifip2p_service:service_manager { find };
53allow testD wifiscanner_service:service_manager { find };
54allow testD wifi_service:service_manager { find };
55allow testD netpolicy_service:service_manager { find };
56allow testD netstats_service:service_manager { find };
57allow testD network_score_service:service_manager { find };
58allow testD textclassification_service:service_manager { find };
59allow testD textservices_service:service_manager { find };
60allow testD ipsec_service:service_manager { find };
61allow testD network_management_service:service_manager { find };
62allow testD clipboard_service:service_manager { find };
63allow testD statusbar_service:service_manager { find };
64allow testD device_policy_service:service_manager { find };
65allow testD deviceidle_service:service_manager { find };
66allow testD uimode_service:service_manager { find };
67allow testD lock_settings_service:service_manager { find };
68allow testD storagestats_service:service_manager { find };
69allow testD accessibility_service:service_manager { find };
70allow testD input_method_service:service_manager { find };
71allow testD pinner_service:service_manager { find };
72allow testD network_watchlist_service:service_manager { find };
73allow testD vr_manager_service:service_manager { find };
74allow testD input_service:service_manager { find };
可以找到这些type的共同点,也就是attribute
上面的可以简化为下面的,减去的哪些type是因为违反了neverallow规则的
1allow testD { service_manager_type -stats_service -incident_service -vold_service -netd_service -installd_service -dumpstate_service }:service_manager { find };
3.3.4setools工具
这个工具挺好用的,可以分析二进制策略文件,比如用于某些情况下判断权限是否加上了,可以点击下载setools3 工具
 1$ sesearch -A precompiled_sepolicy | grep kernel
 2allow kernel app_data_file:file read;
 3allow kernel asec_image_file:file read;
 4allow kernel binder_device:chr_file { append getattr ioctl lock map open read write };
 5allow kernel debugfs_mali:dir search;
 6allow kernel device:blk_file { create getattr setattr unlink };
 7allow kernel device:chr_file { create getattr setattr unlink };
 8allow kernel device:dir { add_name append create getattr ioctl lock map open read remove_name rmdir search write };
 9allow kernel file_contexts_file:file { getattr ioctl lock map open read };
10allow kernel hwbinder_device:chr_file { append getattr ioctl lock map open read write };
11allow kernel init:process { rlimitinh share siginh transition };
12allow kernel init_exec:file { execute getattr map open read relabelto };
13allow kernel kernel:cap_userns { sys_boot sys_nice sys_resource };
14allow kernel kernel:capability { mknod sys_boot sys_nice sys_resource };
15allow kernel kernel:dir { getattr ioctl lock open read search };
16allow kernel kernel:fd use;
17allow kernel kernel:fifo_file { append getattr ioctl lock map open read write };
18allow kernel kernel:file { append getattr ioctl lock map open read write };
19allow kernel kernel:lnk_file { getattr ioctl lock map open read };
20allow kernel kernel:process { fork getattr getcap getpgid getsched getsession setcap setpgid setrlimit setsched sigchld sigkill signal signull sigstop };
21allow kernel kernel:security setcheckreqprot;
22......
4CTS neverallow处理
4.1一些权限的解决方案
4.1.1区分vendor域和system域
按照以往的经验,我们在Android P上添加客制化的脚本,还是喜欢用 #!/system/bin/sh
但是自从Android 8.0的Treble Project之后,vendor和system已经开始分离了,vendor下面的脚本要使用 #!/vendor/bin/sh,这样能减少很多权限问题
举个例子:
/vendor/bin/testA.sh
1#!/system/bin/sh
2
3...
然后运行的时候会报下面的权限问题
1[  973.048826@1]- type=1400 audit(1619667483.432:167): avc: denied { read execute } for pid=4368 comm="testA.sh"
2path="/system/bin/sh" dev="mmcblk0p17" ino=1073 scontext=u:r:testA:s0 tcontext=u:object_r:shell_exec:s0 tclass=file permissive=0
这个时候如果直接在te里面添加权限:
1allow testA shell_exec:file { read execute };
添加完之后就会发现违反了neverallow规则
1FAILED: out/target/product/xxxxx/obj/ETC/sepolicy_neverallows_intermediates/sepolicy_neverallows
2/bin/bash -c "(rm -f out/target/product/xxxxx/obj/ETC/sepolicy_neverallows_intermediates/sepolicy_neverallows ) && (ASAN_OPTIONS=detect_leaks=0 out/host/linux-x86/bin/checkpolicy -M -c               30 -o out/target/product/xxxxx/obj/ETC/sepolicy_neverallows_intermediates/sepolicy_neverallows out/target/product/xxxxx/obj/ETC/sepolicy_neverallows_intermediates/policy.conf )"
3libsepol.report_failure: neverallow on line 1047 of system/sepolicy/public/domain.te (or line 11499 of policy.conf) violated by allow testA shell_exec:file { execute };
4libsepol.check_assertions: 1 neverallow failures occurred
5Error while expanding policy
6out/host/linux-x86/bin/checkpolicy:  loading policy configuration from out/target/product/xxxxx/obj/ETC/sepolicy_neverallows_intermediates/policy.conf
7ninja: build stopped: subcommand failed.
811:42:19 ninja failed with: exit status 1
原因在domain.te的注释里面说的很清楚了,vendor的组件不允许直接运行system的file
1full_treble_only(`
2    # Do not allow vendor components to execute files from system
3    # except for the ones whitelist here.
4    neverallow {
修改脚本为:
1#!/vendor/bin/sh
2
3...
可以解决上述问题
但是改完之后,有些在/system/bin/ 下的命令就用不了,比如pm、am、logcat这些Android才有的命令,而不是在toybox里面的
如果实在要用,可以这样操作:
1#!/vendor/bin/sh
2
3am broadcast -a com.test.broadcast.toast -e Message "hello world" > /dev/picasso
4
5直接运行也会报错
6picasso:/ # /vendor/bin/testA.sh[3]: am: not found
可以修改成:
1/system/bin/cmd activity broadcast -a com.test.broadcast.toast -e Message "hello world" > /dev/picasso
te里面要补充关联上属性: vendor_executes_system_violators
1type testA, domain, vendor_executes_system_violators;
4.1.2setenforce的可行性
这个肯定是没有办法解决的,如果随便一个脚本都可以拥有关闭SELinux的权限,那还得了
在userdebug和eng版本上,可以先这样debug搞:
添加permissive testA;
对testA type以permissive状态运行
不过只能在eng和userdebug版本下才能用
1type testA, coredomain, domain, mlstrustedsubject;
2type testA_exec, exec_type, file_type;
3
4permissive testA;
5
6init_daemon_domain(testA)
要过CTS,这个权限可是天敌啊,主要就是有些功能想做的事情太多,权限太大,搞得非得要临时关闭SELinux来处理
跟着代码实现,不难发现setenforce命令的操作其实就是写节点/sys/fs/selinux/enforce
结合前面提到的权限检查原理,很快可以发现,这个权限就是我们无法绕过的根本原因了
 1static ssize_t sel_write_enforce(struct file *file, const char __user *buf,
 2                 size_t count, loff_t *ppos)
 3
 4{
 5    ......
 6        length = task_has_security(current, SECURITY__SETENFORCE);
 7        if (length)
 8            goto out;
 9    ......
10}
这个权限检查就是后面报avc denied的地方了
1allow testA kernel:security { setenforce };
对应的neverallow规则如下:
1# Only init prior to switching context should be able to set enforcing mode.
2# init starts in kernel domain and switches to init domain via setcon in
3# the init.rc, so the setenforce occurs while still in kernel. After
4# switching domains, there is never any need to setenforce again by init.
5neverallow * kernel:security setenforce;
6neverallow { domain -kernel } kernel:security setcheckreqprot;
这儿有个不是办法的办法:就是不影响现有命令的基础上,新增了一个节点,然后直接不做权限检查
 1diff --git a/security/selinux/selinuxfs.c b/security/selinux/selinuxfs.c
 2index 72c145dd799f..b2332f55415c 100644
 3--- a/security/selinux/selinuxfs.c
 4+++ b/security/selinux/selinuxfs.c
 5@@ -100,6 +100,7 @@ enum sel_inos {
 6        SEL_ROOT_INO = 2,
 7        SEL_LOAD,       /* load policy */
 8        SEL_ENFORCE,    /* get or set enforcing status */
 9+       SEL_ENABLE,     /* get or set enforcing status */
10        SEL_CONTEXT,    /* validate context */
11        SEL_ACCESS,     /* compute access decision */
12        SEL_CREATE,     /* compute create labeling decision */
13@@ -193,6 +194,57 @@ static const struct file_operations sel_enforce_ops = {
14        .llseek         = generic_file_llseek,
15 };
16
17+#ifdef CONFIG_SECURITY_SELINUX_DEVELOP
18+static ssize_t sel_write_enable(struct file *file, const char __user *buf,
19+                size_t count, loff_t *ppos)
20+
21+{
22+    char *page = NULL;
23+    ssize_t length;
24+    int new_value;
25+
26+    if (count >= PAGE_SIZE)
27+        return -ENOMEM;
28+
29+    /* No partial writes. */
30+    if (*ppos != 0)
31+        return -EINVAL;
32+
33+    page = memdup_user_nul(buf, count);
34+    if (IS_ERR(page))
35+        return PTR_ERR(page);
36+
37+    length = -EINVAL;
38+    if (sscanf(page, "%d", &new_value) != 1)
39+        goto out;
40+
41+    if (new_value != selinux_enforcing) {
42+        audit_log(current->audit_context, GFP_KERNEL, AUDIT_MAC_STATUS,
43+            "enforcing=%d old_enforcing=%d auid=%u ses=%u",
44+            new_value, selinux_enforcing,
45+            from_kuid(&init_user_ns, audit_get_loginuid(current)),
46+            audit_get_sessionid(current));
47+        selinux_enforcing = new_value;
48+        if (selinux_enforcing)
49+            avc_ss_reset(0);
50+        selnl_notify_setenforce(selinux_enforcing);
51+        selinux_status_update_setenforce(selinux_enforcing);
52+    }
53+    length = count;
54+out:
55+    kfree(page);
56+    return length;
57+}
58+#else
59+#define sel_write_enable NULL
60+#endif
61+
62+static const struct file_operations sel_enable_ops = {
63+    .read       = sel_read_enforce,
64+    .write      = sel_write_enable,
65+    .llseek     = generic_file_llseek,
66+};
67+
68 static ssize_t sel_read_handle_unknown(struct file *filp, char __user *buf,
69                                        size_t count, loff_t *ppos)
70 {
71@@ -1790,6 +1842,7 @@ static int sel_fill_super(struct super_block *sb, void *data, int silent)
72        static struct tree_descr selinux_files[] = {
73                [SEL_LOAD] = {"load", &sel_load_ops, S_IRUSR|S_IWUSR},
74                [SEL_ENFORCE] = {"enforce", &sel_enforce_ops, S_IRUGO|S_IWUSR},
75+               [SEL_ENABLE] = {"enable", &sel_enable_ops, S_IRUGO|S_IWUSR},
76                [SEL_CONTEXT] = {"context", &transaction_ops, S_IRUGO|S_IWUGO},
77                [SEL_ACCESS] = {"access", &transaction_ops, S_IRUGO|S_IWUGO},
78                [SEL_CREATE] = {"create", &transaction_ops, S_IRUGO|S_IWUGO},
然后开关就用:
关SELinux
1echo 0 > /sys/fs/selinux/enable
开SELinux
1echo 1 > /sys/fs/selinux/enable
权限还得补一下:
1allow testA selinuxfs:file rw_file_perms;
2selinux_check_access(testA)
相比setenforce,差异就是去掉了权限检查,开了一个后门,比较bug的存在
4.1.3dac_override 解决办法
谷歌官方文档的一段话总结的很精辟
授予dac_override权能
dac-override拒绝事件意味着违规进程正在尝试使用错误的unix user/group/world权限访问某个文件。正确的解决方案几乎从不授予dac-override权限,而是更改相应文件或进程的unix权限。有些网域(例如init、vold和installd)确实需要能够蓄换unix文件权限才能访问其他进程的文件。如需查看更深入的讲解,请访问Dan Walsh的博客。
关于解决selinux dac_override/dac_read_search问题,有一个固定思路,可以点击这里
比如修改group的:
未修改前:
1service testA /system/bin/testA.sh -start
2    user root
3    group root
4    disabled
5    oneshot
6    seclabel u:r:testA:s0
修改后:
1service testA /system/bin/testA.sh -start
2    user root
3    group root system
4    disabled
5    oneshot
6    seclabel u:r:testA:s0
大部分情况下,我们可以直接ls -l 查看要访问的文件或者目录的user 和 group
但是有些情况下,我们很难搞清楚访问的文件或者目录所在的group是哪个,这些信息在avc denied里面是不会有的
可以在kernel中补充这些代码,打印出来
patch:
 1kernelcode$ git diff .
 2diff --git a/fs/namei.c b/fs/namei.c
 3index a5a05d3..9b8f0da 100644
 4--- a/fs/namei.c
 5+++ b/fs/namei.c
 6@@ -39,6 +39,8 @@
 7 #include <linux/init_task.h>
 8 #include <asm/uaccess.h>
 9
10+#include <linux/printk.h>
11+
12 #include "internal.h"
13 #include "mount.h"
14
15@@ -341,8 +343,12 @@ int generic_permission(struct inode *inode, int mask)
16
17        if (S_ISDIR(inode->i_mode)) {
18                /* DACs are overridable for directories */
19-               if (capable_wrt_inode_uidgid(inode, CAP_DAC_OVERRIDE))
20-                       return 0;
21+        if (capable_wrt_inode_uidgid(inode, CAP_DAC_OVERRIDE)) {
22+            return 0;
23+        } else {
24+            pr_err("dac_override(dir) denied for cap=%3o inode=%lu with uid=%u gid=%u\n",
25+                mask&0777, inode->i_ino, inode->i_uid.val, inode->i_gid.val);
26+        }
27                if (!(mask & MAY_WRITE))
28                        if (capable_wrt_inode_uidgid(inode,
29                                                     CAP_DAC_READ_SEARCH))
30@@ -354,9 +360,17 @@ int generic_permission(struct inode *inode, int mask)
31         * Executable DACs are overridable when there is
32         * at least one exec bit set.
33         */
34-       if (!(mask & MAY_EXEC) || (inode->i_mode & S_IXUGO))
35-               if (capable_wrt_inode_uidgid(inode, CAP_DAC_OVERRIDE))
36-                       return 0;
37+       // if (!(mask & MAY_EXEC) || (inode->i_mode & S_IXUGO))
38+       //      if (capable_wrt_inode_uidgid(inode, CAP_DAC_OVERRIDE))
39+    /* IXUGO = (S_IXUSR|S_IXGRP|S_IXOTH) */
40+    if (!(mask & MAY_EXEC) || (inode->i_mode & S_IXUGO)) {
41+        if (capable_wrt_inode_uidgid(inode, CAP_DAC_OVERRIDE)) {
42+            return 0;
43+        } else {
44+            pr_err("dac_override(file) denied for cap=%3o inode=%lu with uid=%u gid=%u\n",
45+                mask&0777, inode->i_ino, inode->i_uid.val, inode->i_gid.val);
46+        }
47+    }
48
49
50diff --git a/security/selinux/avc.c b/security/selinux/avc.c
51index e60c79d..9b1dfad 100644
52--- a/security/selinux/avc.c
53+++ b/security/selinux/avc.c
54@@ -734,7 +734,11 @@ static void avc_audit_post_callback(struct audit_buffer *ab, void *a)
55        if (ad->selinux_audit_data->denied) {
56                audit_log_format(ab, " permissive=%u",
57                                 ad->selinux_audit_data->result ? 0 : 1);
58-       }
59+        if (ad->u.cap == 1) {
60+            audit_log_format(ab, " cap=dac_override, dumping stack");
61+            WARN_ON(ad->u.cap == 1);
62+        }
63+    }
64 }
65
66 /* This is the slow part of avc audit with big stack footprint */
打印信息如下:
 1[   44.952920@0]- ------------[ cut here ]------------
 2[   44.952983@0]- WARNING: CPU: 0 PID: 3901 at :739 avc_audit_post_callback+0x180/0x184
 3[   44.961323@0]- Modules linked in: hardware_dmx(O) jpegenc(O) amvdec_av1(O) amvdec_mavs(O) encoder(O) amvdec_avs2(O) amvdec_vp9(O) amvdec_vc1(O) amvdec_real(O) amvdec_mmpeg4(O) amvdec_mpeg4(O) amvdec_mmpeg12(O) amvdec_mpeg12(O) amvdec_mmjpeg(O) amvdec_mjpeg(O) amvdec_h265(O) amvdec_h264mvc(O) amvdec_mh264(O) amvdec_h264(O) amvdec_avs(O) stream_input(O) decoder_common(O) video_framerate_adapter(O) firmware(O) media_clock(O) tb_detect(PO) mali(O) dnlp_alg(P)
 4[   45.000226@0]d CPU: 0 PID: 3901 Comm: cmd Tainted: P        W  O    4.9.113 #20
 5[   45.007459@0]d Hardware name: Generic DT based system
 6[   45.012491@0]d [bc4afac4+  16][<c020dc10>] show_stack+0x20/0x24
 7[   45.018343@0]d [bc4afae4+  32][<c054394c>] dump_stack+0x90/0xac
 8[   45.024201@0]d [bc4afb14+  48][<c0228724>] __warn+0x104/0x11c
 9[   45.029897@0]d [bc4afb2c+  24][<c022880c>] warn_slowpath_null+0x30/0x38
10[   45.036456@0]d [bc4afb5c+  48][<c04d4fec>] avc_audit_post_callback+0x180/0x184
11[   45.043606@0]d [bc4afbb4+  88][<c04f20e0>] common_lsm_audit+0x260/0x7c0
12[   45.050165@0]d [bc4afbfc+  72][<c04d5994>] slow_avc_audit+0x9c/0xb0
13[   45.056376@0]d [bc4afc64+ 104][<c04da364>] cred_has_capability+0x118/0x124
14[   45.063184@0]d [bc4afc74+  16][<c04da3f0>] selinux_capable+0x38/0x3c
15[   45.069483@0]d [bc4afc9c+  40][<c04d1370>] security_capable+0x4c/0x68
16[   45.075870@0]d [bc4afcac+  16][<c0233d58>] ns_capable_common+0x7c/0x90
17[   45.082336@0]d [bc4afcc4+  24][<c0233e00>] capable_wrt_inode_uidgid+0x28/0x54
18[   45.089409@0]d [bc4afcf4+  48][<c03a5abc>] generic_permission+0x100/0x208
19[   45.096138@0]d [bc4afd14+  32][<c0414df0>] kernfs_iop_permission+0x58/0x64
20[   45.102951@0]d [bc4afd34+  32][<c03a5c84>] __inode_permission2+0xc0/0xf0
21[   45.109589@0]d [bc4afd44+  16][<c03a5cfc>] inode_permission2+0x20/0x54
22[   45.116057@0]d [bc4afd8c+  72][<c0396fb4>] SyS_faccessat+0xec/0x220
23[   45.122273@0]d [00000000+   0][<c02085c0>] ret_fast_syscall+0x0/0x48
24[   45.128879@0]s DI: DI: tasklet schedule cost 128ms.
25[   45.133835@0]- ---[ end trace 40474d395a0d6c86 ]---
26[   45.138462@0]- dac_override(file) denied for cap= 22 inode=5 with uid=1000 gid=1000
27[   45.138640@1]- type=1400 audit(1620051338.180:75): avc: denied { dac_override } for pid=3900 comm="cmd" capability=1 scontext=u:r:testA:s0 tcontext=u:r:testA:s0 tclass=capability permissive=0 cap=dac_override, dumping stack
打印的gid在 system/core/include/private/android_filesystem_config.h 里面查找,就知道init.rc里面要加什么了
4.1.4echo打印到终端
1#echo "test" > /dev/picasso
2allow testA picasso_device:chr_file rw_file_perms;
4.1.5读写U盘内容
读U盘:
1allow testA mnt_media_rw_file:dir { search read open };
2allow testA vfat:file r_file_perms;
3allow testA vfat:dir r_dir_perms;
要写和创建的话,权限给大一点就行了:
1allow testA mnt_media_rw_file:dir { search read open };
2allow testA vfat:dir create_dir_perms;
3allow testA vfat:file create_file_perms;
4.1.6am 命令
1allow testA activity_service:service_manager { find };
2allow testA system_server:binder { call transfer };
3binder_use(testA)
4binder_call(system_server, testA)
pm命令同理
4.1.7ioctl
1[ 57.670632] type=1400 audit(1623998437.166:9): avc: denied { ioctl } for pid=4285 comm="Thread-43" path="socket:[30690]" dev="sockfs" ino=30690 ioctlcmd=0x8927 scontext=u:r:untrusted_app_25:s0:c512,c768 tcontext=u:r:untrusted_app_25:s0:c512,c768 tclass=tcp_socket permissive=0
ioctl有少许不一样,Andrid o之后有所变化
ioctlGoogle在Android Q上增强了对ioctl的审查,除保持对ioctl的审查/授权之外,对具体的ioctlcmd也需要进一步地审查/授权。具体可以点击这里解决方案。
1//kernel/security/selinux/hooks.c
2...
3error = ioctl_has_perm(cred, file, FILE__IOCTL, (u16) cmd);
对于这样的一条avc log:
1avc: denied { ioctl } for comm="BootAnimation" path="/proc/ged" dev="proc" ino=4026532249 ioctlcmd=0x6700 scontext=u:r:bootanim:s0 tcontext=u:object_r:proc_ged:s0 tclass=file permissive=0在Android Q上,则需要:
1allow bootanim proc_ged:file ioctl;
2allowxperm bootanim proc_ged:file ioctl 0x6700;
0x6700 即log中的ioctlcmd。
0x6700这个值一般在sepolicy目录下的ioctl_defines文件中配置。所以在Q上,上述log最终:
1ioctl_defines#
2define(`GED_BRIDGE_IO_LOG_BUF_GET', `0x6700')
3
4bootanim.te#
5allow bootanim proc_ged:file ioctl;
6allowxperm bootanim proc_ged:file ioctl GED_BRIDGE_IO_LOG_BUF_GET;
1allow untrusted_app_25 self:udp_socket ioctl;
2allowxperm untrusted_app_25 self:udp_socket ioctl SIOCGIFHWADDR;
3
4两句都要添加上,缺一不可
4.2常见违反neverallow规则的解决方案
4.2.1指定文件、属性、服务的安全上下文,避免权限放大
这一类neverallow规则,其实搞明白为什么要这么做,是很容易解决的
有一个系统属性persist.sys.test
1picasso:/data # getprop -Z persist.sys.test
2u:object_r:system_prop:s0
假如你想要设置这个属性,加了一个权限
1set_prop(testA, system_prop)
结果一编译就违反neverallow规则了,这是为什么?
因为没有特别指定,persist.sys.开头的属性,它的安全上下问题都是u:object_r:system_prop:s0
1//android/system/sepolicy/private/property_contexts
2
3persist.sys.            u:object_r:system_prop:s0
一旦你给了这个权限,意味着你可以设置的属性不仅仅是persist.sys.test了,还可以是persist.sys.A、persist.sys.B 等等
这就是权限放大,neverallow规则的限定,就是为了不给你这么玩
我们要做的就是,指定文件、属性、服务的安全上下文,收缩权限
下面有一些例子:
4.2.1.1testNeverallowRules131 解决方案
 1<Test result="fail" name="testNeverallowRules131">
 2        <Failure message="junit.framework.AssertionFailedError: The following errors were encountered when validating the SELinuxneverallow rule:">
 3          <StackTrace>junit.framework.AssertionFailedError: The following errors were encountered when validating the SELinuxneverallow rule:
 4neverallow { domain -kernel -init -recovery } block_device:blk_file { open read write };
 5libsepol.report_failure: neverallow violated by allow testA block_device:blk_file { read write open };
 6libsepol.check_assertions: 1 neverallow failures occurred
 7
 8</StackTrace>
 9        </Failure>
10      </Test>
testA是因为要操作 /dev/block/testblock
1picasso:/ # ls -lZ /dev/block/testblock
2brw------- 1 root root u:object_r:block_device:s0 179,   5 1970-01-01 08:00 /dev/block/testblock
给这个testblock block指定type,不然就会有权限放大的问题
1//sepolicy/device.te
2type testblock_device, dev_type;
3
4sepolicy/file_contexts
5/dev/block/testblock                 u:object_r:testblock_device:s0
接着allow语句修改为:
1allow testA testblock_device:blk_file { read write open };
4.2.1.2testNeverallowRules198 解决方案
 1<Test result="fail" name="testNeverallowRules198">
 2        <Failure message="junit.framework.AssertionFailedError: The following errors were encountered when validating the SELinuxneverallow rule:">
 3          <StackTrace>junit.framework.AssertionFailedError: The following errors were encountered when validating the SELinuxneverallow rule:
 4neverallow {      domain      -coredomain      -appdomain       -data_between_core_and_vendor_violators       -socket_between_core_and_vendor_violators      -vendor_init    } {      coredomain_socket      core_data_file_type      unlabeled     }:sock_file ~{ append getattr ioctl read write };
 5libsepol.report_failure: neverallow violated by allow testA property_socket:sock_file { open };
 6libsepol.check_assertions: 1 neverallow failures occurred
 7
 8</StackTrace>
 9        </Failure>
10      </Test>
查脚本,看设置的是哪个属性,然后把这个属性的安全上下文指定到我们自定义的上面去
1//sepolicy/property_contexts
2sys.testA.finish            u:object_r:test_prop:s0
3
4sepolicy/testA.te
5set_prop(testA, test_prop)
4.2.1.3testNeverallowRules154 解决方案
 1<Test result="fail" name="testNeverallowRules154">
 2        <Failure message="junit.framework.AssertionFailedError: The following errors were encountered when validating the SELinuxneverallow rule:">
 3          <StackTrace>junit.framework.AssertionFailedError: The following errors were encountered when validating the SELinuxneverallow rule:
 4neverallow * default_android_service:service_manager add;
 5libsepol.report_failure: neverallow violated by allow testA default_android_service:service_manager { add };
 6libsepol.check_assertions: 1 neverallow failures occurred
 7
 8</StackTrace>
 9        </Failure>
10      </Test>
首先这个违反的neverallow规则如下,禁止所有的进程添加default_android_service类型的service_manager
1neverallow * default_android_service:service_manager add;
先看看之前的解决方案:
sepolicy/service_contexts
1添加
2test.service                               u:object_r:test_service:s0
service.te:
1添加
2type test_service,    app_api_service, system_server_service, service_manager_type;
testA.te 里面如下:
1allow testA default_android_service:service_manager { add };
然后再把neverallow规则干掉,神挡杀神,佛挡杀佛
1neverallow { domain -testA } default_android_service:service_manager add;
看到这里,比较疑惑的点是service_contexts和service.te,和普通文件一样,service也是可以给它定义一个新的type
但是定义了这个test_service type之后,没有生效?
从报错的信息来看,test.service的type依然还是default_android_service,这是为何?
106-10 08:50:30.172 3062 3062 E SELinux : avc: denied { add } for service=test.service pid=4707 uid=0 scontext=u:r:testA:s0 tcontext=u:object_r:default_android_service:s0 tclass=service_manager permissive=0
这时,我们查看 /system/etc/selinux/plat_service_contexts 里面的内容,发现我们添加的test.service 压根就不在里面,难怪不会生效
在板卡上直接修改添加,重启之后,就会发现报错已经变成了这样了:
106-10 08:55:15.748 3062 3062 E SELinux : avc: denied { add } for service=test.service pid=4732 uid=0 scontext=u:r:testA:s0 tcontext=u:object_r:test_service:s0 tclass=service_manager permissive=0
接下来再添加权限就行了,这个时候就不会违反neverallow规则
透过现象看本质,为什么会导致这个问题呢?
原因要从编译出plat_service_contexts那里说起,回到/android/system/sepolicy/Android.mk
 1include $(CLEAR_VARS)
 2
 3LOCAL_MODULE := plat_service_contexts
 4LOCAL_MODULE_CLASS := ETC
 5LOCAL_MODULE_TAGS := optional
 6ifeq ($(PRODUCT_SEPOLICY_SPLIT),true)
 7LOCAL_MODULE_PATH := $(TARGET_OUT)/etc/selinux
 8else
 9LOCAL_MODULE_PATH := $(TARGET_ROOT_OUT)
10endif
11
12include $(BUILD_SYSTEM)/base_rules.mk
13
14plat_svcfiles := $(call build_policy, service_contexts, $(PLAT_PRIVATE_POLICY))
15
16plat_service_contexts.tmp := $(intermediates)/plat_service_contexts.tmp
17$(plat_service_contexts.tmp): PRIVATE_SVC_FILES := $(plat_svcfiles)
18$(plat_service_contexts.tmp): PRIVATE_ADDITIONAL_M4DEFS := $(LOCAL_ADDITIONAL_M4DEFS)
19$(plat_service_contexts.tmp): $(plat_svcfiles)
20    @mkdir -p $(dir $@)
21    $(hide) m4 -s $(PRIVATE_ADDITIONAL_M4DEFS) $(PRIVATE_SVC_FILES) > $@
22
23$(LOCAL_BUILT_MODULE): PRIVATE_SEPOLICY := $(built_sepolicy)
24$(LOCAL_BUILT_MODULE): $(plat_service_contexts.tmp) $(built_sepolicy) $(HOST_OUT_EXECUTABLES)/checkfc $(ACP)
25    @mkdir -p $(dir $@)
26    sed -e 's/#.*$$//' -e '/^$$/d' $< > $@
27    $(HOST_OUT_EXECUTABLES)/checkfc -s $(PRIVATE_SEPOLICY) $@
28
29built_plat_svc := $(LOCAL_BUILT_MODULE)
30plat_svcfiles :=
31plat_service_contexts.tmp :=
mk里面搜索的目录是PLAT_PRIVATE_POLICY,前面有提过,这个目录是/android/system/sepolicy/private 以及 BOARD_PLAT_PRIVATE_SEPOLICY_DIR 所组成的,所以device厂商下面的sepolicy/service_contexts 没有用到
解决办法很简单:
1首先指定拓展的私有目录 BOARD_PLAT_PRIVATE_SEPOLICY_DIR
2BOARD_PLAT_PRIVATE_SEPOLICY_DIR += \
3    xxxx/sepolicy/private
4
5然后添加:
6xxxx/sepolicy/private/service_contexts
7
8内容为:
9test.service                               u:object_r:test_service:s0
编译selinux_policy,就可以看到这个context被追加到plat_service_contexts了
还有,在这个地方添加的service_contexts,并不是所有情况都没有作用
看看这两段mk:
 1# Include precompiled policy, unless told otherwise
 2ifneq ($(PRODUCT_PRECOMPILED_SEPOLICY),false)
 3LOCAL_REQUIRED_MODULES += precompiled_sepolicy precompiled_sepolicy.plat_and_mapping.sha256
 4endif
 5else
 6# The following files are only allowed for non-Treble devices.
 7LOCAL_REQUIRED_MODULES += \
 8    sepolicy \
 9    vendor_service_contexts
10endif
vendor_service_contexts
 1include $(CLEAR_VARS)
 2
 3LOCAL_MODULE := vendor_service_contexts
 4LOCAL_MODULE_CLASS := ETC
 5LOCAL_MODULE_TAGS := optional
 6LOCAL_MODULE_PATH := $(TARGET_ROOT_OUT)
 7
 8include $(BUILD_SYSTEM)/base_rules.mk
 9
10vendor_svcfiles := $(call build_policy, service_contexts, $(PLAT_VENDOR_POLICY) $(BOARD_VENDOR_SEPOLICY_DIRS) $(REQD_MASK_POLICY))
11
12vendor_service_contexts.tmp := $(intermediates)/vendor_service_contexts.tmp
13$(vendor_service_contexts.tmp): PRIVATE_SVC_FILES := $(vendor_svcfiles)
14$(vendor_service_contexts.tmp): PRIVATE_ADDITIONAL_M4DEFS := $(LOCAL_ADDITIONAL_M4DEFS)
15$(vendor_service_contexts.tmp): $(vendor_svcfiles)
16    @mkdir -p $(dir $@)
17    $(hide) m4 -s $(PRIVATE_ADDITIONAL_M4DEFS) $(PRIVATE_SVC_FILES) > $@
18
19$(LOCAL_BUILT_MODULE): PRIVATE_SEPOLICY := $(built_sepolicy)
20$(LOCAL_BUILT_MODULE): $(vendor_service_contexts.tmp) $(built_sepolicy) $(HOST_OUT_EXECUTABLES)/checkfc $(ACP)
21    @mkdir -p $(dir $@)
22    sed -e 's/#.*$$//' -e '/^$$/d' $< > $@
23    $(hide) $(HOST_OUT_EXECUTABLES)/checkfc -s $(PRIVATE_SEPOLICY) $@
24
25built_vendor_svc := $(LOCAL_BUILT_MODULE)
26vendor_svcfiles :=
27vendor_service_contexts.tmp :=
28
29endif
注释很清楚,也就是说在非treble的设备上,上面路径的service_contexts会编译到vendor_service_contexts里面;如果要生效,就得把它加到private的拓展目录
4.2.1.4testNeverallowRules252 解决方案
1<Test result="fail" name="testNeverallowRules252">
2        <Failure message="junit.framework.AssertionFailedError: The following errors were encountered when validating the SELinuxneverallow rule:">
3          <StackTrace>junit.framework.AssertionFailedError: The following errors were encountered when validating the SELinuxneverallow rule:
4neverallow { domain -init -vendor_init -system_server -dumpstate } debugfs:file { { append create link unlink relabelfrom rename setattr write } open read ioctl lock };
5libsepol.report_failure: neverallow violated by allow mediaserver debugfs:file { read open };
6libsepol.report_failure: neverallow violated by allow hal_memtrack_default debugfs:file { read open };
7libsepol.check_assertions: 2 neverallow failures occurred
报错信息如下:
1[ 818.411706@1] type=1400 audit(1623295203.581:48): avc: denied { read } for pid=3147 comm="HwBinder:3147_3" name="test_en" dev="debugfs" ino=377 scontext=u:r:mediaserver:s0 tcontext=u:object_r:debugfs:s0 tclass=file permissive=0
拿其中mediaserver的来分析,查找修改记录,很快就可以得知,这个是在读写节点 /sys/kernel/debug/test/test_en 的时候出现的权限问题
和上面的处理思路一样,我们要给这个节点指定一个安全上下文,不然就是权限放大的问题
但是和普通的文件不同,这个不是添加在file_contexts里面了,而是要添加在 genfs_contexts
file_contexts 里面的指定的文件,都是编译之后就有了的,而像 /sys/kernel/debug 、 /proc 这些是系统起来之后动态生成的,这些的节点文件的安全上下文就要在genfs_contexts里面指定的
1genfscon debugfs /sys/kernel/debug/test/test_en u:object_r:debugfs_test:s0
这里很容易犯一个错误,就是直接把完整路径写到第三个字段里面去了
实际上,debugfs 指代的就是/sys/kernel/debug这个路径,后面要写的是相对于debugfs 的路径
因此,正确的写法是这样的:
1genfscon debugfs /test/test_en u:object_r:debugfs_test:s0
特别注意这里根据笔者经验,特别是/proc或者是/sys/fs目录下面,存在很多软连接,上面的例如/test/test_en这类必须为真实路径,否则设置te文件的权限可能无效
当然,file.te里面还得定义debugfs_test这个type
1type debugfs_test, fs_type, sysfs_type, debugfs_type;
修改之后是要编译precompiled_sepolicy的,而不是像file_contexts可以直接在板子上修改,重启之后报错如下:
1[ 818.411706@1] type=1400 audit(1623295203.581:48): avc: denied { read } for pid=3147 comm="HwBinder:3147_3" name="test_en" dev="debugfs" ino=377 scontext=u:r:mediaserver:s0 tcontext=u:object_r:debugfs_afc:s0 tclass=file permissive=0
再往下只要添加对应的权限就行了
4.2.1.5exec_type
还有一个例子也是很重要的
1[ 10.583284] type=1400 audit(10.256:8): avc: denied { entrypoint } for pid=3233 comm="init" path="/vendor/bin/testA.sh" dev="mmcblk0p16" ino=712 scontext=u:r:testA:s0 tcontext=u:object_r:vendor_file:s0 tclass=file permissive=0
添加权限
1allow testA vendor_file:file entrypoint;
结果违反了neverallow规则,然后继续干掉规则呗,这还不简单
1FAILED: out/target/product/xxxx/obj/ETC/sepolicy_neverallows_intermediates/sepolicy_neverallows
2/bin/bash -c "(rm -f out/target/product/xxxx/obj/ETC/sepolicy_neverallows_intermediates/sepolicy_neverallows ) && (ASAN_OPTIONS=detect_leaks=0 out/host/linux-x86/bin/checkpolicy -M -c           30 -o out/target/product/xxxx/obj/ETC/sepolicy_neverallows_intermediates/sepolicy_neverallows out/target/product/xxxx/obj/ETC/sepolicy_neverallows_intermediates/policy.conf )"
3libsepol.report_failure: neverallow on line 376 of system/sepolicy/public/domain.te (or line 10221 of policy.conf) violated by allow testA vendor_file:file { entrypoint };
4libsepol.check_assertions: 1 neverallow failures occurred
domain.te里面的neverallow规则:
1# Ensure that all entrypoint executables are in exec_type or postinstall_file.
2neverallow * { file_type -exec_type -postinstall_file }:file entrypoint;
正确的处理方式和前面提到的是一样的,也是同个道理
1//sepolicy/file_contexts
2
3/vendor/bin/testA.sh        u:object_r:testA_exec:s0
这就是为什么我们之前添加脚本的时候,每次都要加这样一句话的原因
4.2.2利用attributes绕开neverallow规则
这一类处理方式并不是从根源上解决,而是利用了规则的定义绕开了而已
8.0以前的不会有这样的一些规则,归根到底还是treble工程
4.2.2.1testNeverallowRules184 解决方案
 1<Test result="fail" name="testNeverallowRules184">
 2        <Failure message="junit.framework.AssertionFailedError: The following errors were encountered when validating the SELinuxneverallow rule:">
 3          <StackTrace>junit.framework.AssertionFailedError: The following errors were encountered when validating the SELinuxneverallow rule:
 4neverallow {      domain      -coredomain      -appdomain      -binder_in_vendor_violators     } binder_device:chr_file { { getattr open read ioctl lock map } { open append write lock map } };
 5libsepol.report_failure: neverallow violated by allow testA binder_device:chr_file { ioctl read write open };
 6libsepol.check_assertions: 1 neverallow failures occurred
 7
 8</StackTrace>
 9        </Failure>
10      </Test>
利用属性 binder_in_vendor_violators 规避这个问题
1type testA, domain;
2修改为
3type testA, domain, binder_in_vendor_violators;
原因很简单,binder_in_vendor_violators是一个属性,查看上面的neverallow规则就可以明白
4.2.2.3testNeverallowRules185 解决方案
1<Test result="fail" name="testNeverallowRules185">
2        <Failure message="junit.framework.AssertionFailedError: The following errors were encountered when validating the SELinuxneverallow rule:">
3          <StackTrace>junit.framework.AssertionFailedError: The following errors were encountered when validating the SELinuxneverallow rule:
4neverallow {      domain      -coredomain      -appdomain       -binder_in_vendor_violators     } service_manager_type:service_manager find;
5libsepol.report_failure: neverallow violated by allow testA activity_service:service_manager { find };
6libsepol.check_assertions: 1 neverallow failures occurred
和上面的一样,利用属性 binder_in_vendor_violators 规避这个问题
1type testA, domain;
2修改为
3type testA, domain, binder_in_vendor_violators;
这些属性之所以会存在,说明了Google并没有做到最完美的system和vendor分离,所有有这么一个像是后门的东西
还有一些:
- vendor_executes_system_violators
- data_between_core_and_vendor_violators
- system_writes_vendor_properties_violators
4.2.3vendor的脚本,在有权限的目录读写,不要操作system的
这类问题很明显,system和vendor分离之后才有的,没有啥好讲的,多看看报错信息和domain.te里面的注释,就能搞明白了
4.2.3.1testNeverallowRules217 解决方案
 1<Test result="fail" name="testNeverallowRules217">
 2        <Failure message="junit.framework.AssertionFailedError: The following errors were encountered when validating the SELinuxneverallow rule:">
 3          <StackTrace>junit.framework.AssertionFailedError: The following errors were encountered when validating the SELinuxneverallow rule:
 4neverallow {          domain          -coredomain          -appdomain          -vendor_executes_system_violators          -vendor_init      } {          exec_type          -vendor_file_type          -crash_dump_exec          -netutils_wrapper_exec      }:file { entrypoint execute execute_no_trans };
 5libsepol.report_failure: neverallow violated by allow testA shell_exec:file { execute };
 6libsepol.check_assertions: 1 neverallow failures occurred
 7
 8</StackTrace>
 9        </Failure>
10      </Test>
首先,如果脚本在/vendor/bin下面,先将sh改过来
1#!/system/bin/sh
2
3修改为:
4
5#!/vendor/bin/sh
以上能解决大部分问题,但是如果有些命令只有在/system/bin下面才有的,那这个时候就没有办法了,这个shell_exec:file 一定要加
此时,只能通过vendor_executes_system_violators 来规避问题了
1type testA, domain, binder_in_vendor_violators;
2
3修改为:
4
5type testA, domain, binder_in_vendor_violators, vendor_executes_system_violators;
4.2.3.2testNeverallowRules203 解决方案
 1<Test result="fail" name="testNeverallowRules203">
 2        <Failure message="junit.framework.AssertionFailedError: The following errors were encountered when validating the SELinuxneverallow rule:">
 3          <StackTrace>junit.framework.AssertionFailedError: The following errors were encountered when validating the SELinuxneverallow rule:
 4neverallow {      domain      -appdomain       -coredomain      -data_between_core_and_vendor_violators       -vendor_init    } {      core_data_file_type                        -zoneinfo_data_file    }:{ { chr_file blk_file } { file lnk_file sock_file fifo_file } } ~{ append getattr ioctl read write map };
 5libsepol.report_failure: neverallow violated by allow testA system_data_file:file { open };
 6libsepol.check_assertions: 1 neverallow failures occurred
 7
 8</StackTrace>
 9        </Failure>
10      </Test>
仔细看domain.te里面的注释,就能明白了
1# vendor domains may only access files in /data/vendor, never core_data_file_types
把脚本里面的路径修改一下
1TEMP_PATH="/data/test"
2
3修改为:
4
5TEMP_PATH="/data/vendor/test"
当然,有些neverallow规则还是可以利用属性绕过的(像data_between_core_and_vendor_violators),不过能正面解决就直接解决了
4.2.4dac_override 问题
这个在前面以及提到过了,阅读一下参考文章就能明白了
解决这个问题从来不是添加SELinux处理的,必须要去解决unix user/group/others权限问题
4.2.5读写/data数据
这里讨论下另一个解决方案:
1<Test result="fail" name="testNeverallowRules237">
2        <Failure message="junit.framework.AssertionFailedError: The following errors were encountered when validating the SELinuxneverallow rule:">
3          <StackTrace>junit.framework.AssertionFailedError: The following errors were encountered when validating the SELinuxneverallow rule:
4neverallow {   domain   -system_server   -system_app   -init   -installd    -vold_prepare_subdirs     } system_data_file:file { append create link unlink relabelfrom rename setattr write };
5libsepol.report_failure: neverallow violated by allow testA system_data_file:file { write create setattr unlink };
6libsepol.check_assertions: 1 neverallow failures occurred
再次看到这个很好奇,不是已经在上面的处理方法中解决了吗,修改读写的路径,改成有权限的地方就行了
这里再提供另一种解决思路,对于那些我们不方便修改代码的,这是一个福音
以下面的这个权限为例:
1allow testA system_data_file:file { write create unlink };
这个权限添加的目的是为了读写、删除这个文件: /data/test.txt
问题就在于进程testA他没有直接权限读写啊
按照以前的思路:干掉规则 -testA
 1neverallow {
 2  domain
 3  -system_server
 4  -system_app
 5  -init
 6  -installd # for relabelfrom and unlink, check for this in explicit neverallow
 7  -vold_prepare_subdirs # For unlink
 8  -testA
 9  with_asan(`-asan_extract')
10} system_data_file:file no_w_file_perms;
经过上面的处理经验,一个简单的方案出来了,把/data/test.txt 修改成/data/vendor/test.txt
然后权限拉满,就可以正常创建和删除了
1allow testA vendor_data_file:dir create_dir_perms;
2allow testA vendor_data_file:file create_file_perms;
下面讨论的是另一种解决方案:
data根目录,它所对应的安全上下文为:u:object_r:system_data_file:s0
1drwxrwx--x 40 system system u:object_r:system_data_file:s0 4096 2021-06-10 16:09 data
如果创建一个文件 /data/test.txt, 它的安全上下文是继承于父目录的,也就是u:object_r:system_data_file:s0
所以在上面的报错会看到是对system_data_file类型的目录缺少写的权限
但是,如果有一种方式可以实现创建文件或者子目录的时候,不要继承父目录的scontext,改成一个拥有权限的type,那不就可以了嘛?
没错,还真的有这种操作,这个叫做type transition , 类型转移
在前面的基础文档里面已经有介绍了,我们直切主题,用宏 file_type_auto_trans
1file_type_auto_trans(testA, system_data_file, vendor_data_file)
 1#####################################
 2# file_type_auto_trans(domain, dir_type, file_type)
 3# Automatically label new files with file_type when
 4# they are created by domain in directories labeled dir_type.
 5#
 6define(`file_type_auto_trans', `
 7# Allow the necessary permissions.
 8file_type_trans($1, $2, $3)
 9# Make the transition occur by default.
10type_transition $1 $2:dir $3;
11type_transition $1 $2:notdevfile_class_set $3;
12')
13
14意思就是,testA(第一个参数domain)这个type的进程,在system_data_file(第二个参数dir_type)类型的目录下面,创建文件时,指定它的type为vendor_data_file(第三个参数file_type)
同样的,这里同样要给vendor_data_file加权限
这一句将会发生如下变化:
1picasso:/ # ls -lZ /data/test.txt
2-rw------- 1 root system u:object_r:system_data_file:s0 5320 2021-06-10 17:06 /data/test.txt
3
4变成
5
6picasso:/ # ls -lZ /data/test.txt
7-rw------- 1 root system u:object_r:vendor_data_file:s0 5320 2021-06-10 17:06 /data/test.txt
接着还有删除文件时需要下面的权限,这个正常添加就行了,下面的权限不会违反neverallow规则
1[ 67.886702@2] type=1400 audit(1623315964.145:18): avc: denied { remove_name } for pid=3142 comm="HwBinder:3142_2" name="test.txt" dev="mmcblk0p21" ino=1263 scontext=u:r:testA:s0 tcontext=u:object_r:system_data_file:s0 tclass=dir permissive=0
这种方式不一定适用于app,因为app里面还有其他neverallow规则会限制
它不是针对某个进程,而是针对的是一个域,这样会导致所有在这个域里面的进程都会创建出新的type的文件
4.3一些思考
4.3.1修改属性的neverallow规则,还能测试通过
在/android/system/sepolicy/public/property.te 这一段,本来以为会有报错的,因为违反了neverallow规则
 1compatible_property_only(`
 2  # Neverallow coredomain to set vendor properties
 3  neverallow {
 4    coredomain
 5    -init
 6    -system_writes_vendor_properties_violators
 7    -system_server
 8    -platform_app
 9    -testA
10  } {
11    property_type
12    -audio_prop
13    -bluetooth_a2dp_offload_prop
14    -bluetooth_prop
15    -bootloader_boot_reason_prop
16......
17    -test_prop
18  }:property_service set;
19')
但实际上并没有报错,找到CTS测试的源码:
 1@RestrictedBuildTest
 2  public void testNeverallowRules436() throws Exception {
 3    String neverallowRule = "neverallow {      coredomain      -init      -system_writes_vendor_properties_violators    } {      property_type      -audio_prop      -bluetooth_a2dp_offload_prop      -bluetooth_prop      -bootloader_boot_reason_prop      -boottime_prop      -config_prop      -cppreopt_prop      -ctl_bootanim_prop      -ctl_bugreport_prop      -ctl_picasso_prop      -ctl_default_prop      -ctl_dumpstate_prop      -ctl_fuse_prop      -ctl_interface_restart_prop      -ctl_interface_start_prop      -ctl_interface_stop_prop      -ctl_mdnsd_prop      -ctl_restart_prop      -ctl_rildaemon_prop      -ctl_sigstop_prop      -ctl_start_prop      -ctl_stop_prop      -dalvik_prop      -debug_prop      -debuggerd_prop      -default_prop      -device_logging_prop      -dhcp_prop      -dumpstate_options_prop      -dumpstate_prop      -exported2_config_prop      -exported2_default_prop      -exported2_radio_prop      -exported2_system_prop      -exported2_vold_prop      -exported3_default_prop      -exported3_radio_prop      -exported3_system_prop      -exported_bluetooth_prop      -exported_config_prop      -exported_dalvik_prop      -exported_default_prop      -exported_dumpstate_prop      -exported_ffs_prop      -exported_fingerprint_prop      -exported_overlay_prop      -exported_pm_prop      -exported_radio_prop      -exported_secure_prop      -exported_system_prop      -exported_system_radio_prop      -exported_vold_prop      -exported_wifi_prop      -extended_core_property_type      -ffs_prop      -fingerprint_prop      -firstboot_prop      -hwservicemanager_prop      -last_boot_reason_prop      -log_prop      -log_tag_prop      -logd_prop      -logpersistd_logging_prop      -lowpan_prop      -mmc_prop      -net_dns_prop      -net_radio_prop      -netd_stable_secret_prop      -nfc_prop      -overlay_prop      -pan_result_prop      -persist_debug_prop      -persistent_properties_ready_prop      -pm_prop      -powerctl_prop      -radio_prop      -restorecon_prop      -safemode_prop      -serialno_prop      -shell_prop      -system_boot_reason_prop      -system_prop      -system_radio_prop      -test_boot_reason_prop      -traced_enabled_prop      -vendor_default_prop      -vendor_security_patch_level_prop      -vold_prop      -wifi_log_prop      -wifi_prop    }:property_service set;";
 4    boolean fullTrebleOnly = false;
 5    boolean compatiblePropertyOnly = true;
 6
 7    if ((fullTrebleOnly) && (!isFullTrebleDevice()))
 8    {
 9      return;
10    }
11    if ((compatiblePropertyOnly) && (!isCompatiblePropertyEnforcedDevice()))
12    {
13      return;
14    }
15
16    File policyFile = (isSepolicySplit()) && (this.mVendorSepolicyVersion < 28) ?
17      this.deviceSystemPolicyFile :
18      this.devicePolicyFile;
19
20    ProcessBuilder pb = new ProcessBuilder(new String[] { this.sepolicyAnalyze.getAbsolutePath(), policyFile
21      .getAbsolutePath(), "neverallow", "-w", "-n", neverallowRule });
22
23    pb.redirectOutput(ProcessBuilder.Redirect.PIPE);
24    pb.redirectErrorStream(true);
25    Process p = pb.start();
26    p.waitFor();
27    BufferedReader result = new BufferedReader(new InputStreamReader(p.getInputStream()));
28
29    StringBuilder errorString = new StringBuilder();
30    String line;
31    while ((line = result.readLine()) != null) {
32      errorString.append(line);
33      errorString.append("\n");
34    }
35    assertTrue("The following errors were encountered when validating the SELinuxneverallow rule:\n" + neverallowRule + "\n" + errorString, errorString
36      .length() == 0);
37  }
代码是在这里被return了,也就是没有做检查,所以测试结果是pass的
 1if ((compatiblePropertyOnly) && (!isCompatiblePropertyEnforcedDevice()))
 2{
 3  return;
 4}
 5
 6
 7//isCompatiblePropertyEnforcedDevice拿的是系统属性,从板子里面看了看,这个值是false
 8public static boolean isCompatiblePropertyEnforcedDevice(ITestDevice device)
 9    throws DeviceNotAvailableException
10{
11  return PropertyUtil.propertyEquals(device, "ro.actionable_compatible_property.enabled", "true");
12}
简单追了一下这里面的流程,首先compatible_property_only是一个宏,定义如下
1# Compatible property only
2# SELinux rules which apply only to devices with compatible property
3#
4define(`compatible_property_only', ifelse(target_compatible_property, `true', $1,
5ifelse(target_compatible_property, `cts',
6# BEGIN_COMPATIBLE_PROPERTY_ONLY -- this marker is used by CTS -- do not modify
7$1
8# END_COMPATIBLE_PROPERTY_ONLY -- this marker is used by CTS -- do not modify
9, )))
值来源于target_compatible_property,这个值是前面提到的transform-policy-to-conf里面的变量传递进来的
1-D target_compatible_property=$(PRIVATE_COMPATIBLE_PROPERTY)
继续,值是从PRODUCT_COMPATIBLE_PROPERTY来的
1PRIVATE_COMPATIBLE_PROPERTY := $(PRODUCT_COMPATIBLE_PROPERTY)
往下
 1#android/build/make/core/config.mk
 2
 3# Boolean variable determining if the whitelist for compatible properties is enabled
 4PRODUCT_COMPATIBLE_PROPERTY := false
 5ifneq ($(PRODUCT_COMPATIBLE_PROPERTY_OVERRIDE),)
 6  PRODUCT_COMPATIBLE_PROPERTY := $(PRODUCT_COMPATIBLE_PROPERTY_OVERRIDE)
 7else ifeq ($(PRODUCT_SHIPPING_API_LEVEL),)
 8  #$(warning no product shipping level defined)
 9else ifneq ($(call math_lt,27,$(PRODUCT_SHIPPING_API_LEVEL)),)
10  PRODUCT_COMPATIBLE_PROPERTY := true
11endif
PRODUCT_COMPATIBLE_PROPERTY 的值默认为false,如果有PRODUCT_COMPATIBLE_PROPERTY_OVERRIDE,则用这个
然后是PRODUCT_SHIPPING_API_LEVEL
也就是说,PRODUCT_COMPATIBLE_PROPERTY 最后的值为false
所以前面的neverallow规则不会生效
再看看属性ro.actionable_compatible_property.enabled是怎么来的?
1# Sets ro.actionable_compatible_property.enabled to know on runtime whether the whitelist
2# of actionable compatible properties is enabled or not.
3ifeq ($(PRODUCT_ACTIONABLE_COMPATIBLE_PROPERTY_DISABLE),true)
4ADDITIONAL_DEFAULT_PROPERTIES += ro.actionable_compatible_property.enabled=false
5else
6ADDITIONAL_DEFAULT_PROPERTIES += ro.actionable_compatible_property.enabled=${PRODUCT_COMPATIBLE_PROPERTY}
7endif
PRODUCT_ACTIONABLE_COMPATIBLE_PROPERTY_DISABLE 是空的没有定义,也是最后生成的值是false
追查了代码,发现原来以前BoardConfig.mk里面是有定义的
1PRODUCT_SHIPPING_API_LEVEL := 28
但是后面居然把这个去掉了?
PRODUCT_SHIPPING_API_LEVEL 这个会影响到一些neverallow规则
还会影响到这个属性ro.product.first_api_level的生成
4.3.2抽离业务场景需求的公共权限
或许我们会有一个疑问,就是为什么不把所有自己的脚本都用同一个安全上下文呢?
这的确是可行的方案,可以更加便捷的完成功能需求,但是从权限管控的初衷来看,分开了之后能够达到权限最小化;
在上面的思路基础上,引发了另一个想法:
定义一个自定义的属性,然后添加脚本的时候,关联上这个属性,就拥有了对应的权限了
比如:
1attribute testdomain;
testdomain.te里面定义一些公共的权限,比如:
1allow testdomain picasso_device:chr_file rw_file_perms;
2allow testdomain vendor_toolbox_exec:file { execute_no_trans };
3allow testdomain vendor_data_file:dir create_dir_perms;
4allow testdomain vendor_data_file:file create_file_perms;
然后在对应的type中关联属性
1type testA, domain, testdomain;
当然目前属于想法阶段,还没有具体实施,理论上可行
4.3.3三方apk的权限
对于第三方apk的权限问题,比如:
目前这个在系统端没有找到解决方案,只能从apk实现上入手了
1[ 97.450511@1] type=1400 audit(1623116538.872:18): avc: denied { create } for pid=3953 comm="testB" name="shpex98m.tmp" scontext=u:r:testB:s0 tcontext=u:object_r:system_data_file:s0 tclass=file permissive=0
这个是绕不过neverallow规则的
1[ 45.533219@3] type=1400 audit(1623985073.895:7): avc: denied { execute } for pid=4052 comm="bootloader" path="/data/data/com.xxxx.xxx/files/test/test.so" dev="mmcblk0p21" ino=1085 scontext=u:r:system_app:s0 tcontext=u:object_r:system_app_data_file:s0 tclass=file permissive=0
到这里,基本上就介绍完了,总结来说,多看看代码,报错信息以及te文件里面的注释,能学到很多东西
能不动到原生的部分,就不要修改
5名词解释
| 英文名次 | 含义 |
|---|---|
AVC |
Access Vector Cache访问向量缓存用于当一个subject要访问object时,selinux执行检查AVC中,subject和object的权限被缓存 |
CTS |
Compatibility Test Suite(兼容性测试)Android设备只有满足规定并且通过CTS,才能获得Android的商标和享受Android Market的权限 |
DAC |
DAC:Discretionary Access Control 自主访问控制 |
LSM |
Linux Security Modules (LSM) 是一种 Linux 内核子系统旨在将内核以模块形式集成到各种安全模块中 |
MAC |
MAC:Mandatory Access Control 强制访问控制 |
MLS |
Multi-Level Security,多层次的安全系统的进程和文件进行了分级,不同级别的资源需要对应级别的进程才能访问 |
SElinux |
SELinux(Security-Enhanced Linux) 安全增强型linux子系统在这种访问控制体系的限制下,进程只能访问那些在他的任务中所需要文件 |
TE |
TE (Type Enforcement)强制类型基本管理单位是TEAC(Type Enforcement Accesc Control),源码中存在TE文件,这些文件是用于制定策略规则的 |
转载说明
本文非原创,主要是转载headwind的文章内容,在加上稍微的修改。
参考
[1] nianxing123, 【安卓】SELinux走过的坑, 2022.
[2] 沉默的过客, SELinux策略语言–客体类别和许可, 2017.
[3] 罗升阳, SEAndroid安全机制框架分析, 2014.
[4] headwind_, Android P SELinux (一) 基础概念, 2021.
[5] headwind_, Android P SELinux (二) 开机初始化与策略文件编译过程, 2021.
[6] headwind_, Android P SELinux (三) 权限检查原理与调试, 2022.
[7] headwind_, Android P SELinux (四) CTS neverallow处理总结, 2022.
[8] IT先森, Android SELinux开发入门指南之SELinux基础知识, 2020.
[9] IT先森, 正确姿势临时和永久开启关闭Android的SELinux, 2020.
[10] 冯疯子, 谈谈Android 安全策略SElinux, 2020.
[11] 五菱宏光8PLUS, Android 添加 SELinux权限, 2022.
[12] Android开发实践, Android安全策略Selinux小结, 2019.
[13] 砸漏, 详解Android Selinux 权限及问题, 2020.
[14] sheldon_blogs, Android : SELinux 简析&修改 , 2017.
[17] 安德路, android sepolicy 最新小结, 2018.
[18] miroku_it, SELinux策略配置语言, 2009.
[19] 岁月斑驳7, android 8.1 安全机制 — SEAndroid & SELinux, 2018.
[20] _dowork, SELinux audit2allow命令使用, 2019.
[21] Donald_Zhuang, selinux dac_override/dac_read_search问题处理思路, 2020.
[22] linux内核之旅, Linux多安全策略和动态安全策略框架模块代码分析报告(14), 2017.
[23] Boyliang1987, SEAndroid策略, 2013.
[24] KINGYT, 精致全景图 | linux内核输出的日志去哪里了, 2021.
[26] jimbo_lee, 常用正则表达式大全 – 正则表达式基本语法, 2011.
[27] Sherry Baron, Android.mk(持续补充中哦!!!), 2021.
[28] 魏波., Makefile_03:Makefile介绍(作用、例子、原理), 2022.
[29] kc专栏, Android.mk 小细节(LOCAL_CFLAGS 、BUILD_PREBUILT), 2015.
[30] hjxu2016, Makefile入门二、理解$@、$^和$<, 2019.
[31] 「已注销」, Android CTS中neverallow规则生成过程, 2019.
[32] 安德路, Android sepolicy简要记, 2018.
[33] 安德路, android sepolicy 最新小结, 2018.
[34] 铁桶小分队, SEAndroid的MLS相关知识以及配置方法, 2019.
[35] wsrspirit, 从【SELINUX】策略中学习【LSM】编写规则, 2014.
[36] CSlunatic, Linux Security模块, 2014.
[37] MrHare, SEAndroid kernel层源码解析1——从hook点到策略点, 2017.
[38] MrHare, SEAndroid kernel 源码解析2–策略执行, 2017.
[39] InsightAndroid, selinux常见neverallow项解决方法与常用命令, 2020.
其他参考
1学习本文内容最好先阅读下面SElinux文章
[1] 阿拉神农, 深入理解SELinux SEAndroid(第一部分), 2014.
[2] 阿拉神农, 深入理解SELinux SEAndroid之二, 2014.
[3] 阿拉神农, 深入理解SELinux SEAndroid(最后部分), 2014.
[4] sven, SELinux 安全上下文, 2015.
[5] bruk_spp, selinux源码分析, 2020.
[6] 岁月斑驳7, android 8.1 安全机制 — SEAndroid & SELinux, 2018.
[7] 罗升阳, SEAndroid安全机制对Binder IPC的保护分析, 2014.
[8] 罗升阳, SEAndroid安全机制对Android属性访问的保护分析, 2014.
[9] 罗升阳, SEAndroid安全机制中的进程安全上下文关联分析, 2014.
[10] 罗升阳, SEAndroid安全机制中的文件安全上下文关联分析, 2014.
[11] 罗升阳, SEAndroid安全机制框架分析, 2014.
[12] 罗升阳, SEAndroid安全机制简要介绍和学习计划, 2014.
2文章通用参考汇总
[1] 高桐@BILL, Android8.0 SELinux详解, 2018.
[2] 戈壁老王, Android Treble 简介, 2020.
[3] Gunder, SeLinux权限配置心得总结, 2021.
[4] 流浪_归家, SELinux avc 权限问题修改, 2020.
[5] 缥缈孤鸿影_love, Android SELinux avc dennied权限问题解决方法, 2017.
[6] 岁月斑驳7, Android 8.1 非系统进程设置系统域属性问题, 2018.
[7] 李晓刚, Android Selinux, 2019.
[8] Andy.Lee , 详解Android Selinux 权限及问题, 2017.
[9] 布道师Peter, Selinux 权限问题解决方案, 2020.
[10] DJLZPP, 访问文件的SELINUX权限添加, 2020.
[11] 花一样的阿衰, SElinux权限配置, 2020.
[12] 飞车侠, i.MX8 系列 | Android APP 访问硬件驱动可以这样做!, 2020.
[13] 秋少, Android系统开发入门-7.添加java层系统服务, 2019.
[14] gaon5, Android : 为系统服务添加 SELinux 权限 (Android 9.0), 2018.
[15] 李晓刚, Android R Selinux, 2020.
[16] 守望尼罗河畔的初心, Android7.1 Selinux使用, 2017.
[17] CedarDiao, Android9 Sepolicy规则基础 - MTK平台, 2020.
[18] 锄禾豆, Android 9 SELinux, 2018.
[19] JasonWan, SELinux在Android中的应用, 2019.
[20] gandalf, Android(十)SEAndroid初探, 2019.
[21] sheldon, Android : SELinux 简析&修改, 2017.
[22] werther zhang, SEAndroid规则介绍, 2017.
[23] xuefeng_apple, android启动脚本-selinux(实践), 2020.
[24] 恶魔殿下_HIM, Android的安全机制(SEANDROID), 2016.
[26] 沉默的过客, SELinux策略语言–客体类别和许可, 2017.
[27] 林多, SELinux MAC安全机制简介, 2019.
[[28] SinoTech, Android R Selinux, 2018.](为 Android 8.0 添加开机启动脚本)
[29] MickCaptain, Android 8.1添加系统服务,sepolicy相关配置, 2019.
[30] SinoTech, 在 Android 8.0 中绕过 hwbinder 实现跨模块对 audio HAL 调用, 2017.
[31] xbalien, SEAndroid策略, 2014.
[32] tww85, 对Android 平台下SElinux的理解及遇到过的相关问题解决方法总结, 2016.
[33] wydong, SELinux与SEAndroid, 2018.
[34] 段小苏学习之路, Android有关selinux详解, 2019.
[35] 不上班行不行, SEAndroid系统架构总体分析, 2018.
[36] 亚洲第一蓝胖子, android中SELINUX规则分析和语法简介, 2018.
[37] Zpeg, selinux - Android编写sepolicy, 2020.
[39] 光明之门, SELinux&SEAndroid简介, 2017.
[39] IT先森, Android SELinux开发入门指南之正确姿势解决访问data目录权限问题, 2020.
[40] 渴望成长的菜鸟, Android O selinux违反Neverallow解决办法, 2018.
[41] kc专栏, Android6.0 selinux没有对某个文件的权限(又neverAllow)处理方法, 2016.
[42] 维基百科, SELinux/Quick introduction, 2021.
[43] foxleezh, (连载)Android 8.0 : 系统启动流程之init进程(一), 2018.
[44] xiaozhuangzi, selinux label的初始化过程, 2019.
[45] Ryan, Selinux中的APP分类, 2018.
[46] zhudaozhuan, SELinux app权限配置, 2016.
[47] 砸漏, Android 7.0 SEAndroid app权限配置方法, 2020.
[49] 夜风~, linux内核中likely与unlikely, 2018.
[50] Decisiveness, Linux内核中的IS_ERR()、PTR_ERR()和ERR_PTR(), 2015.
[51] 扬眉, Flex(scanner)/Bison(parser)词法语法分析工作原理, 2022.
[52] up哥小号, Linux 编程中的API函数和系统调用的关系, 2012.
[53] wenyubo_2008, Linux 中open系统调用实现原理, 2012.
[54] feixin620, linux syscall 详解, 2017.
[55] Xiaowei He, Linux 进程安全上下文 struct cred, 2022.
[56] Morphad, linux cred管理, 2013.
[57] 庾志辉, openVswitch(OVS)源代码分析之工作流程(哈希桶结构体的解释), 2014.
[58] 庾志辉, openVswitch(OVS)源代码的分析技巧(哈希桶结构体为例), 2014.
[59] Happybevis, 神奇的Selinux Restore Rule, 2018.
3《Linux强制访问控制机制模块代码分析报告》
[1] linux内核之旅, Linux强制访问控制机制模块代码分析报告(一), 2017.
[2] linux内核之旅, Linux强制访问控制机制模块代码分析报告(二), 2017.
[3] linux内核之旅, Linux强制访问控制机制模块代码分析报告(三), 2017.
[4] linux内核之旅, Linux强制访问控制机制模块代码分析报告(四), 2017.
[5] linux内核之旅, Linux强制访问控制机制模块代码分析报告(五), 2017.
[6] linux内核之旅, Linux强制访问控制机制模块代码分析报告(六), 2017.
[7] linux内核之旅, Linux强制访问控制机制模块代码分析报告(七), 2017.
[8] linux内核之旅, Linux强制访问控制机制模块代码分析报告(八), 2017.
[9] linux内核之旅, Linux强制访问控制机制模块代码分析报告(九), 2017.
[10] linux内核之旅, Linux强制访问控制机制模块代码分析报告(十), 2017.
[11] linux内核之旅, Linux强制访问控制机制模块代码分析报告(十一), 2017.
4《Linux多安全策略和动态安全策 略框架模块代码分析报告》
[1] linux内核之旅, Linux多安全策略和动态安全策 略框架模块代码分析报告(1) , 2017.
[2] linux内核之旅, Linux多安全策略和动态安全策 略框架模块代码分析报告(2) , 2017.
[3] linux内核之旅, Linux多安全策略和动态安全策 略框架模块代码分析报告(3) , 2017.
[4] linux内核之旅, Linux多安全策略和动态安全策 略框架模块代码分析报告(4) , 2017.
[5] linux内核之旅, Linux多安全策略和动态安全策 略框架模块代码分析报告(5) , 2017.
[6] linux内核之旅, Linux多安全策略和动态安全策 略框架模块代码分析报告(6) , 2017.
[7] linux内核之旅, Linux多安全策略和动态安全策 略框架模块代码分析报告(7) , 2017.
[8] linux内核之旅, Linux多安全策略和动态安全策 略框架模块代码分析报告(8) , 2017.
[9] linux内核之旅, Linux多安全策略和动态安全策 略框架模块代码分析报告(9) , 2017.
[10] linux内核之旅, Linux多安全策略和动态安全策 略框架模块代码分析报告(10) , 2017.
[11] linux内核之旅, Linux多安全策略和动态安全策 略框架模块代码分析报告(11) , 2017.
[12] linux内核之旅, Linux多安全策略和动态安全策 略框架模块代码分析报告(12) , 2017.
[13] linux内核之旅, Linux多安全策略和动态安全策 略框架模块代码分析报告(13) , 2017.
[14] linux内核之旅, Linux多安全策略和动态安全策 略框架模块代码分析报告(14) , 2017.
[15] linux内核之旅, Linux多安全策略和动态安全策 略框架模块代码分析报告(15) , 2017.
[16] linux内核之旅, Linux多安全策略和动态安全策 略框架模块代码分析报告(16) , 2017.
[17] linux内核之旅, Linux多安全策略和动态安全策 略框架模块代码分析报告(17) , 2017.
[18] linux内核之旅, Linux多安全策略和动态安全策 略框架模块代码分析报告(18) , 2017.
[19] linux内核之旅, Linux多安全策略和动态安全策 略框架模块代码分析报告(19) , 2017.
[20] linux内核之旅, Linux多安全策略和动态安全策 略框架模块代码分析报告(20) , 2017.
[21] linux内核之旅, Linux多安全策略和动态安全策 略框架模块代码分析报告(21) , 2017.
[22] linux内核之旅, Linux多安全策略和动态安全策 略框架模块代码分析报告(22) , 2017.
[23] linux内核之旅, Linux多安全策略和动态安全策 略框架模块代码分析报告(23) , 2017.
5fs_use_xattr
[1] Boyliang1987, SEAndroid策略, 2013.
[2] 铁桶小分队, 预设置只读文件系统squashfs上的文件的扩展属性的方法, 2017.
6dac_override
[1] pwl999, Linux DAC 权限管理详解, 2020.
[2] Open Devices Corner, Debugging DAC_OVERRIDE, 2019.
[3] 悟空小饭, Linux Capabilites 机制详细介绍, 2018.
[4] Donald_Zhuang, selinux dac_override/dac_read_search问题处理思路, 2020.
[5] shichaog, Selinux 权限策略定制, 2016.
[6] 大江之舞, SELinux: capabilites{dac_override} 权限, 2015.
7android 用户组
[1] CarolineVampire, Android用户和用户组的定义, 2014.