
Android Property详解
9800 Words|Read in about 46 Min|本文总阅读量次
Android系统中的属性,我们可以通过get和set去获取,但是有时候App获取修改属性的操作被拒绝了,这个就需要深入了解属性系统。
Android Property详解
0属性介绍
0.1简介
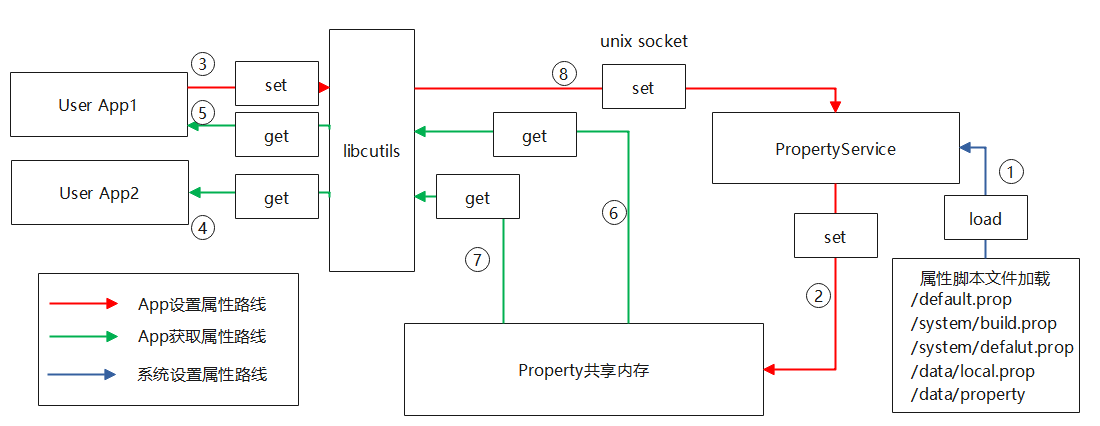
在 android 系统中,为同一管理系统的属性,设计了一个统一的属性系统。每个属性都有一个名字和值,他们都是字符串格式。属性被大量使用在 Android 系统中,用来记录系统设置或进程之间的信息交换。属性是在整个系统中全局可见的。每个进程可以 get/set 属性。在编译的过程中会将各种系统参数汇总到 build.proc 以及 default.proc 这两个文件中,主要属性集中在 build.proc 中。系统在开机后将读取配置信息并构建共享缓冲区,加快查询速度。本文以Android11来介绍属性系统。
0.2Properties Type
系统属性根据不同的应用类型,分为不可变型,持久型,网络型,启动和停止服务等。
特别属性:
- 属性名称以
ro.开头,那么这个属性被视为只读属性。一旦设置,属性值不能改变。 - 属性名称以
persist.开头,当设置这个属性时,其值也将写入/data/property。 - 属性名称以
net.开头,当设置这个属性时,net.change属性将会自动设置,以加入到最后修改的属性名。(这是很巧妙的。netresolve模块的使用这个属性来追踪在net.*属性上的任何变化。) - 属性
ctrl.start和ctrl.stop是用来启动和停止服务。每一项服务必须在/init.rc中定义。系统启动时,与init守护进程将解析init.rc和启动属性服务。一旦收到设置ctrl.start属性的请求,属性服务将使用该属性值作为服务名找到该服务,启动该服务。这项服务的启动结果将会放入init.svc.<服务名>属性中。客户端应用程序可以轮训那个属性值,以确定结果。
0.3Android toolbox
Android toolbox 程序提供了两个工具:setprop 和 getprop 获取和设置属性。其使用方法:
getprop <属性名>
setprop <属性名> <属性值>
Java
在 Java 应用程序可以使用 System.getProperty() 和 System.setProperty() 函数获取和设置属性。
Action
默认情况下,设置属性只会使 init 守护程序写入共享内存,它不会执行任何脚本或二进制程序。但是,您可以将您的想要的实现的操作与 init.rc 中某个属性的变化相关联。例如,在默认的 init.rc 中有:
1# adbd on at boot in emulator
2on property:ro.kernel.qemu=1
3start adbd
4on property:persist.service.adb.enbale=1
5start adbd
6on property:persist.service.adb.enable=0
7stop adbd
0.4Properties Source
属性的设置可以出现在 make android 的任何环节。
alps/build/target/board/generic_arm64/system.prop
alps/build/target/product/core.mk
alps/buid/tools/buildinfo.sh
编译好后,被设置的系统属性主要存放在:
这样,如果你设置 persist.service.adb.enable 为1,init 守护进程就知道需要采取行动:开启 adbd 服务。
/default.prop手机厂商自己定制使用
/system/build.prop系统属性主要存放处
/system/default.propdefault properties,存放与 security 相关的属性
/data/property/persistent_properties保存着持久属性
系统初始化属性
初始化属性一定是在系统初始化的时候就存在,且存在的时刻不能太晚,后续好多rc文件去启动进程,都会大量的需要属性的读取和设置。
1//system/core/init/init.cpp
2static int property_fd = -1;
3int SecondStageMain(int argc, char** argv) {
4    PropertyInit();
5    ...
6    StartPropertyService(&property_fd);
7    ...
8}
1PropertyInit
用于属性的初始化,包括创建有关PropertyInfo的序列化,创建对应的SElinux的Context文件,初始化属性的导入,这里也会加载一些属性脚本文件等
 1//system/core/init/property_service.cpp
 2void PropertyInit() {
 3    //SElinux初始化配置,这个不是很重要
 4    selinux_callback cb;
 5    cb.func_audit = PropertyAuditCallback;
 6    selinux_set_callback(SELINUX_CB_AUDIT, cb);
 7	//1.创建属性文件,用于序列化操作
 8    mkdir("/dev/__properties__", S_IRWXU | S_IXGRP | S_IXOTH);
 9    CreateSerializedPropertyInfo();
10    //2.初始化属性安全上下文
11    if (__system_property_area_init()) {
12        LOG(FATAL) << "Failed to initialize property area";
13    }
14    //3.属性安全上下文的文件导入
15    if (!property_info_area.LoadDefaultPath()) {
16        LOG(FATAL) << "Failed to load serialized property info file";
17    }
18	//4.其他的属性初始化
19    ProcessKernelDt();
20    ProcessKernelCmdline();
21
22    ExportKernelBootProps();
23    PropertyLoadBootDefaults();
24}
25
1.1创建属性文件,用于序列化操作
首先在设备中创建/dev/__properties__,这个目录后续会对其进行序列化。
 1//system/core/init/property_service.cpp
 2void CreateSerializedPropertyInfo() {
 3    auto property_infos = std::vector<PropertyInfoEntry>();
 4    if (access("/system/etc/selinux/plat_property_contexts", R_OK) != -1) {
 5        if (!LoadPropertyInfoFromFile("/system/etc/selinux/plat_property_contexts",
 6                                      &property_infos)) {
 7            return;
 8        }
 9        // Don't check for failure here, so we always have a sane list of properties.
10        // E.g. In case of recovery, the vendor partition will not have mounted and we
11        // still need the system / platform properties to function.
12        if (access("/system_ext/etc/selinux/system_ext_property_contexts", R_OK) != -1) {
13            LoadPropertyInfoFromFile("/system_ext/etc/selinux/system_ext_property_contexts",
14                                     &property_infos);
15        }
16        if (!LoadPropertyInfoFromFile("/vendor/etc/selinux/vendor_property_contexts",
17                                      &property_infos)) {
18            // Fallback to nonplat_* if vendor_* doesn't exist.
19            LoadPropertyInfoFromFile("/vendor/etc/selinux/nonplat_property_contexts",
20                                     &property_infos);
21        }
22        if (access("/product/etc/selinux/product_property_contexts", R_OK) != -1) {
23            LoadPropertyInfoFromFile("/product/etc/selinux/product_property_contexts",
24                                     &property_infos);
25        }
26        if (access("/odm/etc/selinux/odm_property_contexts", R_OK) != -1) {
27            LoadPropertyInfoFromFile("/odm/etc/selinux/odm_property_contexts", &property_infos);
28        }
29    } else {
30        if (!LoadPropertyInfoFromFile("/plat_property_contexts", &property_infos)) {
31            return;
32        }
33        LoadPropertyInfoFromFile("/system_ext_property_contexts", &property_infos);
34        if (!LoadPropertyInfoFromFile("/vendor_property_contexts", &property_infos)) {
35            // Fallback to nonplat_* if vendor_* doesn't exist.
36            LoadPropertyInfoFromFile("/nonplat_property_contexts", &property_infos);
37        }
38        LoadPropertyInfoFromFile("/product_property_contexts", &property_infos);
39        LoadPropertyInfoFromFile("/odm_property_contexts", &property_infos);
40    }
41
42    auto serialized_contexts = std::string();
43    auto error = std::string();
44    if (!BuildTrie(property_infos, "u:object_r:default_prop:s0", "string", &serialized_contexts,
45                   &error)) {
46        LOG(ERROR) << "Unable to serialize property contexts: " << error;
47        return;
48    }
49
50    constexpr static const char kPropertyInfosPath[] = "/dev/__properties__/property_info";
51    if (!WriteStringToFile(serialized_contexts, kPropertyInfosPath, 0444, 0, 0, false)) {
52        PLOG(ERROR) << "Unable to write serialized property infos to file";
53    }
54    selinux_android_restorecon(kPropertyInfosPath, 0);
55}
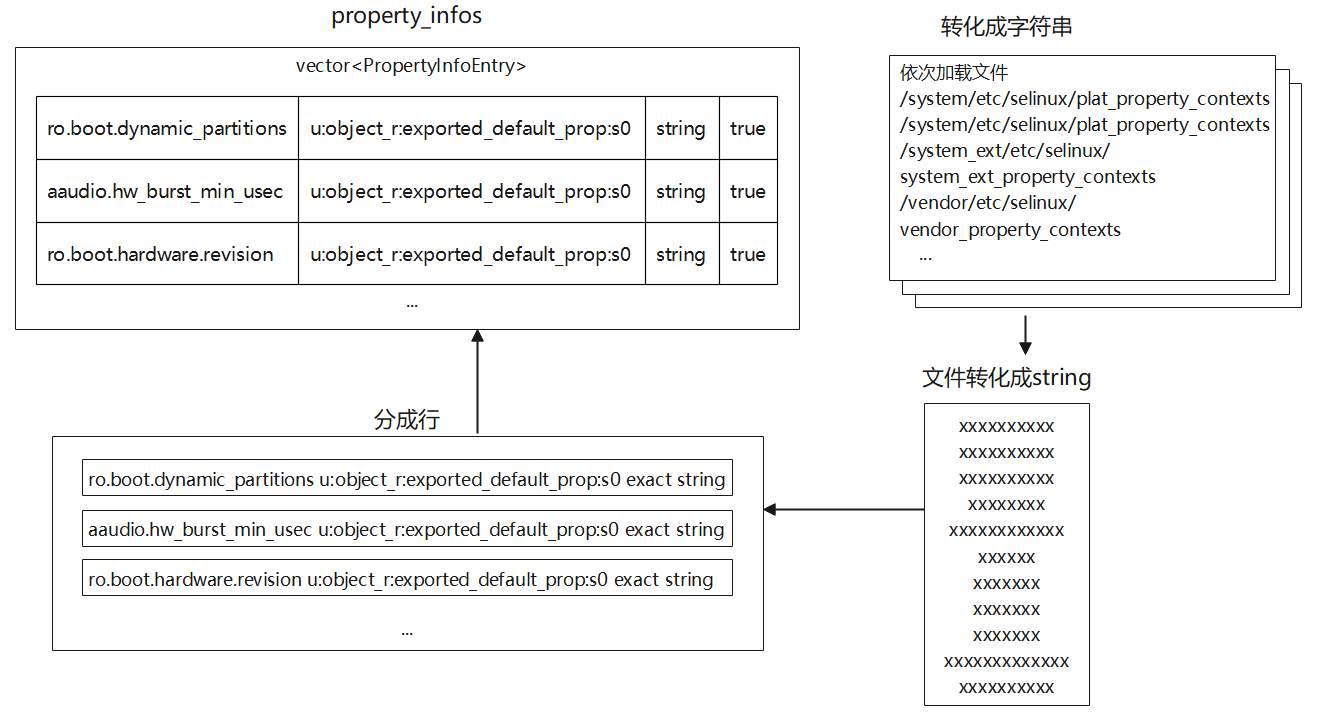
这里的逻辑分成两块,第一块是LoadPropertyInfoFromFile用于将对应文件中的词条一条条导入到property_infos的数组中。
第二块是将上述的数组通过字典树的方式以二进制序列化的形式存储在变量serialized_contexts中,最后变成文件的形式存到/dev/__properties__/property_info里面。
1.1.1LoadPropertyInfoFromFile
 1//system/core/init/property_service.cpp
 2bool LoadPropertyInfoFromFile(const std::string& filename,
 3                              std::vector<PropertyInfoEntry>* property_infos) {
 4    auto file_contents = std::string();
 5    //将文件内容转化成字符串形式,导入到file_contents中
 6    if (!ReadFileToString(filename, &file_contents)) {
 7        PLOG(ERROR) << "Could not read properties from '" << filename << "'";
 8        return false;
 9    }
10
11    auto errors = std::vector<std::string>{};
12    bool require_prefix_or_exact = SelinuxGetVendorAndroidVersion() >= __ANDROID_API_R__;
13    //将对应的/system/etc/selinux/plat_property_contexts,
14    ///system/etc/selinux/plat_property_contexts等文件
15    //依次变成字符串的形式去对应解析成PropertyInfoEntry数组的形式
16    ParsePropertyInfoFile(file_contents, require_prefix_or_exact, property_infos, &errors);
17    ...
18    return true;
19}
这里的property_infos类型是vector<PropertyInfoEntry>*,这个类似于函数运行结束的返回值写法,并且传入到ParsePropertyInfoFile函数中,是在这个函数中获取这个数组的。
 1//system/core/property_service/libpropertyinfoserializer/property_info_file.cpp
 2void ParsePropertyInfoFile(const std::string& file_contents, bool require_prefix_or_exact,
 3                           std::vector<PropertyInfoEntry>* property_infos,
 4                           std::vector<std::string>* errors) {
 5  errors->clear();
 6  //将对应文件中的"\n"来分割文件内容,即按照行来分割文件内容,注释和空白行自动过滤掉
 7  for (const auto& line : Split(file_contents, "\n")) {
 8    auto trimmed_line = Trim(line);
 9    if (trimmed_line.empty() || StartsWith(trimmed_line, "#")) {
10      continue;
11    }
12
13    auto property_info_entry = PropertyInfoEntry{};
14    auto parse_error = std::string{};
15    //最终通过行解析得到具体的数组值,一个PropertyInfoEntry类型的实例
16    if (!ParsePropertyInfoLine(trimmed_line, require_prefix_or_exact, &property_info_entry,
17                               &parse_error)) {
18      errors->emplace_back(parse_error);
19      continue;
20    }
21
22    property_infos->emplace_back(property_info_entry);
23  }
24}
ParsePropertyInfoLine
 1bool ParsePropertyInfoLine(const std::string& line, bool require_prefix_or_exact,
 2                           PropertyInfoEntry* out, std::string* error) {
 3  //去除一行首部和尾部中的空格
 4  auto tokenizer = SpaceTokenizer(line);
 5  //获取第一列数据,为property的name(string类型)
 6  auto property = tokenizer.GetNext();
 7  ...
 8  //获取第二列数据,为SElinux的context(string类型)
 9  auto context = tokenizer.GetNext();
10  ...
11  //获取第三列数据,为exact/prefix/...参数
12  auto match_operation = tokenizer.GetNext();
13  auto type_strings = std::vector<std::string>{};
14  //获取第四列的数据类型,string/bool/int/uint/double/size/enum(定义在property_type.cpp中)
15  auto type = tokenizer.GetNext();
16  //这里就是为了获取enum类型存在的
17  while (!type.empty()) {
18    type_strings.emplace_back(type);
19    type = tokenizer.GetNext();
20  }
21
22  bool exact_match = false;
23  if (match_operation == "exact") {
24    exact_match = true;
25  } else if (match_operation != "prefix" && match_operation != "" && require_prefix_or_exact) {
26    return false;
27  }
28  ...
29  *out = {property, context, Join(type_strings, " "), exact_match};
30  return true;
31}
比如设备中的/system/etc/selinux/plat_property_contexts文件
 1#截取部分内容
 2bluetooth.              u:object_r:bluetooth_prop:s0
 3config.                 u:object_r:config_prop:s0
 4ctl.bootanim            u:object_r:ctl_bootanim_prop:s0
 5ctl.bugreport           u:object_r:ctl_bugreport_prop:s0
 6...
 7ro.boot.dynamic_partitions    u:object_r:exported_default_prop:s0              exact string
 8aaudio.hw_burst_min_usec      u:object_r:exported_default_prop:s0              exact string
 9ro.boot.hardware.revision     u:object_r:exported_default_prop:s0              exact string
10ro.surfaceflinger.primary_display_orientation u:object_r:exported_default_prop:s0 exact
11 ORENTATION_0 ORENTATION_180 ORENTATION_270 ORENTATION_90
12cache_key.bluetooth           u:object_r:binder_cacherbluetooth_server_prop:s0 prefix string
13graphics_gpu.profiler.support u:object_r:graphics_config_prop:s0               exact bool
14...
转化为类似
 1//PropertyInfoEntry类型数组
 2...
 3{ro.boot.dynamic_partitions,   u:object_r:exported_default_prop:s0,              string, true},
 4{aaudio.hw_burst_min_usec,     u:object_r:exported_default_prop:s0,              string, true},
 5{ro.boot.hardware.revision,    u:object_r:exported_default_prop:s0,              string, true},
 6{ro.surfaceflinger.primary_display_orientation, u:object_r:exported_default_prop:s0,
 7 {ORENTATION_0, ORENTATION_180, ORENTATION_270, ORENTATION_90}, true},
 8{cache_key.bluetooth,          u:object_r:binder_cacherbluetooth_server_prop:s0, string, false},
 9{graphics_gpu.profiler.support,u:object_r:graphics_config_prop:s0,               bool,   true},
10...
1.1.2BuildTrie
 1//system/core/property_service/libpropertyinfoserializer/property_info_serializer.cpp
 2//构建字典树,并且序列化
 3bool BuildTrie(const std::vector<PropertyInfoEntry>& property_info,
 4               const std::string& default_context, const std::string& default_type,
 5               std::string* serialized_trie, std::string* error) {
 6  // Check that names are legal first
 7  auto trie_builder = TrieBuilder(default_context, default_type);
 8
 9  for (const auto& [name, context, type, is_exact] : property_info) {
10    //生成字典树
11    if (!trie_builder.AddToTrie(name, context, type, is_exact, error)) {
12      return false;
13    }
14  }
15  //实例化字典树序列器
16  auto trie_serializer = TrieSerializer();
17  //字典树序列化
18  *serialized_trie = trie_serializer.SerializeTrie(trie_builder);
19  return true;
20}
显然,这边主要是一个装饰着模式的应用,主要的实现还在其他地方,这个函数主要作用就是用于把之前导入的属性构建成字典树然后将其序列化成字符串的形式,最终会调到CreateSerializedPropertyInfo函数,变成一个序列化的文件/dev/__properties__/property_info
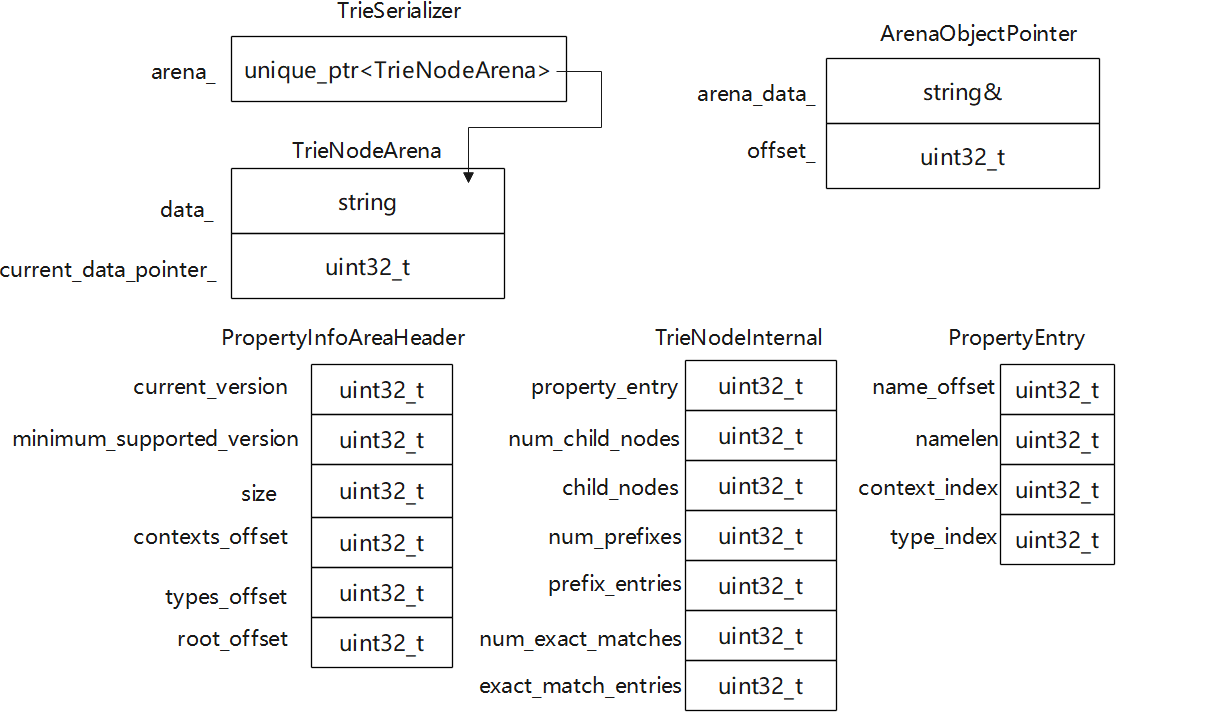
1.1.2.1TrieBuilder
1//system/core/property_service/libpropertyinfoserializer/trie_builder.cpp
2TrieBuilder::TrieBuilder(const std::string& default_context, const std::string& default_type)
3    : builder_root_("root") {
4  auto* context_pointer = StringPointerFromContainer(default_context, &contexts_);
5  builder_root_.set_context(context_pointer);
6  auto* type_pointer = StringPointerFromContainer(default_type, &types_);
7  builder_root_.set_type(type_pointer);
8}
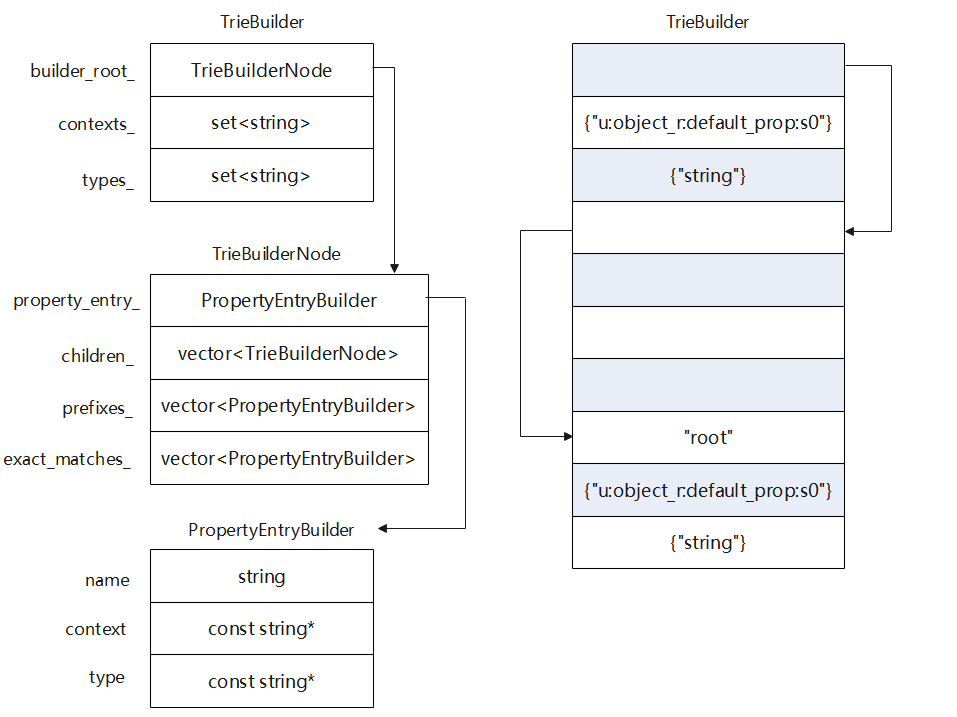
如下图所示,是字典树的数据结构,简化后如右图所示,只显示TrieBuilder构造完成后对应的关系的数据结构图
1.1.2.2AddToTrie
 1//system/core/property_service/libpropertyinfoserializer/trie_builder.cpp
 2bool TrieBuilder::AddToTrie(const std::string& name, const std::string& context,
 3                            const std::string& type, bool exact, std::string* error) {
 4  auto* context_pointer = StringPointerFromContainer(context, &contexts_);
 5  auto* type_pointer = StringPointerFromContainer(type, &types_);
 6  return AddToTrie(name, context_pointer, type_pointer, exact, error);
 7}
 8
 9bool TrieBuilder::AddToTrie(const std::string& name, const std::string* context,
10                            const std::string* type, bool exact, std::string* error) {
11  //找到根结点,就是TrieBuilder构造完成的结点
12  TrieBuilderNode* current_node = &builder_root_;
13  //通过属性name的点来划分属性名字,分成几段
14  auto name_pieces = Split(name, ".");
15
16  bool ends_with_dot = false;
17  if (name_pieces.back().empty()) {
18    ends_with_dot = true;
19    name_pieces.pop_back();
20  }
21
22  // Move us to the final node that we care about, adding incremental nodes if necessary.
23  while (name_pieces.size() > 1) {
24    //按照排列寻找对应的结点的每一段在字典树中查找(不排序)
25    auto child = current_node->FindChild(name_pieces.front());
26    if (child == nullptr) {
27      //找不到字典树对应的结点,就新增一个结点(数组中添加)
28      child = current_node->AddChild(name_pieces.front());
29    }
30    if (child == nullptr) {
31      *error = "Unable to allocate Trie node";
32      return false;
33    }
34    current_node = child;
35    name_pieces.erase(name_pieces.begin());
36  }
37
38  //传入到这里代表着属性name点的最后一段,根据传入的exact参数值判断是否是exact类型或者是prefix类型来添加对应的结点
39  if (exact) {
40    if (!current_node->AddExactMatchContext(name_pieces.front(), context, type)) {
41      *error = "Duplicate exact match detected for '" + name + "'";
42      return false;
43    }
44  } else if (!ends_with_dot) {
45    if (!current_node->AddPrefixContext(name_pieces.front(), context, type)) {
46      *error = "Duplicate prefix match detected for '" + name + "'";
47      return false;
48    }
49  } else {
50    auto child = current_node->FindChild(name_pieces.front());
51    if (child == nullptr) {
52      child = current_node->AddChild(name_pieces.front());
53    }
54    if (child == nullptr) {
55      *error = "Unable to allocate Trie node";
56      return false;
57    }
58    if (child->context() != nullptr || child->type() != nullptr) {
59      *error = "Duplicate prefix match detected for '" + name + "'";
60      return false;
61    }
62    child->set_context(context);
63    child->set_type(type);
64  }
65  return true;
66}
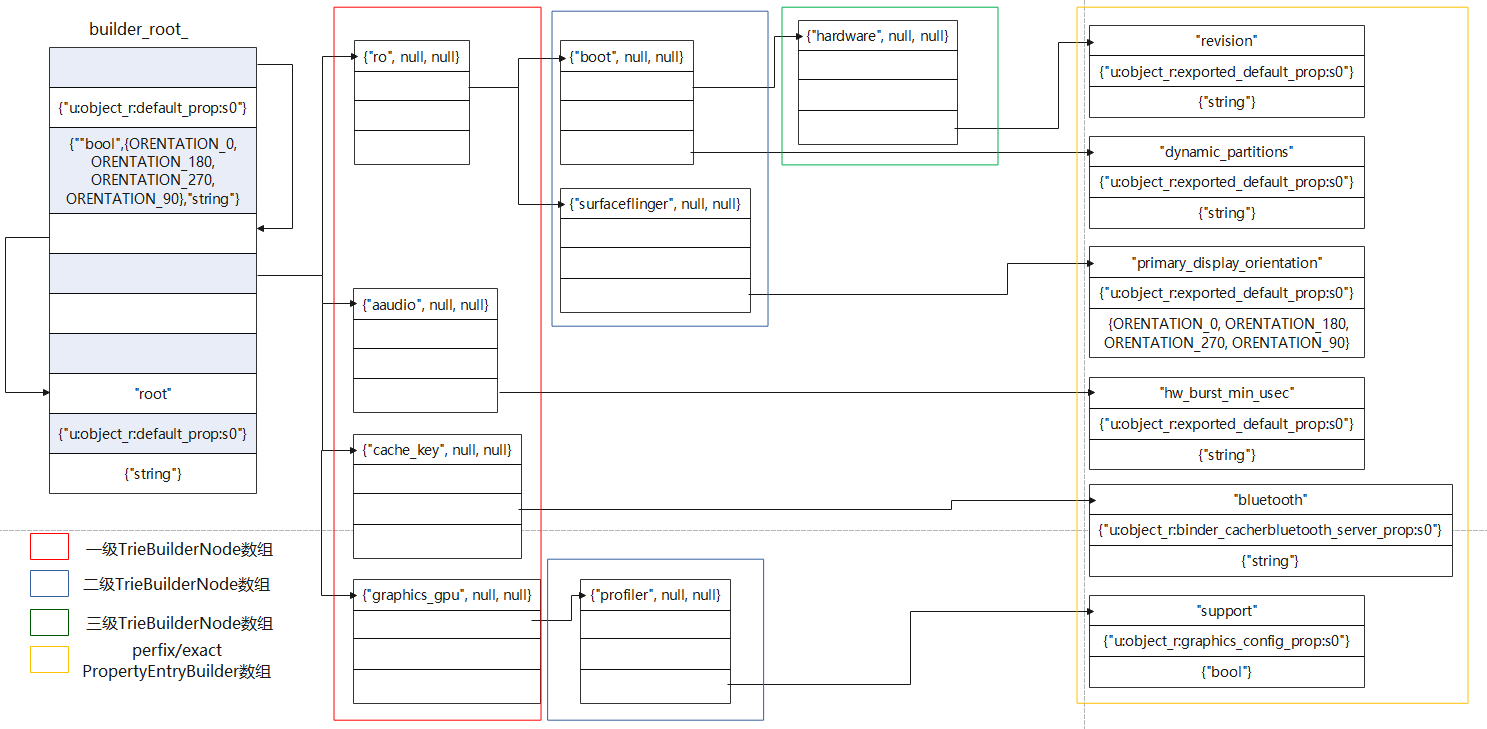
真正开始添加成为一棵树,并开始添加子节点,以1.1.1中的PropertyInfoEntry类型数组为例说明
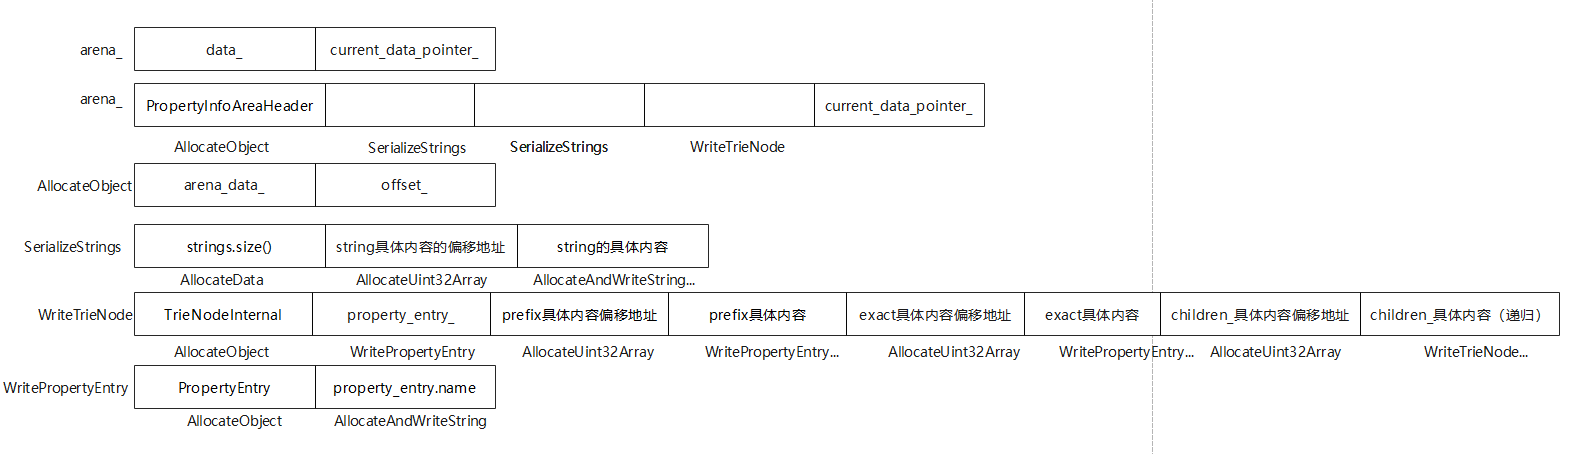
1.1.2.3SerializeTrie
 1//system/core/property_service/libpropertyinfoserializer/trie_serializer.cpp
 2std::string TrieSerializer::SerializeTrie(const TrieBuilder& trie_builder) {
 3  arena_.reset(new TrieNodeArena());
 4  //arena_指针是TrieNodeArena类型的,也就是这里的arena_所指的data_的头部为PropertyInfoAreaHeader类型
 5  //PropertyInfoAreaHeader类型是为了记录TrieBuilder中各个元素距离data_指针的偏移
 6  auto header = arena_->AllocateObject<PropertyInfoAreaHeader>(nullptr);
 7  header->current_version = 1;
 8  header->minimum_supported_version = 1;
 9  //开始存储TrieBuilder数据结构中的contexts_,并记录当前的位置,这个位置是与data_指针相差的距离
10  header->contexts_offset = arena_->size();
11  SerializeStrings(trie_builder.contexts());
12  //开始存储TrieBuilder数据结构中的types_,并记录当前的位置,这个位置是与data_指针相差的距离
13  header->types_offset = arena_->size();
14  SerializeStrings(trie_builder.types());
15  //记录types_之后的位置,主要是用于TrieBuilderNode序列化的寻址
16  header->size = arena_->size();
17  //开始对TrieBuilderNode这个数据结构图进行序列化
18  uint32_t root_trie_offset = WriteTrieNode(trie_builder.builder_root());
19  //root_offset记录的是TrieNodeInternal类型和data_指针的偏移地址
20  header->root_offset = root_trie_offset;
21  //最终记录TrieBuilderNode的与data_指针的偏移地址
22  header->size = arena_->size();
23  //截断多余的空间,使得data_使用空间大小和current_data_point_相等
24  return arena_->truncated_data();
25}
关于arena_,TrieNodeArena等定义都在下面的头文件中,这个头文件比较重要,包含了如何序列化的一些函数
 1//system/core/property_service/libpropertyinfoserializer/trie_node_arena.h
 2template <typename T>
 3class ArenaObjectPointer {
 4    public:
 5    ArenaObjectPointer(std::string& arena_data, uint32_t offset)
 6        : arena_data_(arena_data), offset_(offset) {}
 7
 8    T* operator->() { return reinterpret_cast<T*>(arena_data_.data() + offset_); }
 9
10    private:
11    std::string& arena_data_;
12    uint32_t offset_;
13};
14
15class TrieNodeArena {
16    public:
17    TrieNodeArena() : current_data_pointer_(0) {}
18
19    // We can't return pointers to objects since data_ may move when reallocated, thus invalidating
20    // any pointers.  Therefore we return an ArenaObjectPointer, which always accesses elements via
21    // data_ + offset.
22    template <typename T>
23    ArenaObjectPointer<T> AllocateObject(uint32_t* return_offset) {
24        uint32_t offset;
25        AllocateData(sizeof(T), &offset);
26        if (return_offset) *return_offset = offset;
27        return ArenaObjectPointer<T>(data_, offset);
28    }
29    uint32_t AllocateUint32Array(int length) {
30        uint32_t offset;
31        AllocateData(sizeof(uint32_t) * length, &offset);
32        return offset;
33    }
34
35    uint32_t* uint32_array(uint32_t offset) {
36        return reinterpret_cast<uint32_t*>(data_.data() + offset);
37    }
38
39    uint32_t AllocateAndWriteString(const std::string& string) {
40        uint32_t offset;
41        char* data = static_cast<char*>(AllocateData(string.size() + 1, &offset));
42        strcpy(data, string.c_str());
43        return offset;
44    }
45
46    void AllocateAndWriteUint32(uint32_t value) {
47        auto location = static_cast<uint32_t*>(AllocateData(sizeof(uint32_t), nullptr));
48        *location = value;
49    }
50
51    void* AllocateData(size_t size, uint32_t* offset) {
52        //这里的意思,实际上是数据结构的内存对齐,保证分配的大小是4的整数倍
53        size_t aligned_size = size + (sizeof(uint32_t) - 1) & ~(sizeof(uint32_t) - 1);
54
55        if (current_data_pointer_ + aligned_size > data_.size()) {
56            auto new_size = (current_data_pointer_ + aligned_size + data_.size()) * 2;
57            data_.resize(new_size, '\0');
58        }
59        if (offset) *offset = current_data_pointer_;
60
61        uint32_t return_offset = current_data_pointer_;
62        current_data_pointer_ += aligned_size;
63        return &data_[0] + return_offset;
64    }
65
66    uint32_t size() const { return current_data_pointer_; }
67
68    const std::string& data() const { return data_; }
69    std::string truncated_data() const {
70        auto result = data_;
71        result.resize(current_data_pointer_);
72        return result;
73    }
74
75    private:
76    std::string data_;
77    uint32_t current_data_pointer_;
78};
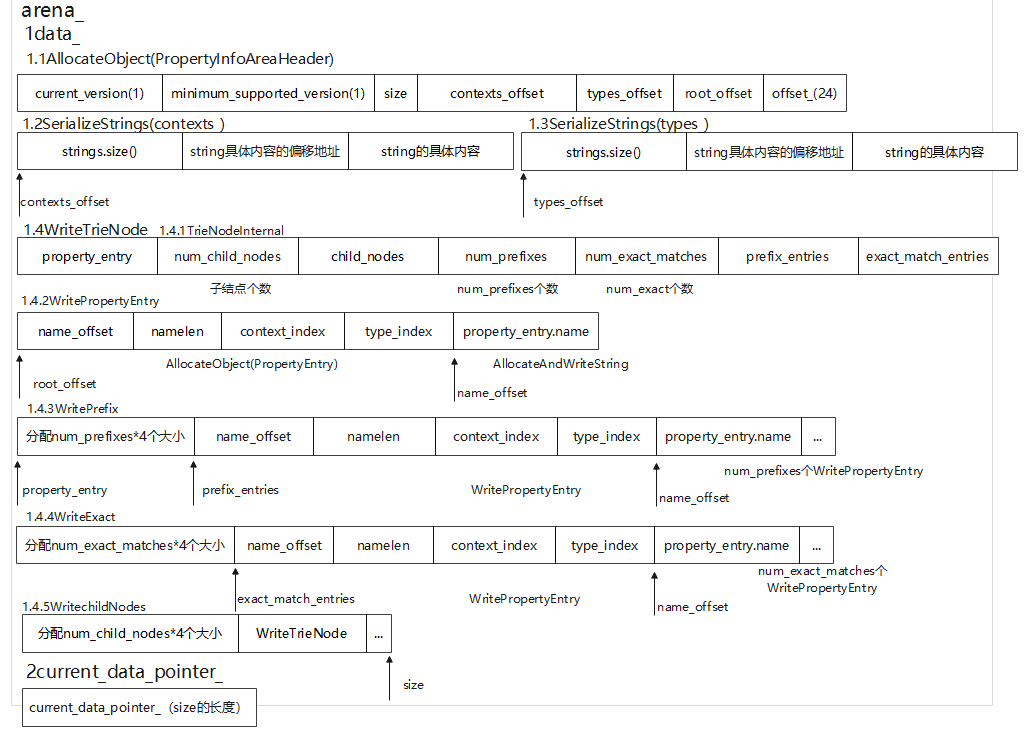
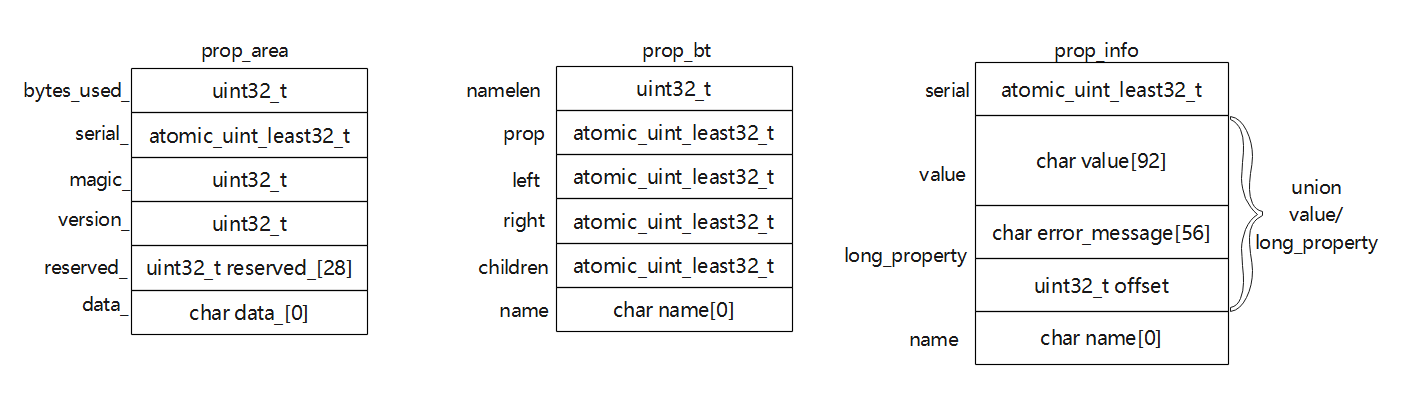
序列化拆分的数据结构
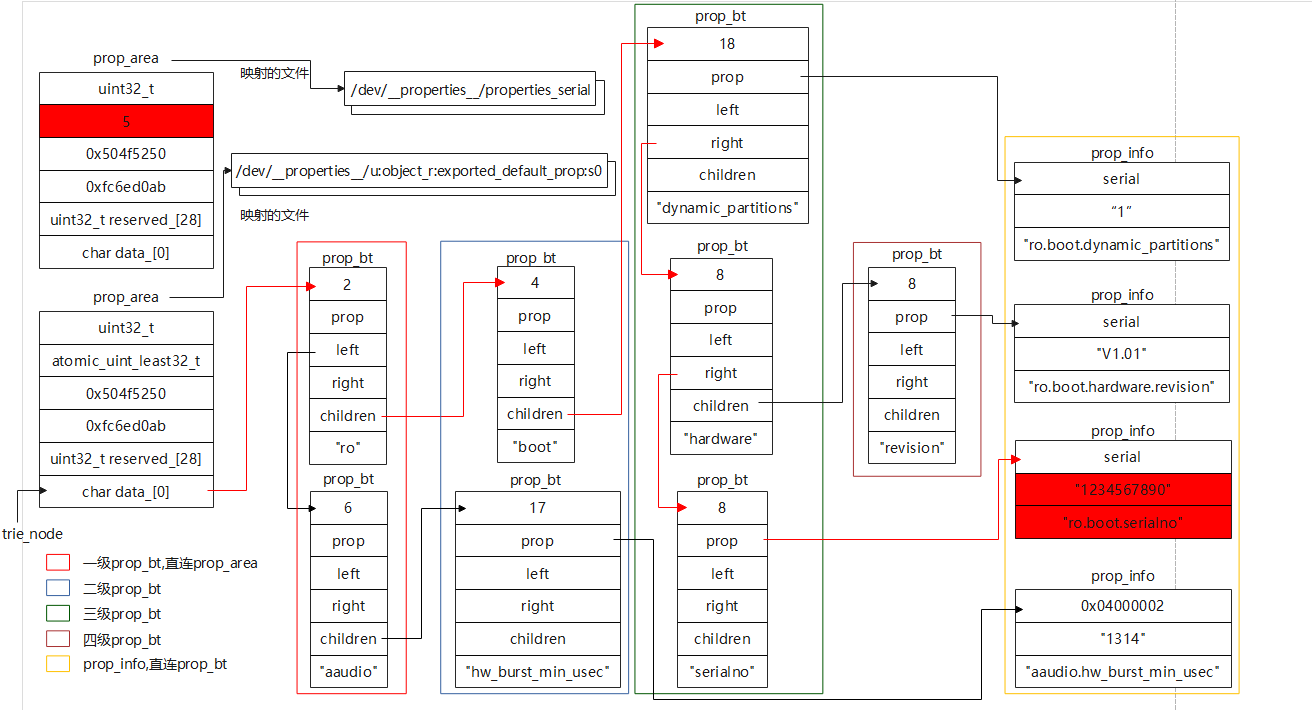
文件/dev/__properties__/property_info中的数据结构如下所示,后续可根据对应的PropertyInfoAreaHeader、TrieNodeInternal、PropertyEntry三个结构体存储的内容来具体找到对应的属性中的偏移。
1.2初始化属性安全上下文
初始化属性安全上下文__system_property_area_init
 1//bionic/libc/bionic/system_property_api.cpp
 2//__BIONIC_WEAK_FOR_NATIVE_BRIDGE代表__attribute__((__weak__, __noinline__))
 3//声明weak function,链接器不会从库中加载对象来解析弱引用。仅当由于其他原因在镜像中包含了定义时,它才能解析弱引用。
 4//noinline设置函数为非内联函数
 5//#define PROP_FILENAME "/dev/__properties__"
 6 __BIONIC_WEAK_FOR_NATIVE_BRIDGE
 7int __system_property_area_init() {
 8  bool fsetxattr_failed = false;
 9  return system_properties.AreaInit(PROP_FILENAME, &fsetxattr_failed) && !fsetxattr_failed ? 0 : -1;
10}
system_properties.AreaInit
 1//bionic/libc/system_properties/system_properties.cpp
 2bool SystemProperties::AreaInit(const char* filename, bool* fsetxattr_failed) {
 3  if (strlen(filename) >= PROP_FILENAME_MAX) {
 4    return false;
 5  }
 6  strcpy(property_filename_, filename);
 7
 8  contexts_ = new (contexts_data_) ContextsSerialized();
 9  if (!contexts_->Initialize(true, property_filename_, fsetxattr_failed)) {
10    return false;
11  }
12  //初始化结束之后,会把initialized_设置为true
13  initialized_ = true;
14  return true;
15}
这里主要property_filename_赋值为/dev/__properties__,另外对contexts_进行序列化初值,并且初始化,这里的初始化传参是true,跟app传参false区别开来,说明只有系统root用户才有权限写入操作。
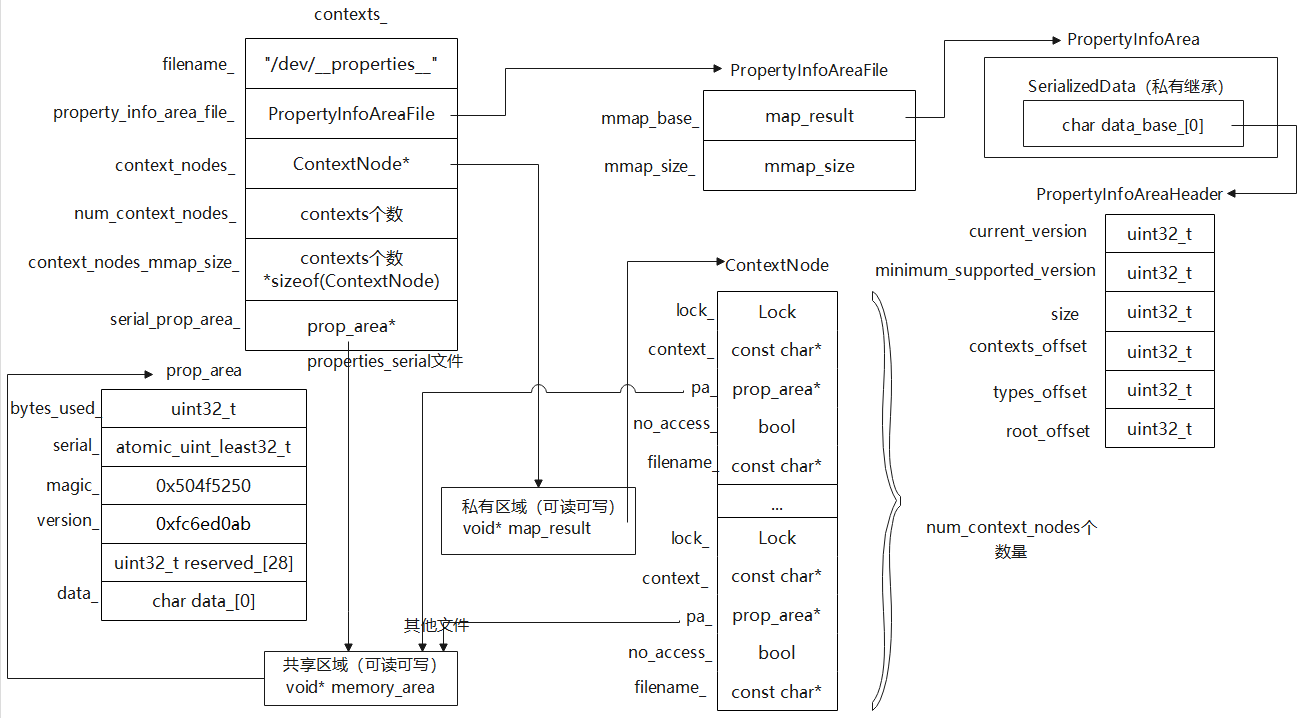
1.2.1ContextsSerialized
contexts_的基类是Contexts,ContextsSerialized是Contexts的子类。
记录ContextsSerialized类的组成
1class ContextsSerialized : public Contexts {
2  const char* filename_;
3  android::properties::PropertyInfoAreaFile property_info_area_file_;
4  ContextNode* context_nodes_ = nullptr;
5  size_t num_context_nodes_ = 0;
6  size_t context_nodes_mmap_size_ = 0;
7  prop_area* serial_prop_area_ = nullptr;
8};
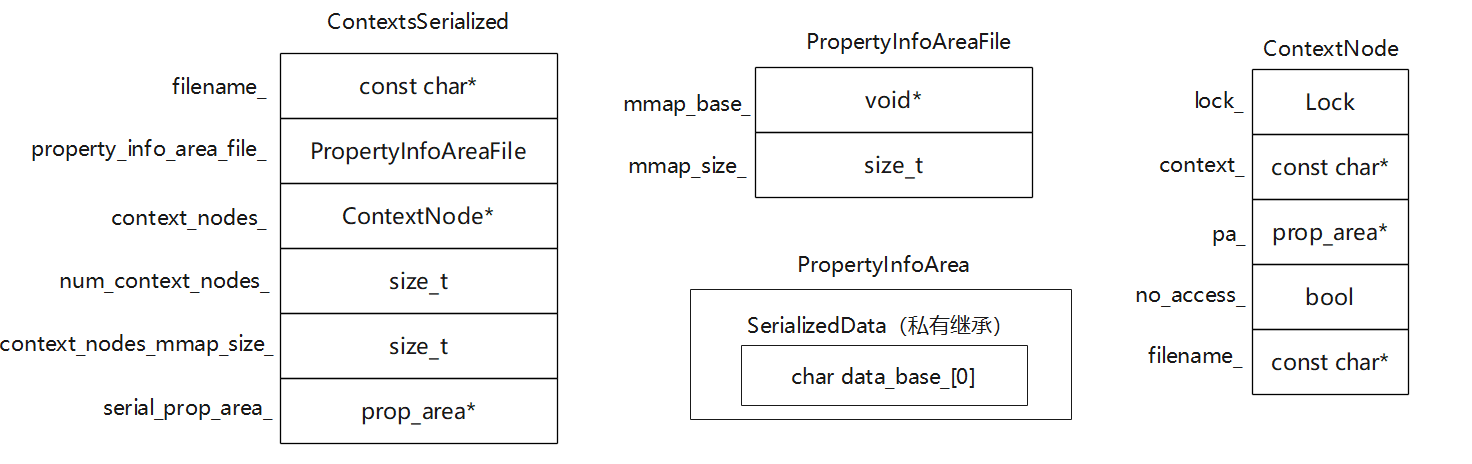
1.2.2Initialize
这个没有定义构造函数,那么就是默认的构造函数contexts_->Initialize
 1//bionic/libc/system_properties/contexts_serialized.cpp
 2//初始化的进程是init进程,所有有root读取权限修改,传入的writable是true,传入的filename是"/dev/__properties__"
 3bool ContextsSerialized::Initialize(bool writable, const char* filename, bool* fsetxattr_failed) {
 4  filename_ = filename;
 5  //是否成功初始化属性
 6  if (!InitializeProperties()) {
 7    return false;
 8  }
 9
10  if (writable) {
11    mkdir(filename_, S_IRWXU | S_IXGRP | S_IXOTH);
12    bool open_failed = false;
13    if (fsetxattr_failed) {
14      *fsetxattr_failed = false;
15    }
16
17    for (size_t i = 0; i < num_context_nodes_; ++i) {
18      //开始创建context文件
19      if (!context_nodes_[i].Open(true, fsetxattr_failed)) {
20        open_failed = true;
21      }
22    }
23    if (open_failed || !MapSerialPropertyArea(true, fsetxattr_failed)) {
24      FreeAndUnmap();
25      return false;
26    }
27  } else {
28    if (!MapSerialPropertyArea(false, nullptr)) {
29      FreeAndUnmap();
30      return false;
31    }
32  }
33  return true;
34}
构造完成之后,contexts_的数据结构如下图所示
1.2.2.1InitializeProperties
 1//bionic/libc/system_properties/contexts_serialized.cpp
 2bool ContextsSerialized::InitializeProperties() {
 3  //导入1.1中完成序列化的property_info文件
 4  if (!property_info_area_file_.LoadDefaultPath()) {
 5    return false;
 6  }
 7  //开始创建SElinux安全上下文文件
 8  if (!InitializeContextNodes()) {
 9    FreeAndUnmap();
10    return false;
11  }
12
13  return true;
14}
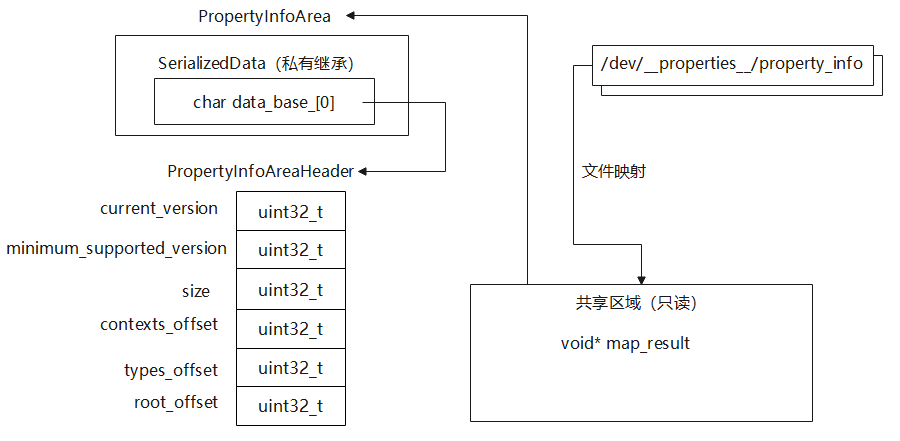
1)LoadDefaultPath
 1//system/core/property_service/libpropertyinfoparser/property_info_parser.cpp
 2bool PropertyInfoAreaFile::LoadDefaultPath() {
 3  return LoadPath("/dev/__properties__/property_info");
 4}
 5
 6bool PropertyInfoAreaFile::LoadPath(const char* filename) {
 7  int fd = open(filename, O_CLOEXEC | O_NOFOLLOW | O_RDONLY);
 8
 9  struct stat fd_stat;
10  if (fstat(fd, &fd_stat) < 0) {
11    close(fd);
12    return false;
13  }
14  //判断打开的文件是不是init进程,必须是uid=0,gid=0,且文件大小需要大于PropertyInfoArea类型
15  if ((fd_stat.st_uid != 0) || (fd_stat.st_gid != 0) ||
16      ((fd_stat.st_mode & (S_IWGRP | S_IWOTH)) != 0) ||
17      (fd_stat.st_size < static_cast<off_t>(sizeof(PropertyInfoArea)))) {
18    close(fd);
19    return false;
20  }
21
22  auto mmap_size = fd_stat.st_size;
23  //这里做了mmap操作,相当于做了读操作的共享区域的映射
24  void* map_result = mmap(nullptr, mmap_size, PROT_READ, MAP_SHARED, fd, 0);
25  if (map_result == MAP_FAILED) {
26    close(fd);
27    return false;
28  }
29  //共享区域映射之后的指针指向PropertyInfoArea类型
30  auto property_info_area = reinterpret_cast<PropertyInfoArea*>(map_result);
31  if (property_info_area->minimum_supported_version() > 1 ||
32      property_info_area->size() != mmap_size) {
33    munmap(map_result, mmap_size);
34    close(fd);
35    return false;
36  }
37
38  close(fd);
39  mmap_base_ = map_result;
40  mmap_size_ = mmap_size;
41  return true;
42}
mmap说明关于
mmap东西很多,这里之前浅谈一些基础api用法,具体可点击这里。1void* mmap(void* addr, size_t length, int prot, int flags, int fd, off_t offset);
- addr 代表映射的虚拟内存起始地址;
- length 代表该映射长度;
- prot 描述了这块新的内存区域的访问权限;
- flags 描述了该映射的类型;
- fd 代表文件描述符;
- offset 代表文件内的偏移值。
参数 参数可选用的值 对应的含义 protPROT_EXEC该内存映射有可执行权限,可以看成是代码段,通常存储CPU可执行机器码 PROT_READ该内存映射可读 PROT_WRITE该内存映射可写 PROT_NONE该内存映射不能被访问 flagsMAP_SHARED创建一个共享映射区域 MAP_PRIVATE创建一个私有映射区域 MAP_ANONYMOUS创建一个匿名映射区域,该情况只需要传入-1即可 MAP_FIXED当操作系统以 addr为起始地址进行内存映射时,如果发现不能满足长度或者权限要求时,将映射失败,如果非MAP_FIXED,则系统就会再找其他合适的区域进行映射fd大于0 内存映射将与文件进行关联 -1 匿名映射,此时flags必为 MAP_ANONYMOUS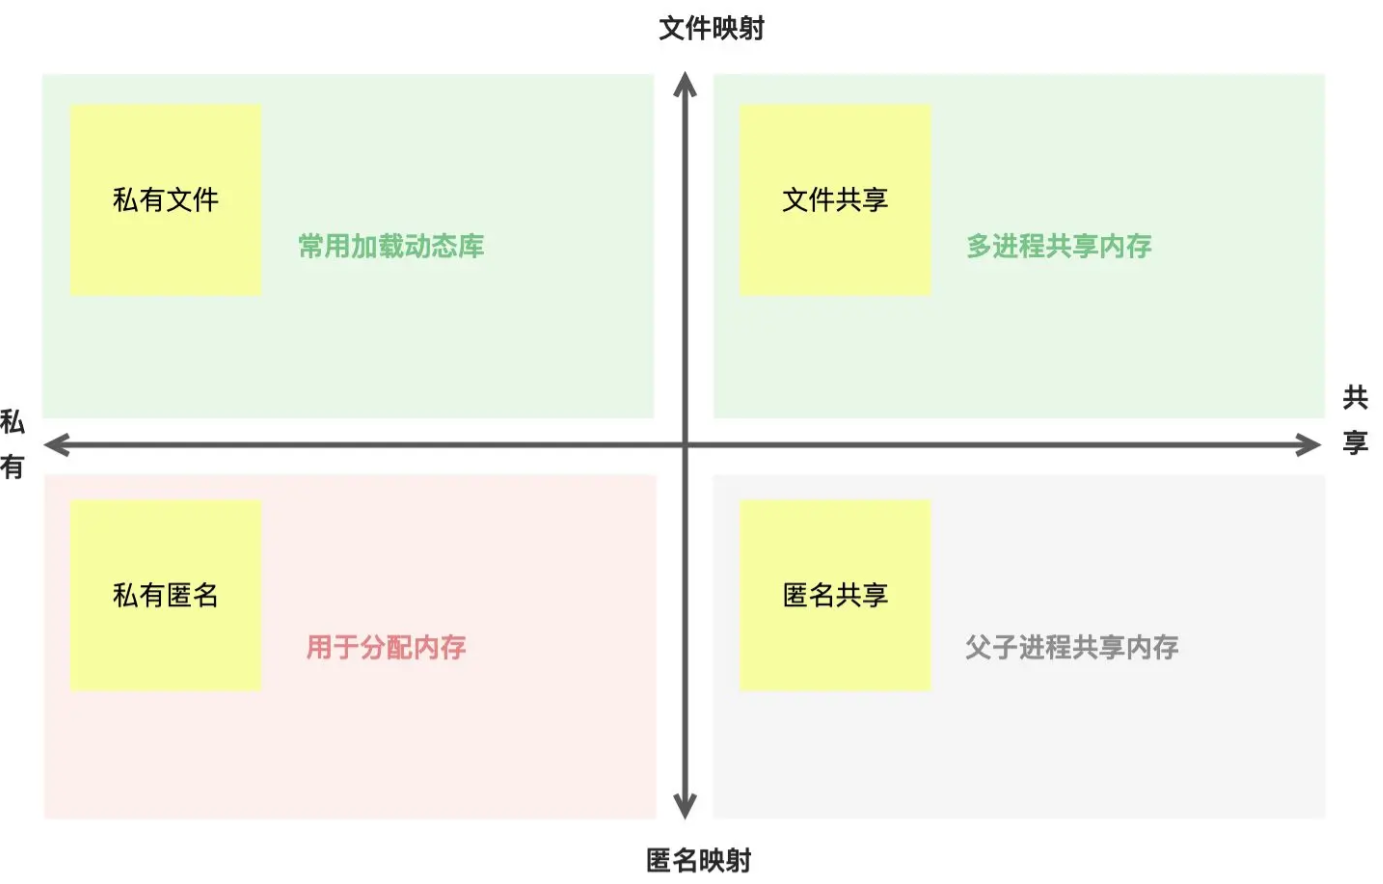
这里的强转的property_info_area指针其实对应着上文1.1中的arena_指针
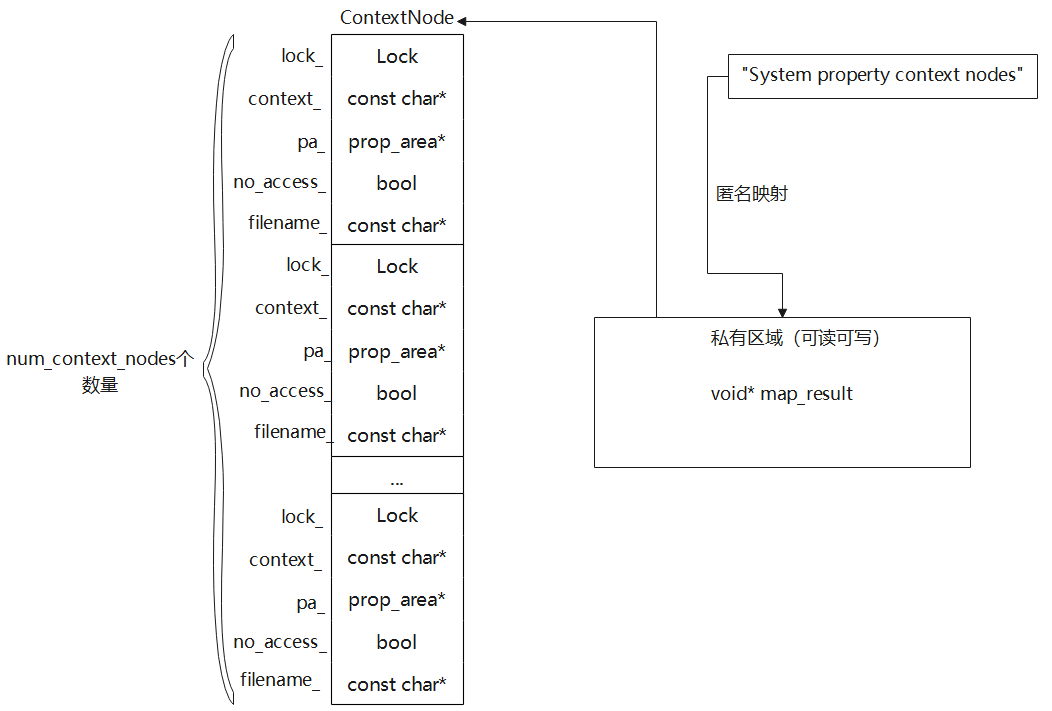
2)InitializeContextNodes
生成对应的SElinux安全上下文的文件
 1//bionic/libc/system_properties/contexts_serialized.cpp
 2bool ContextsSerialized::InitializeContextNodes() {
 3  //num_context_nodes这里指的arena_头部结构体PropertyInfoAreaHeader中的contexts_个数
 4  auto num_context_nodes = property_info_area_file_->num_contexts();
 5  //计算出一个大小为ContextNode大小*contexts_个数的空间
 6  auto context_nodes_mmap_size = sizeof(ContextNode) * num_context_nodes;
 7  //使用mmap分配了一个私有匿名的内存,缓存在context_nodes_中
 8  void* const map_result = mmap(nullptr, context_nodes_mmap_size, PROT_READ | PROT_WRITE,
 9                                MAP_PRIVATE | MAP_ANONYMOUS, -1, 0);
10  if (map_result == MAP_FAILED) {
11    return false;
12  }
13  //调用一次prctl使用PR_SET_VMA参数,功能是给addr和vsize指定的匿名内存区域命名了"System property context nodes"
14  prctl(PR_SET_VMA, PR_SET_VMA_ANON_NAME, map_result, context_nodes_mmap_size,
15        "System property context nodes");
16
17  context_nodes_ = reinterpret_cast<ContextNode*>(map_result);
18  num_context_nodes_ = num_context_nodes;
19  context_nodes_mmap_size_ = context_nodes_mmap_size;
20  for (size_t i = 0; i < num_context_nodes; ++i) {
21    //对每一个Context进行实例化,并且默认的初始值传入
22    //这个property_info_area_file_->context(i)为具体的context内容,filename_为/dev/__properties__
23    new (&context_nodes_[i]) ContextNode(property_info_area_file_->context(i), filename_);
24  }
25  return true;
26}
同LoadDefaultPath类似,这里也出现mmap操作,不过这里更像是malloc分配内存,这个mmap操作既是匿名的又是私有的,并且实例化num_context_nodes个ContextNode。
1.2.2.2Open
 1//bionic/libc/system_properties/context_node.cpp
 2bool ContextNode::Open(bool access_rw, bool* fsetxattr_failed) {
 3  //这里的pa_是prop_area类型的指针,如果pa_安全上下文存在说明文件已经存在,直接退出
 4  lock_.lock();
 5  if (pa_) {
 6    lock_.unlock();
 7    return true;
 8  }
 9
10  char filename[PROP_FILENAME_MAX];
11  //filename 对应的是具体的SElinux的context
12  //比如/dev/__properties__/u:object_r:exported_default_prop:s0
13  int len = async_safe_format_buffer(filename, sizeof(filename), "%s/%s", filename_, context_);
14  if (len < 0 || len >= PROP_FILENAME_MAX) {
15    lock_.unlock();
16    return false;
17  }
18
19  if (access_rw) {
20    //创建对应的文件
21    pa_ = prop_area::map_prop_area_rw(filename, context_, fsetxattr_failed);
22  } else {
23    pa_ = prop_area::map_prop_area(filename);
24  }
25  lock_.unlock();
26  return pa_;
27}
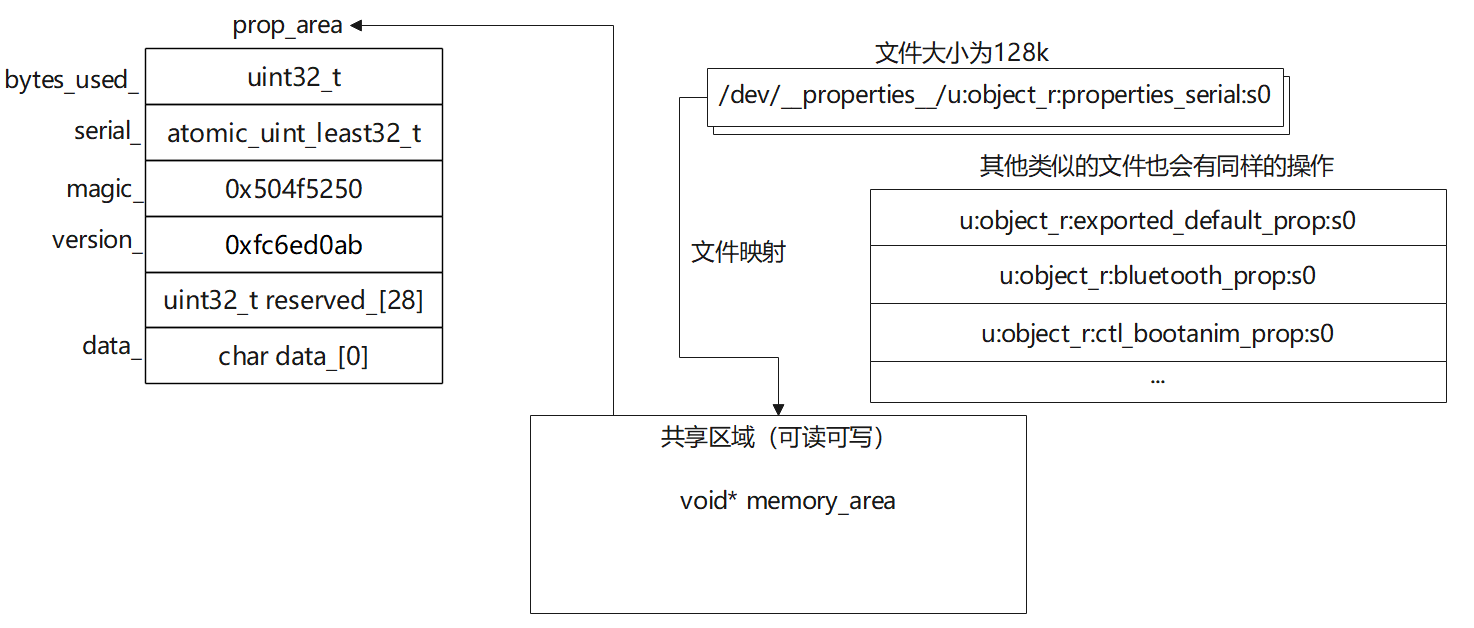
map_prop_area_rw
 1//bionic/libc/system_properties/prop_area.cpp
 2prop_area* prop_area::map_prop_area_rw(const char* filename, const char* context,
 3                                       bool* fsetxattr_failed) {
 4  //打开文件,不存在就创建文件
 5  const int fd = open(filename, O_RDWR | O_CREAT | O_NOFOLLOW | O_CLOEXEC | O_EXCL, 0444);
 6  ...
 7  //文件大小设置为PA_SIZE(128 * 1024),多的大小那么就截断
 8  if (ftruncate(fd, PA_SIZE) < 0) {
 9    close(fd);
10    return nullptr;
11  }
12
13  pa_size_ = PA_SIZE;
14  pa_data_size_ = pa_size_ - sizeof(prop_area);
15  //通过mmap映射了一个可读可写的共享区域
16  void* const memory_area = mmap(nullptr, pa_size_, PROT_READ | PROT_WRITE, MAP_SHARED, fd, 0);
17  if (memory_area == MAP_FAILED) {
18    close(fd);
19    return nullptr;
20  }
21  //并且设置区域的开始为prop_area类型,且附上初值PROP_AREA_MAGIC = 0x504f5250,PROP_AREA_VERSION = 0xfc6ed0ab
22  prop_area* pa = new (memory_area) prop_area(PROP_AREA_MAGIC, PROP_AREA_VERSION);
23
24  close(fd);
25  return pa;
26}
这里第三次出现了mmap,而且是通过创建的SElinux安全上下文文件来映射对应的共享内存区域
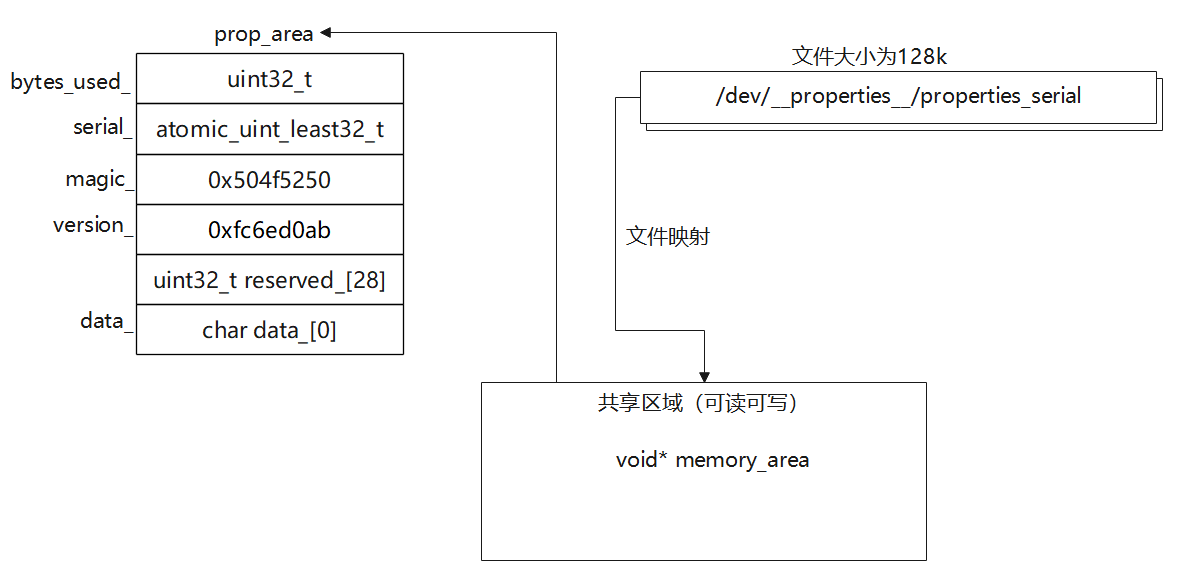
1.2.2.3MapSerialPropertyArea
 1//bionic/libc/system_properties/contexts_serialized.cpp
 2bool ContextsSerialized::MapSerialPropertyArea(bool access_rw, bool* fsetxattr_failed) {
 3  char filename[PROP_FILENAME_MAX];
 4  //这里的filename是/dev/__properties__/properties_serial
 5  int len = async_safe_format_buffer(filename, sizeof(filename), "%s/properties_serial", filename_);
 6  if (len < 0 || len >= PROP_FILENAME_MAX) {
 7    serial_prop_area_ = nullptr;
 8    return false;
 9  }
10
11  if (access_rw) {
12    //init进程肯定是走可读写权限,创建了对应的/dev/__properties__/properties_serial文件,大小为128K
13    //这里传入的context_跟上述不一致,这里是"u:object_r:properties_serial:s0",主要用于校验作用
14    serial_prop_area_ =
15        prop_area::map_prop_area_rw(filename, "u:object_r:properties_serial:s0", fsetxattr_failed);
16  } else {
17    serial_prop_area_ = prop_area::map_prop_area(filename);
18  }
19  return serial_prop_area_;
20}
1.3属性安全上下文的文件导入
这里跟1.2中的有重复部分,这里就不具体展开了,作用是为了二次确认是否/dev/__properties__/property_info是否映射正常
1.4其他的属性初始化
1ProcessKernelDt();
2ProcessKernelCmdline();
3ExportKernelBootProps();
4PropertyLoadBootDefaults();
1.4.1ProcessKernelDt
 1//system/core/init/property_service.cpp
 2static void ProcessKernelDt() {
 3    //判断 /proc/device-tree/firmware/android/compatible 文件中的值是否为 android,firmware
 4    if (!is_android_dt_value_expected("compatible", "android,firmware")) {
 5        return;
 6    }
 7    //get_android_dt_dir()的值为/proc/device-tree/firmware/android
 8    std::unique_ptr<DIR, int (*)(DIR*)> dir(opendir(get_android_dt_dir().c_str()), closedir);
 9    if (!dir) return;
10
11    std::string dt_file;
12    struct dirent* dp;
13    ////遍历dir中的文件
14    while ((dp = readdir(dir.get())) != NULL) {
15        if (dp->d_type != DT_REG || !strcmp(dp->d_name, "compatible") ||
16            !strcmp(dp->d_name, "name")) {
17            continue;
18        }
19
20        std::string file_name = get_android_dt_dir() + dp->d_name;
21
22        android::base::ReadFileToString(file_name, &dt_file);
23        std::replace(dt_file.begin(), dt_file.end(), ',', '.');
24        // 将 ro.boot.文件名 作为key,文件内容为value,设置进属性
25        InitPropertySet("ro.boot."s + dp->d_name, dt_file);
26    }
27}
1.4.2ProcessKernelCmdline
 1//system/core/init/property_service.cpp
 2static void ProcessKernelCmdline() {
 3    bool for_emulator = false;
 4    ImportKernelCmdline([&](const std::string& key, const std::string& value) {
 5        if (key == "qemu") {
 6            for_emulator = true;
 7        } else if (StartsWith(key, "androidboot.")) {
 8            InitPropertySet("ro.boot." + key.substr(12), value);
 9        }
10    });
11
12    if (for_emulator) {
13        ImportKernelCmdline([&](const std::string& key, const std::string& value) {
14            // In the emulator, export any kernel option with the "ro.kernel." prefix.
15            InitPropertySet("ro.kernel." + key, value);
16        });
17    }
18}
主要展开讲一下ProcessKernelCmdline,主要是处理kernel预设的Cmdline的一些属性(在Android系统中,可以用cat /proc/cmdline查看),并且把androidboot.前缀的key值找出来,修改成ro.boot.的key,和把androidboot.前缀的对应的value值形成预设的属性值。
如果需要自定义一些在kernel阶段预设的属性进行设置,可以在Uboot阶段,进行设置
1//类似把androidboot.abc放入到cmdline中
2//Uboot代码中的setup_bootenv函数添加下面的语句
3Setenv2Bootargs("androidboot.abc=", "yangyang48");
然后可以在设备上打印具体的cmdline
1vince:/ # cat /proc/cmdline
2cat /proc/cmdline
3sched_enable_hmp=1 sched_enable_power_aware=1 console=ttyHSL0,115200,n8 androidboot.console=ttyHSL0 androidboot.hardware=qcom msm_rtb.filter=0x237 ehci-hcd.park=3 lpm_levels.sleep_disabled=1 androidboot.bootdevice=7824900.sdhci earlycon=msm_hsl_uart,0x78af000 buildvariant=user androidboot.emmc=true androidboot.verifiedbootstate=orange androidboot.veritymode=enforcing androidboot.keymaster=1 ddr_sorting=undo androidboot.abc=yangyang48 androidboot.serialno=357370480904 androidboot.secureboot=1 androidboot.product.region=cn androidboot.bootloader=MSM8953_DAISY1.0_20190902222450 androidboot.baseband=msm mdss_mdp.panel=1:dsi:0:qcom,mdss_dsi_td4310_fhdplus_video_e7:wpoint=03:1:none:cfg:single_dsi
通过上面的ProcessKernelCmdline,可以得知属性ro.boot.abc会被设置进去
1.4.3ExportKernelBootProps
 1//system/core/init/property_service.cpp
 2static void ExportKernelBootProps() {
 3    constexpr const char* UNSET = "";
 4    struct {
 5        const char* src_prop;
 6        const char* dst_prop;
 7        const char* default_value;
 8    } prop_map[] = {
 9            // clang-format off
10        { "ro.boot.serialno",   "ro.serialno",   UNSET, },
11        { "ro.boot.mode",       "ro.bootmode",   "unknown", },
12        { "ro.boot.baseband",   "ro.baseband",   "unknown", },
13        { "ro.boot.bootloader", "ro.bootloader", "unknown", },
14        { "ro.boot.hardware",   "ro.hardware",   "unknown", },
15        { "ro.boot.revision",   "ro.revision",   "0", },
16            // clang-format on
17    };
18    for (const auto& prop : prop_map) {
19        std::string value = GetProperty(prop.src_prop, prop.default_value);
20        if (value != UNSET) InitPropertySet(prop.dst_prop, value);
21    }
22}
ro.serialno, 可见它是从内核启动参数ro.boot.serialno,如果这些ro属性没有被设置,那么通过这里的初始化来设置属性。
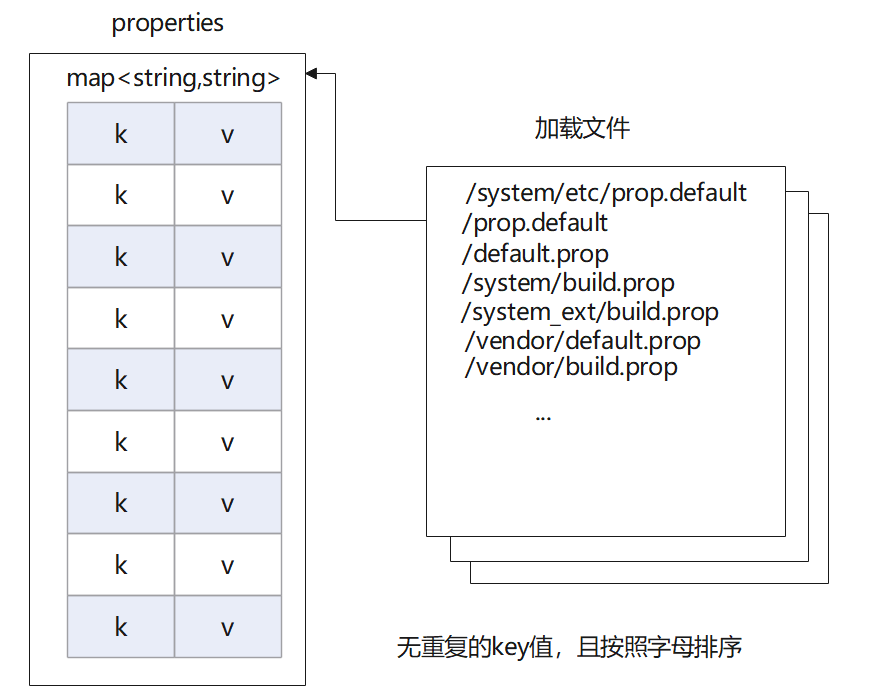
1.4.4PropertyLoadBootDefaults
 1void PropertyLoadBootDefaults() {
 2    std::map<std::string, std::string> properties;
 3    if (!load_properties_from_file("/system/etc/prop.default", nullptr, &properties)) {
 4        // Try recovery path
 5        if (!load_properties_from_file("/prop.default", nullptr, &properties)) {
 6            // Try legacy path
 7            load_properties_from_file("/default.prop", nullptr, &properties);
 8        }
 9    }
10    load_properties_from_file("/system/build.prop", nullptr, &properties);
11    load_properties_from_file("/system_ext/build.prop", nullptr, &properties);
12    load_properties_from_file("/vendor/default.prop", nullptr, &properties);
13    load_properties_from_file("/vendor/build.prop", nullptr, &properties);
14    if (SelinuxGetVendorAndroidVersion() >= __ANDROID_API_Q__) {
15        load_properties_from_file("/odm/etc/build.prop", nullptr, &properties);
16    } else {
17        load_properties_from_file("/odm/default.prop", nullptr, &properties);
18        load_properties_from_file("/odm/build.prop", nullptr, &properties);
19    }
20    load_properties_from_file("/product/build.prop", nullptr, &properties);
21    load_properties_from_file("/factory/factory.prop", "ro.*", &properties);
22
23    if (access(kDebugRamdiskProp, R_OK) == 0) {
24        LOG(INFO) << "Loading " << kDebugRamdiskProp;
25        load_properties_from_file(kDebugRamdiskProp, nullptr, &properties);
26    }
27
28    for (const auto& [name, value] : properties) {
29        std::string error;
30        if (PropertySet(name, value, &error) != PROP_SUCCESS) {
31            LOG(ERROR) << "Could not set '" << name << "' to '" << value
32                       << "' while loading .prop files" << error;
33        }
34    }
35    //关于ro.product.[brand|device|manufacturer|model|name]属性的配置
36    property_initialize_ro_product_props();
37    //关于ro.build.[fingerprint|brand|name|device|version|id|type|tags]属性的配置
38    property_derive_build_fingerprint();
39	//persist.sys.usb.config是否是adb连接,笔者连接时[persist.sys.usb.config]: [mtp,adb]
40    update_sys_usb_config();
41}
这个函数是用于导入一些默认的属性配置,一般工程开发会在这里面添加一些关于自定义但需要开机设置的一些属性。可以看到上面的属性都可以在这个阶段来进行初始化设置,属性会被添加到属性对应的SElinux安全上下文文件中。
通过键值对map来获取这些配置文件里面的属性,然后统一设置开机预置属性。(map默认按照key从小到大进行排序)
2StartPropertyService
用于属性服务的初始化,这个服务是用于管控属性设置的
 1//system/core/init/property_service.cpp
 2void StartPropertyService(int* epoll_socket) {
 3    InitPropertySet("ro.property_service.version", "2");
 4    //初始化了双工通信,这里用于本地通信
 5    int sockets[2];
 6    if (socketpair(AF_UNIX, SOCK_SEQPACKET | SOCK_CLOEXEC, 0, sockets) != 0) {
 7        PLOG(FATAL) << "Failed to socketpair() between property_service and init";
 8    }
 9    //这里的epoll_socket会被作为双工通信的发送端
10    *epoll_socket = from_init_socket = sockets[0];
11    //这里的init_socket会被作为双工通信的接收端
12    init_socket = sockets[1];
13    //这个用于rc文件中属性发生变化的时候的作用
14    StartSendingMessages();
15    //建立一个socket,用于管理属性服务
16    if (auto result = CreateSocket(PROP_SERVICE_NAME, SOCK_STREAM | SOCK_CLOEXEC | SOCK_NONBLOCK,
17                                   false, 0666, 0, 0, {});
18        result.ok()) {
19        property_set_fd = *result;
20    } else {
21        LOG(FATAL) << "start_property_service socket creation failed: " << result.error();
22    }
23    //监听socket,accept 队列长度为8,也就是已完成连接建立的队列长度
24    listen(property_set_fd, 8);
25
26    auto new_thread = std::thread{PropertyServiceThread};
27    property_service_thread.swap(new_thread);
28}
2.1StartSendingMessages
主要是为了设置一个true的一个flag值,用于rc文件中的属性变化来起到触发作用
1//system/core/init/property_service.cpp
2void StartSendingMessages() {
3    auto lock = std::lock_guard{accept_messages_lock};
4    accept_messages = true;
5}
关于lock_guard也是一种比较新的特性,更加方便。构造时候加锁,析构的时候解锁,具体可以点击这里。
lock_guard具有两种构造方法
lock_guard(mutex& m),这种构造会加锁
lock_guard(mutex& m, adopt_lock),这种构造不会加锁lock_guard默认的析构方法
~lock_guard(),用于解锁
2.2CreateSocket
 1//system/core/init/util.cpp
 2//传入的name为"property_service",passcred为false,perm为0666,uid,gid为0
 3Result<int> CreateSocket(const std::string& name, int type, bool passcred, mode_t perm, uid_t uid,
 4                         gid_t gid, const std::string& socketcon) {
 5    if (!socketcon.empty()) {
 6        if (setsockcreatecon(socketcon.c_str()) == -1) {
 7            return ErrnoError() << "setsockcreatecon(\"" << socketcon << "\") failed";
 8        }
 9    }
10    //使用本地协议PF_UNIX(或PF_LOCAL),type中包含SOCK_STREAM,因此创建本地通信的流式套接字为fd
11    android::base::unique_fd fd(socket(PF_UNIX, type, 0));
12    if (fd < 0) {
13        return ErrnoError() << "Failed to open socket '" << name << "'";
14    }
15
16    if (!socketcon.empty()) setsockcreatecon(nullptr);
17
18    struct sockaddr_un addr;
19    memset(&addr, 0 , sizeof(addr));
20    addr.sun_family = AF_UNIX;
21    //ANDROID_SOCKET_DIR为"/dev/socket",那么addr.sun_path为"/dev/socket/property_service"
22    snprintf(addr.sun_path, sizeof(addr.sun_path), ANDROID_SOCKET_DIR "/%s", name.c_str());
23
24    if ((unlink(addr.sun_path) != 0) && (errno != ENOENT)) {
25        return ErrnoError() << "Failed to unlink old socket '" << name << "'";
26    }
27
28    std::string secontext;
29    //对路径addr.sun_path的权限检测
30    if (SelabelLookupFileContext(addr.sun_path, S_IFSOCK, &secontext) && !secontext.empty()) {
31        setfscreatecon(secontext.c_str());
32    }
33
34    if (passcred) {
35        int on = 1;
36        if (setsockopt(fd, SOL_SOCKET, SO_PASSCRED, &on, sizeof(on))) {
37            return ErrnoError() << "Failed to set SO_PASSCRED '" << name << "'";
38        }
39    }
40
41    int ret = bind(fd, (struct sockaddr *) &addr, sizeof (addr));
42    int savederrno = errno;
43    ...
44    return fd.release();
45}
创建了一个本地的socket,且路径为/dev/socket/property_service
2.3PropertyServiceThread
 1//system/core/init/property_service.cpp
 2static void PropertyServiceThread() {
 3    Epoll epoll;
 4    if (auto result = epoll.Open(); !result.ok()) {
 5        LOG(FATAL) << result.error();
 6    }
 7    //这里是封装了一层系统调用的epoll,通过监听fd来完成对函数的调用
 8    if (auto result = epoll.RegisterHandler(property_set_fd, handle_property_set_fd);
 9        !result.ok()) {
10        LOG(FATAL) << result.error();
11    }
12    //这里是封装了一层系统调用的epoll,通过监听fd来完成对函数的调用
13    if (auto result = epoll.RegisterHandler(init_socket, HandleInitSocket); !result.ok()) {
14        LOG(FATAL) << result.error();
15    }
16
17    while (true) {
18        auto pending_functions = epoll.Wait(std::nullopt);
19        if (!pending_functions.ok()) {
20            LOG(ERROR) << pending_functions.error();
21        } else {
22            //当上面的fd发生变化的时候,立刻调用对应注册的函数
23            for (const auto& function : *pending_functions) {
24                (*function)();
25            }
26        }
27    }
28}
2.3.1handle_property_set_fd
 1//system/core/init/property_service.cpp
 2static void handle_property_set_fd() {
 3    static constexpr uint32_t kDefaultSocketTimeout = 2000; /* ms */
 4    //SOCK_CLOEXEC,用于防止父进程泄露打开的文件给子进程
 5    int s = accept4(property_set_fd, nullptr, nullptr, SOCK_CLOEXEC);
 6    if (s == -1) {
 7        return;
 8    }
 9
10    ucred cr;
11    socklen_t cr_size = sizeof(cr);
12    if (getsockopt(s, SOL_SOCKET, SO_PEERCRED, &cr, &cr_size) < 0) {
13        close(s);
14        PLOG(ERROR) << "sys_prop: unable to get SO_PEERCRED";
15        return;
16    }
17    //将原本socket的句柄转交给SocketConnection,SocketConnection实际上也是用poll机制的封装
18    SocketConnection socket(s, cr);
19    uint32_t timeout_ms = kDefaultSocketTimeout;
20
21    uint32_t cmd = 0;
22    //接收消息,超过2s就自动退出
23    //消息体接收分别是cmd,name,value,context
24    if (!socket.RecvUint32(&cmd, &timeout_ms)) {
25        PLOG(ERROR) << "sys_prop: error while reading command from the socket";
26        socket.SendUint32(PROP_ERROR_READ_CMD);
27        return;
28    }
29    switch (cmd) {
30    //PROP_MSG_SETPROP这个是老版本的魔数,Android11已经不使用这个api了
31    case PROP_MSG_SETPROP:
32         ...
33         break;
34    case PROP_MSG_SETPROP2: {
35        std::string name;
36        std::string value;
37        if (!socket.RecvString(&name, &timeout_ms) ||
38            !socket.RecvString(&value, &timeout_ms)) {
39          PLOG(ERROR) << "sys_prop(PROP_MSG_SETPROP2): error while reading name/value from the socket";
40          socket.SendUint32(PROP_ERROR_READ_DATA);
41          return;
42        }
43
44        std::string source_context;
45        if (!socket.GetSourceContext(&source_context)) {
46            PLOG(ERROR) << "Unable to set property '" << name << "': getpeercon() failed";
47            socket.SendUint32(PROP_ERROR_PERMISSION_DENIED);
48            return;
49        }
50
51        const auto& cr = socket.cred();
52        std::string error;
53        //这里的接收比较简单,最终调用到HandlePropertySet这个地方
54        uint32_t result = HandlePropertySet(name, value, source_context, cr, &socket, &error);
55        if (result != PROP_SUCCESS) {
56            LOG(ERROR) << "Unable to set property '" << name << "' from uid:" << cr.uid
57                       << " gid:" << cr.gid << " pid:" << cr.pid << ": " << error;
58        }
59        //把成功的结果PROP_SUCCESS发送给对端
60        socket.SendUint32(result);
61        break;
62      }
63
64    default:
65        LOG(ERROR) << "sys_prop: invalid command " << cmd;
66        socket.SendUint32(PROP_ERROR_INVALID_CMD);
67        break;
68    }
69}
这里主要分成几块,将原本创建的本地通信的流式套接字移交给poll机制封装的SocketConnection,通过SocketConnection来完成对消息体的接收,然后消息体正常接收会调用到HandlePropertySet,这个地方用于设置属性。
2.3.2HandleInitSocket
这个函数主要是处理persist属性的初始化,初始化会把文件中的persist属性导入到文件中去,导入完成之后在设置persist属性,并且设置一个完成导入属性的属性,ro.persistent_properties.ready的属性值为true,说明persist导入文件和设置属性完成。
 1//system/core/init/property_service.cpp
 2static void HandleInitSocket() {
 3    auto message = ReadMessage(init_socket);
 4    if (!message.ok()) {
 5        LOG(ERROR) << "Could not read message from init_dedicated_recv_socket: " << message.error();
 6        return;
 7    }
 8    //这里的InitMessage其实也是一个类,不过是proto格式转化为对应的c++格式的类
 9    auto init_message = InitMessage{};
10    if (!init_message.ParseFromString(*message)) {
11        LOG(ERROR) << "Could not parse message from init";
12        return;
13    }
14
15    switch (init_message.msg_case()) {
16        case InitMessage::kLoadPersistentProperties: {
17            load_override_properties();
18            //这里的persistent_properties的类是persistent_properties.proto中定义的
19            auto persistent_properties = LoadPersistentProperties();
20            for (const auto& persistent_property_record : persistent_properties.properties()) {
21                InitPropertySet(persistent_property_record.name(),
22                                persistent_property_record.value());
23            }
24            InitPropertySet("ro.persistent_properties.ready", "true");
25            //这个变量会在后面的设置属性中用到,如果这里没有初始化成功,后续的persist对应文件将无法保存
26            persistent_properties_loaded = true;
27            break;
28        }
29        default:
30            LOG(ERROR) << "Unknown message type from init: " << init_message.msg_case();
31    }
32}
InitMessage这个类真正定义的地方,可以简单的理解为是一个序列化的消息体。而且protobuf会将对应的proto文件中的变量load_persistent_properties,变成kLoadPersistentProperties,这就是为什么本文涉及到的好多源码的变量前会带有字母k。
 1//system/core/init/property_service.proto
 2syntax = "proto2";
 3option optimize_for = LITE_RUNTIME;
 4
 5message PropertyMessage {
 6    message ControlMessage {
 7        optional string msg = 1;
 8        optional string name = 2;
 9        optional int32 pid = 3;
10        optional int32 fd = 4;
11    }
12
13    message ChangedMessage {
14        optional string name = 1;
15        optional string value = 2;
16    }
17
18    oneof msg {
19        ControlMessage control_message = 1;
20        ChangedMessage changed_message = 2;
21    };
22}
23
24message InitMessage {
25    //oneof关键字,可以简单的理解为是联合体的数据结构
26    oneof msg {
27        bool load_persistent_properties = 1;
28        bool stop_sending_messages = 2;
29        bool start_sending_messages = 3;
30    };
31}
关于
proto之前的dumpsys media.camera文章中提到过一次,但没有具体深入,当然本文也不会特别深入。
Protobuf是一种与平台无关、语言无关、可扩展且轻便高效的序列化数据结构的协议,可以用于网络通信和数据存储。而且由于和语言无关,proto文件既可以转化成c++文件,也可以转化成java,python这类的文件。当然在源码中,可以直接理解为定义了一种数据类,专门用于序列化存储。目前我们定义的
proto文件,比如上面的property_service.proto,可以在下面的源码路径中找到1//其中xxx为具体的架构,有arm架构,arm架构等 2/out/soong/.intermediates/system/core/init/libinit/android_xxx_static/gen/proto/system/core/init/property_service.pb.h 3/out/soong/.intermediates/system/core/init/libinit/android_xxx_static/gen/proto/system/core/init/property_service.pb.cc具体的规则如下,所指定的消息字段修饰符必须是如下之一:
- required:一个格式良好的消息一定要含有1个这种字段。表示该值是必须要设置的;
- optional:消息格式中该字段可以有0个或1个值(不超过1个)。
- repeated:在一个格式良好的消息中,这种字段可以重复任意多次(包括0次)。重复的值的顺序会被保留。表示该值可以重复,相当于java中的List。
上面只是最简单的提到了
proto,如果需要进一步了解语法规则,可以点击这里。
2.3.2.1load_override_properties
 1//system/core/init/property_service.cpp
 2static void load_override_properties() {
 3    //如果存在/data/local.prop,那么就和1.4.4一样的操作即可
 4    if (ALLOW_LOCAL_PROP_OVERRIDE) {
 5        std::map<std::string, std::string> properties;
 6        load_properties_from_file("/data/local.prop", nullptr, &properties);
 7        for (const auto& [name, value] : properties) {
 8            std::string error;
 9            if (PropertySet(name, value, &error) != PROP_SUCCESS) {
10                LOG(ERROR) << "Could not set '" << name << "' to '" << value
11                           << "' in /data/local.prop: " << error;
12            }
13        }
14    }
15}
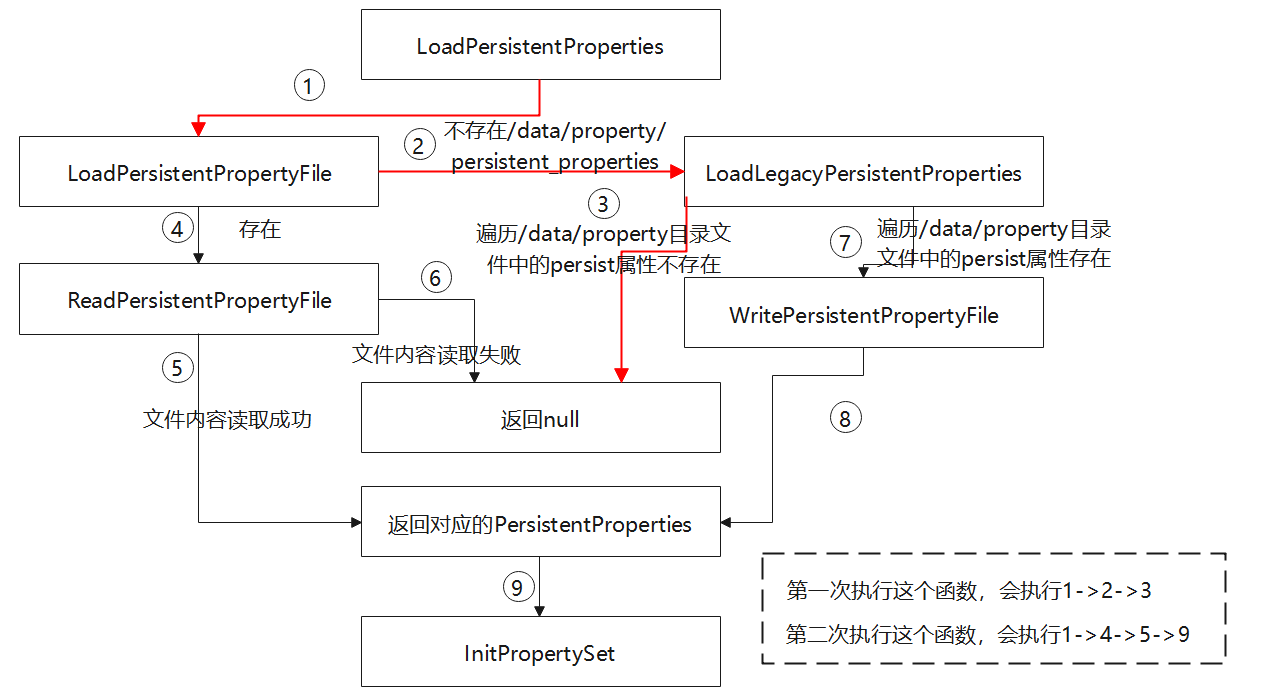
2.3.2.2LoadPersistentProperties
 1//system/core/init/persistent_properties.cpp
 2PersistentProperties LoadPersistentProperties() {
 3    //如果这里导入正常,直接返回即可
 4    //这里的persistent_properties结构是定义在persistent_properties.proto中定义的,
 5    auto persistent_properties = LoadPersistentPropertyFile();
 6
 7    if (!persistent_properties.ok()) {
 8        LOG(ERROR) << "Could not load single persistent property file, trying legacy directory: "
 9                   << persistent_properties.error();
10        persistent_properties = LoadLegacyPersistentProperties();
11        if (!persistent_properties.ok()) {
12            LOG(ERROR) << "Unable to load legacy persistent properties: "
13                       << persistent_properties.error();
14            return {};
15        }
16        if (auto result = WritePersistentPropertyFile(*persistent_properties); result.ok()) {
17            RemoveLegacyPersistentPropertyFiles();
18        } else {
19            LOG(ERROR) << "Unable to write single persistent property file: " << result.error();
20            // Fall through so that we still set the properties that we've read.
21        }
22    }
23
24    return *persistent_properties;
25}
2.3.2.2.1persistent_properties.proto
 1//system/core/init/persistent_properties.proto
 2syntax = "proto2";
 3option optimize_for = LITE_RUNTIME;
 4
 5message PersistentProperties {
 6    message PersistentPropertyRecord {
 7        optional string name = 1;
 8        optional string value = 2;
 9    }
10    //可以理解为是list<PersistentPropertyRecord>
11    //每一个PersistentPropertyRecord中都有name,value,但name,value不一定存在
12    repeated PersistentPropertyRecord properties = 1;
13}
2.3.2.2.2LoadPersistentPropertyFile
 1//system/core/init/persistent_properties.cpp
 2Result<PersistentProperties> LoadPersistentPropertyFile() {
 3    //读取文件内容,如果内容不存在就直接返回
 4    auto file_contents = ReadPersistentPropertyFile();
 5    if (!file_contents.ok()) return file_contents.error();
 6    //如果内容存在,那么把文件中的内容变成PersistentProperties的形式
 7    PersistentProperties persistent_properties;
 8    if (persistent_properties.ParseFromString(*file_contents)) return persistent_properties;
 9    ...
10}
ReadPersistentPropertyFile
 1//system/core/init/persistent_properties.cpp
 2//persistent_property_filename为"/data/property/persistent_properties"
 3Result<std::string> ReadPersistentPropertyFile() {
 4    //查看是否还存在未完成的临时tmp文件,存在就删除
 5    const std::string temp_filename = persistent_property_filename + ".tmp";
 6    if (access(temp_filename.c_str(), F_OK) == 0) {
 7        LOG(INFO)
 8            << "Found temporary property file while attempting to persistent system properties"
 9               " a previous persistent property write may have failed";
10        unlink(temp_filename.c_str());
11    }
12    //读取对应的/data/property/persistent_properties,是否存在文件,第一次进来肯定是不存在的
13    auto file_contents = ReadFile(persistent_property_filename);
14    if (!file_contents.ok()) {
15        return Error() << "Unable to read persistent property file: " << file_contents.error();
16    }
17    return *file_contents;
18}
2.3.2.2.3LoadLegacyPersistentProperties
因为第一次的时候文件/data/property/persistent_properties是不存在的,所以会走到这里,这里的遍历/data/property文件夹,实际上是为了兼容以前的api,现在的api只有一个persistent_properties,以前是一个个类似persist.a.b.c这样的一个文件组成的/data/property文件夹。
 1//system/core/init/persistent_properties.cpp
 2//这里的kLegacyPersistentPropertyDir是/data/property
 3Result<PersistentProperties> LoadLegacyPersistentProperties() {
 4    //打开对应的/data/property文件夹
 5    std::unique_ptr<DIR, decltype(&closedir)> dir(opendir(kLegacyPersistentPropertyDir), closedir);
 6
 7    PersistentProperties persistent_properties;
 8    dirent* entry;
 9    //开始遍历文件夹中的文件,是否以persist开头
10    while ((entry = readdir(dir.get())) != nullptr) {
11        if (!StartsWith(entry->d_name, "persist.")) {
12            continue;
13        }
14        ...
15        std::string value;
16        //存在的话,那么将该文件中的key,value写入到对应的persistent_properties中
17        if (ReadFdToString(fd, &value)) {
18            AddPersistentProperty(entry->d_name, value, &persistent_properties);
19        } else {
20            PLOG(ERROR) << "Unable to read persistent property file " << entry->d_name;
21        }
22    }
23    return persistent_properties;
24}
2.3.2.2.4WritePersistentPropertyFile
 1//system/core/init/persistent_properties.cpp
 2Result<void> WritePersistentPropertyFile(const PersistentProperties& persistent_properties) {
 3    const std::string temp_filename = persistent_property_filename + ".tmp";
 4    unique_fd fd(TEMP_FAILURE_RETRY(
 5        open(temp_filename.c_str(), O_WRONLY | O_CREAT | O_NOFOLLOW | O_TRUNC | O_CLOEXEC, 0600)));
 6    if (fd == -1) {
 7        return ErrnoError() << "Could not open temporary properties file";
 8    }
 9    std::string serialized_string;
10    if (!persistent_properties.SerializeToString(&serialized_string)) {
11        return Error() << "Unable to serialize properties";
12    }
13    if (!WriteStringToFd(serialized_string, fd)) {
14        return ErrnoError() << "Unable to write file contents";
15    }
16    fsync(fd);
17    fd.reset();
18    //将/data/property/persistent_properties.tmp文件更名为/data/property/persistent_properties
19    if (rename(temp_filename.c_str(), persistent_property_filename.c_str())) {
20        ...
21    }
22    //文件的目录/data/property
23    auto dir = Dirname(persistent_property_filename);
24    //判断是否存在这个目录
25    auto dir_fd = unique_fd{open(dir.c_str(), O_DIRECTORY | O_RDONLY | O_CLOEXEC)};
26    if (dir_fd < 0) {
27        return ErrnoError() << "Unable to open persistent properties directory for fsync()";
28    }
29    fsync(dir_fd);
30
31    return {};
32}
具体的流程如下
2.3.2.3InitPropertySet
 1//system/core/init/property_service.cpp
 2uint32_t InitPropertySet(const std::string& name, const std::string& value) {
 3    uint32_t result = 0;
 4    ucred cr = {.pid = 1, .uid = 0, .gid = 0};
 5    std::string error;
 6    result = HandlePropertySet(name, value, kInitContext, cr, nullptr, &error);
 7    if (result != PROP_SUCCESS) {
 8        LOG(ERROR) << "Init cannot set '" << name << "' to '" << value << "': " << error;
 9    }
10
11    return result;
12}
这里的InitPropertySet函数只增加了cr的参数,使得cr为第一个进程,且uid,gid都为0
 1uint32_t HandlePropertySet(const std::string& name, const std::string& value,
 2                           const std::string& source_context, const ucred& cr,
 3                           SocketConnection* socket, std::string* error) {
 4    //检查name,value,source_context三者的权限性
 5    if (auto ret = CheckPermissions(name, value, source_context, cr, error); ret != PROP_SUCCESS) {
 6        return ret;
 7    }
 8    //如果是ctl的属性,那么就调用到SendControlMessage去
 9    if (StartsWith(name, "ctl.")) {
10        return SendControlMessage(name.c_str() + 4, value, cr.pid, socket, error);
11    }
12    //这个sys.powerctl使用与关机属性的
13    if (name == "sys.powerctl") {
14        std::string cmdline_path = StringPrintf("proc/%d/cmdline", cr.pid);
15        std::string process_cmdline;
16        std::string process_log_string;
17        if (ReadFileToString(cmdline_path, &process_cmdline)) {
18            ...
19        }
20        if (value == "reboot,userspace" && !is_userspace_reboot_supported().value_or(false)) {
21            ...
22        }
23    }
24
25    //如果init以外的进程正在写入一个非空值,这意味着该进程正在请求init在'value'指定的路径上执行restorecon操作
26    //kRestoreconProperty为"selinux.restorecon_recursive"
27    if (name == kRestoreconProperty && cr.pid != 1 && !value.empty()) {
28        static AsyncRestorecon async_restorecon;
29        async_restorecon.TriggerRestorecon(value);
30        return PROP_SUCCESS;
31    }
32    //检验完毕之后,最终会调用到PropertySet函数中
33    return PropertySet(name, value, error);
34}
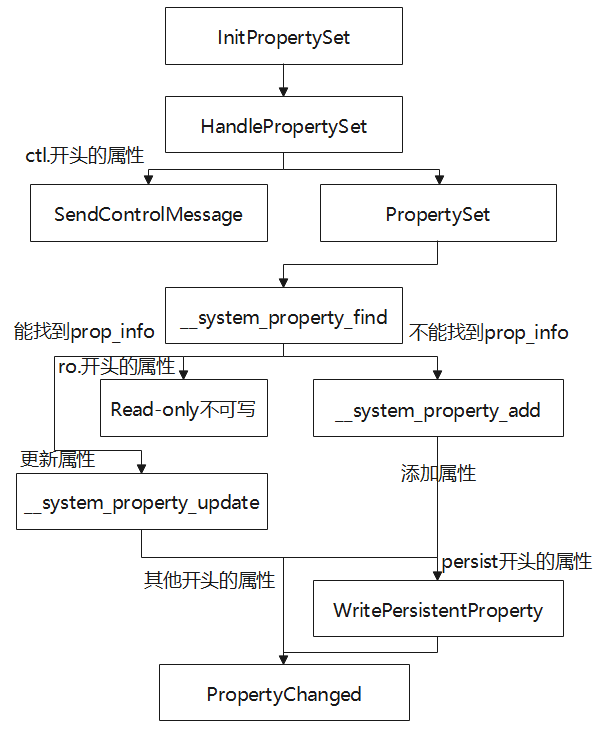
PropertySet
属性设置生效的地方
 1//system/core/init/property_service.cpp
 2static uint32_t PropertySet(const std::string& name, const std::string& value, std::string* error) {
 3    size_t valuelen = value.size();
 4
 5    if (!IsLegalPropertyName(name)) {
 6        *error = "Illegal property name";
 7        return PROP_ERROR_INVALID_NAME;
 8    }
 9
10    if (auto result = IsLegalPropertyValue(name, value); !result.ok()) {
11        *error = result.error().message();
12        return PROP_ERROR_INVALID_VALUE;
13    }
14    //这里的属性设置,是通过name找到对应的prop_info
15    prop_info* pi = (prop_info*) __system_property_find(name.c_str());
16    if (pi != nullptr) {
17        //这里是限制ro属性第二次写入的操作
18        if (StartsWith(name, "ro.")) {
19            *error = "Read-only property was already set";
20            return PROP_ERROR_READ_ONLY_PROPERTY;
21        }
22        //如果找到的是原本存在的name,直接更新对应的value即可
23        __system_property_update(pi, value.c_str(), valuelen);
24    } else {
25        //如果没有找到对应的name,name直接添加属性,ro属性第一次写入也是这里添加进去的
26        int rc = __system_property_add(name.c_str(), name.size(), value.c_str(), valuelen);
27        if (rc < 0) {
28            *error = "__system_property_add failed";
29            return PROP_ERROR_SET_FAILED;
30        }
31    }
32    //能够调用到这里面,需要persistent_properties_loaded为true
33    //在2.3.2HandleInitSocket中完成文件导入和设置就会调用到这里
34    //也就是说默认的persist属性已经导入进去了,只有自定义的persist属性才会被再次写到persist的文件中
35    if (persistent_properties_loaded && StartsWith(name, "persist.")) {
36        WritePersistentProperty(name, value);
37    }
38    //这里的accept_messages是在2.1StartSendingMessages初始化的时候就打开了,用于rc文件中的属性触发
39    auto lock = std::lock_guard{accept_messages_lock};
40    if (accept_messages) {
41        PropertyChanged(name, value);
42    }
43    return PROP_SUCCESS;
44}
属性设置的流程如下所示
2.3.2.3.1__system_property_find
1//bionic/libc/bionic/system_property_api.cpp
2__BIONIC_WEAK_FOR_NATIVE_BRIDGE
3const prop_info* __system_property_find(const char* name) {
4  return system_properties.Find(name);
5}
system_properties.Find
 1//bionic/libc/system_properties/system_properties.cpp
 2const prop_info* SystemProperties::Find(const char* name) {
 3  //如果没有初始化过,直接返回空指针,这个在1.2中SystemProperties::AreaInit已经初始化
 4  if (!initialized_) {
 5    return nullptr;
 6  }
 7  //通过属性名字,找到name对应的SElinux安全上下文
 8  prop_area* pa = contexts_->GetPropAreaForName(name);
 9  if (!pa) {
10    async_safe_format_log(ANDROID_LOG_ERROR, "libc", "Access denied finding property \"%s\"", name);
11    return nullptr;
12  }
13  //SElinux安全上下文,那么查找这个域中完整的路径
14  return pa->find(name);
15}
1)contexts_->GetPropAreaForName
 1//bionic/libc/system_properties/contexts_serialized.cpp
 2prop_area* ContextsSerialized::GetPropAreaForName(const char* name) {
 3  uint32_t index;
 4  //从私有匿名区域查找name对应的SElinux安全上下文的ContextNode的编号
 5  property_info_area_file_->GetPropertyInfoIndexes(name, &index, nullptr);
 6  ...
 7  auto* context_node = &context_nodes_[index];
 8  if (!context_node->pa()) {
 9    //不检查 no_access_,因为与foreach()的情况不同,希望为该函数中的每个非允许属性访问生成一个selinux
10    context_node->Open(false, nullptr);
11  }
12  //返回对应当前ContextNode指向的pa指针,也就是指向对应的SElinux安全上下文文件
13  return context_node->pa();
14}
GetPropertyInfoIndexes
 1//system/core/property_service/libpropertyinfoparser/property_info_parser.cpp
 2void PropertyInfoArea::GetPropertyInfoIndexes(const char* name, uint32_t* context_index,
 3                                              uint32_t* type_index) const {
 4  uint32_t return_context_index = ~0u;
 5  uint32_t return_type_index = ~0u;
 6  const char* remaining_name = name;
 7  //这里的root_node不是prop_bt中的root_node(),这里指的是PropertyInfoAreaHeader中的root_offset
 8  //对应的还是/dev/__properties__/property_info
 9  auto trie_node = root_node();
10  //通过分隔符点来循环遍历,直到找到对应的index
11  while (true) {
12    const char* sep = strchr(remaining_name, '.');
13
14    // Apply prefix match for prefix deliminated with '.'
15    if (trie_node.context_index() != ~0u) {
16      return_context_index = trie_node.context_index();
17    }
18    if (trie_node.type_index() != ~0u) {
19      return_type_index = trie_node.type_index();
20    }
21
22    // Check prefixes at this node.  This comes after the node check since these prefixes are by
23    // definition longer than the node itself.
24    CheckPrefixMatch(remaining_name, trie_node, &return_context_index, &return_type_index);
25
26    if (sep == nullptr) {
27      break;
28    }
29
30    const uint32_t substr_size = sep - remaining_name;
31    TrieNode child_node;
32    if (!trie_node.FindChildForString(remaining_name, substr_size, &child_node)) {
33      break;
34    }
35
36    trie_node = child_node;
37    remaining_name = sep + 1;
38  }
39
40  // We've made it to a leaf node, so check contents and return appropriately.
41  // Check exact matches
42  for (uint32_t i = 0; i < trie_node.num_exact_matches(); ++i) {
43    if (!strcmp(c_string(trie_node.exact_match(i)->name_offset), remaining_name)) {
44      if (context_index != nullptr) {
45        if (trie_node.exact_match(i)->context_index != ~0u) {
46          *context_index = trie_node.exact_match(i)->context_index;
47        } else {
48          *context_index = return_context_index;
49        }
50      }
51      if (type_index != nullptr) {
52        if (trie_node.exact_match(i)->type_index != ~0u) {
53          *type_index = trie_node.exact_match(i)->type_index;
54        } else {
55          *type_index = return_type_index;
56        }
57      }
58      return;
59    }
60  }
61  // Check prefix matches for prefixes not deliminated with '.'
62  CheckPrefixMatch(remaining_name, trie_node, &return_context_index, &return_type_index);
63  // Return previously found prefix match.
64  if (context_index != nullptr) *context_index = return_context_index;
65  if (type_index != nullptr) *type_index = return_type_index;
66  return;
67}
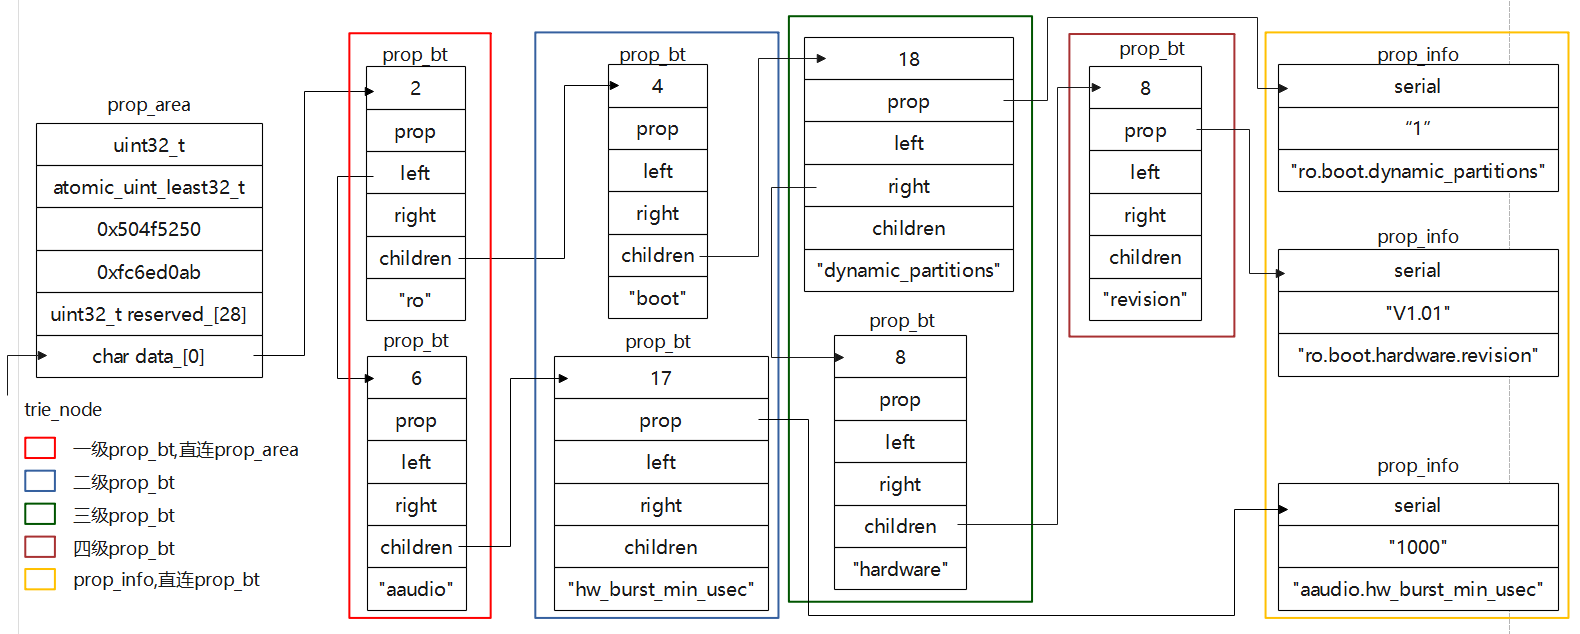
通过把属性name拆分出来分成若干个结点来找到对应的index,如果是ro.boot.hardware.reversion,那么就会通过一个个结点最终找到reversion这个结点对应序列化保存的index。
2)pa->find
找到index之后,开始找对应的prop_info,对应的数据结构如下
1//bionic/libc/system_properties/prop_area.cpp
2const prop_info* prop_area::find(const char* name) {
3  //这里的root_node()才是prop_bt中的函数
4  return find_property(root_node(), name, strlen(name), nullptr, 0, false);
5}
find_property
1//bionic/libc/system_properties/prop_area.cpp
2const prop_info* prop_area::find_property(prop_bt* const trie, const char* name, uint32_t namelen,
3 const char* value, uint32_t valuelen,
4 bool alloc_if_needed) {
5 if (!trie) return nullptr;
6
7 const char* remaining_name = name;
8 prop_bt* current = trie;
9 while (true) {
10 const char* sep = strchr(remaining_name, '.');
11 const bool want_subtree = (sep != nullptr);
12 //通过点分割后的字符串和未分割的字符串的长度相差,来判断是否是最后一个结点
13 const uint32_t substr_size = (want_subtree) ? sep - remaining_name : strlen(remaining_name);
14
15 if (!substr_size) {
16 return nullptr;
17 }
18
19 prop_bt* root = nullptr;
20 uint_least32_t children_offset = atomic_load_explicit(¤t->children, memory_order_relaxed);
21 if (children_offset != 0) {
22 //查找到子结点
23 root = to_prop_bt(¤t->children);
24 } else if (alloc_if_needed) {
25 uint_least32_t new_offset;
26 root = new_prop_bt(remaining_name, substr_size, &new_offset);
27 if (root) {
28 atomic_store_explicit(¤t->children, new_offset, memory_order_release);
29 }
30 }
31
32 if (!root) {
33 return nullptr;
34 }
35 //向左向右查找,根据字符串的字母顺序来排列
36 current = find_prop_bt(root, remaining_name, substr_size, alloc_if_needed);
37 if (!current) {
38 return nullptr;
39 }
40
41 if (!want_subtree) break;
42
43 remaining_name = sep + 1;
44 }
45 //退出,说明name只剩下最后一个结点
46 //尝试查找对应的prop_info值
47 uint_least32_t prop_offset = atomic_load_explicit(¤t->prop, memory_order_relaxed);
48 if (prop_offset != 0) {
49 //找到就返回对应的prop_info
50 return to_prop_info(¤t->prop);
51 } else if (alloc_if_needed) {
52 uint_least32_t new_offset;
53 prop_info* new_info = new_prop_info(name, namelen, value, valuelen, &new_offset);
54 if (new_info) {
55 atomic_store_explicit(¤t->prop, new_offset, memory_order_release);
56 }
57 return new_info;
58 } else {
59 return nullptr;
60 }
61}
如果查找ro.boot.dynamic_partitions,可以直接在下图中查找到,最后返回ro.boot.dynamic_partitions对应的prop_info
2.3.2.3.2__system_property_update
1//bionic/libc/bionic/system_property_api.cpp
2__BIONIC_WEAK_FOR_NATIVE_BRIDGE
3int __system_property_update(prop_info* pi, const char* value, unsigned int len) {
4  return system_properties.Update(pi, value, len);
5}
system_properties.Update
 1//bionic/libc/system_properties/system_properties.cpp
 2int SystemProperties::Update(prop_info* pi, const char* value, unsigned int len) {
 3  ...
 4  //新增了一个serial_pa的prop_area安全上下文,对应文件名是/dev/__properties__/properties_serial
 5  prop_area* serial_pa = contexts_->GetSerialPropArea();
 6  if (!serial_pa) {
 7    return -1;
 8  }
 9  //同前面一样
10  prop_area* pa = contexts_->GetPropAreaForName(pi->name);
11  //找到prop_info中的serial,这里的组成是 value长度(8位) + 更新或者添加*2(24位)
12  uint32_t serial = atomic_load_explicit(&pi->serial, memory_order_relaxed);
13  //SERIAL_VALUE_LEN这个操作是右移运算,右移32位,得到value的长度
14  unsigned int old_len = SERIAL_VALUE_LEN(serial);
15  //只要设置了脏位,脏备份区域中就有一个未损坏的预脏值副本,确保在看到脏序列之前发布脏区更新
16  memcpy(pa->dirty_backup_area(), pi->value, old_len + 1);
17  atomic_thread_fence(memory_order_release);
18  serial |= 1;
19  //更新value的前,序列号为奇数
20  atomic_store_explicit(&pi->serial, serial, memory_order_relaxed);
21  //更新value的值
22  strlcpy(pi->value, value, len + 1);
23  atomic_thread_fence(memory_order_release);
24  //serial,这里的prop_info中的serial,前8位是value的长度,后24位为序列数,如果开始更新则为奇数,更新完成则为偶数
25  atomic_store_explicit(&pi->serial, (len << 24) | ((serial + 1) & 0xffffff), memory_order_relaxed);
26  __futex_wake(&pi->serial, INT32_MAX);  // Fence by side effect
27  //只要有操作update的函数,就会对serial_pa中的serial_加1
28  atomic_store_explicit(serial_pa->serial(),
29                        atomic_load_explicit(serial_pa->serial(), memory_order_relaxed) + 1,
30                        memory_order_release);
31  // __futex_wake以及serial值用于控制更新操作的并发进行。
32  __futex_wake(serial_pa->serial(), INT32_MAX);
33
34  return 0;
35}
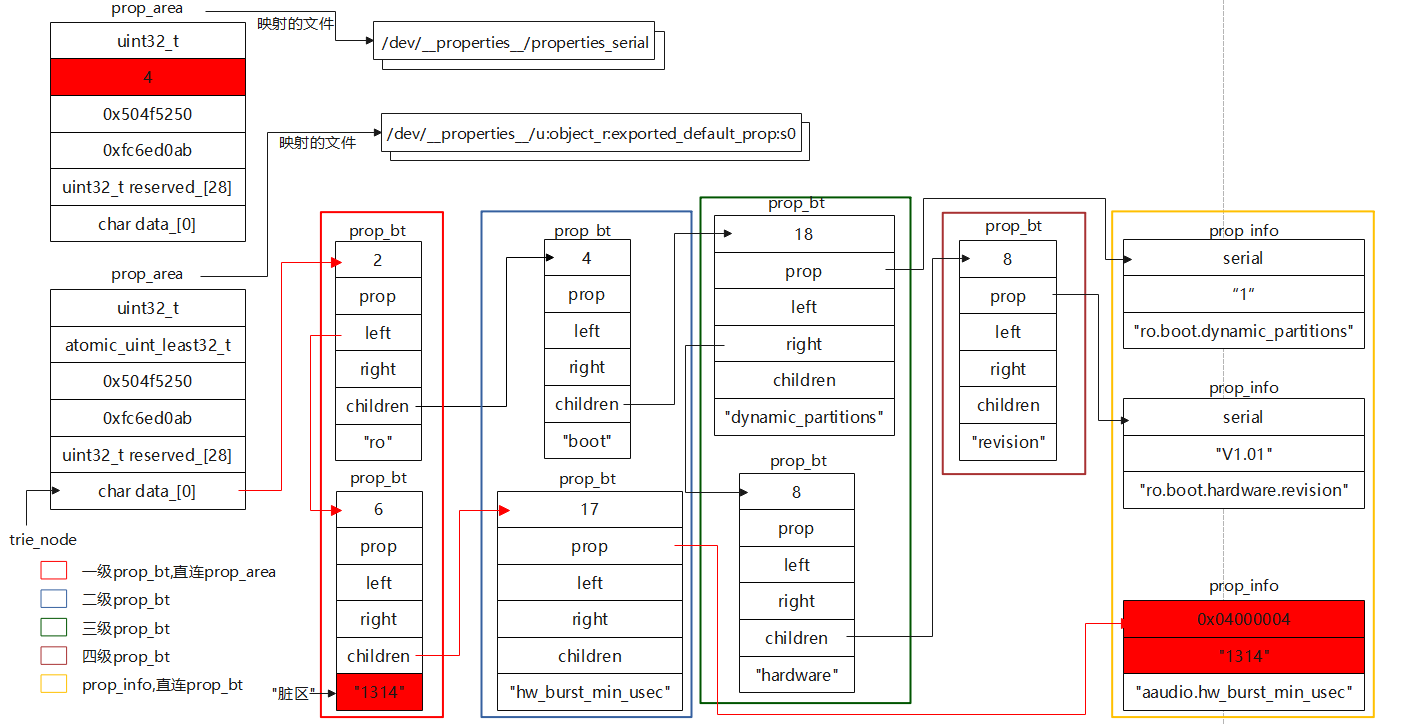
每次Update的时候,会更新几处地方
prop_info的value会更新prop_info的serial会更新,前8位是新value的长度,后24位记录数值,这个数值是被修改次数的2倍,如果为奇数,说明这个value正在写入prop_info中- 会更新
/dev/__properties__/properties_serial所在的prop_area中的serial_值,目前有两种情况会变化,Update和Add的时候,都会增加1。
下面举例说明,在总共只有三个属性的情况下,对于aaudio.hw_burst_min_usec这个属性中,第一次更新了一次属性,那么prop_info中的serial为0x04000004(前8位的4是value的长度4,后32位的4指的是(Add+Update)*2),并且/dev/__properties__/properties_serial所在的prop_area中的serial_值为4。
补充关于Android属性中的脏区,主要为了防止多线程时候发生读写错误。
脏区在属性系统中只有两处地方调用和一处地方定义。
1)一处读取
 1//bionic/libc/system_properties/system_properties.cpp
 2uint32_t SystemProperties::ReadMutablePropertyValue(const prop_info* pi, char* value) {
 3  //获取prop_info中的serial
 4  uint32_t new_serial = load_const_atomic(&pi->serial, memory_order_acquire);
 5  uint32_t serial;
 6  unsigned int len;
 7  for (;;) {
 8    serial = new_serial;
 9    //获取前8位的值
10    len = SERIAL_VALUE_LEN(serial);
11    //如果serial为奇数,那么读取脏区内容拷贝到value变量,反之直接拷贝prop_info中的value值到value变量
12    if (__predict_false(SERIAL_DIRTY(serial))) {
13      prop_area* pa = contexts_->GetPropAreaForName(pi->name);
14      memcpy(value, pa->dirty_backup_area(), len + 1);
15    } else {
16      memcpy(value, pi->value, len + 1);
17    }
18    atomic_thread_fence(memory_order_acquire);
19    new_serial = load_const_atomic(&pi->serial, memory_order_relaxed);
20    if (__predict_true(serial == new_serial)) {
21      break;
22    }
23    atomic_thread_fence(memory_order_acquire);
24  }
25  return serial;
26}
2)一处写入
详见上述
SystemProperties::Update,每次更新都会调用。1memcpy(pa->dirty_backup_area(), pi->value, old_len + 1);3)一处声明
1//bionic/libc/system_properties/include/system_properties/prop_area.h
2char* dirty_backup_area() {
3    return data_ + sizeof (prop_bt);
4}
关于
memcpy如果第三个参数小于目标区域,正常把内容拷贝;如果第三个参数大于目前区域,会发生memcpy内存越界,造成段错误。这里所谓的"脏区",就是prop_bt后面的空间。可以在map_prop_area_rw中知道,每一个prop_area定义的共享内存大小都为128k,所以拷贝到脏区不会内存越界。因此,保证传入的value大小小于92长度,必定能保证目前区域有足够的空间。1//bionic/libc/system_properties/prop_area.cpp 2prop_area* prop_area::map_prop_area_rw(const char* filename, const char* context, 3 bool* fsetxattr_failed) { 4 const int fd = open(filename, O_RDWR | O_CREAT | O_NOFOLLOW | O_CLOEXEC | O_EXCL, 0444); 5 ... 6 //PA_SIZE大小为128k,sizeof(prop_area)为124字节,pa_data_size_大小为128k-124 7 pa_size_ = PA_SIZE; 8 pa_data_size_ = pa_size_ - sizeof(prop_area); 9 10 void* const memory_area = mmap(nullptr, pa_size_, PROT_READ | PROT_WRITE, MAP_SHARED, fd, 0); 11 if (memory_area == MAP_FAILED) { 12 close(fd); 13 return nullptr; 14 } 15 16 prop_area* pa = new (memory_area) prop_area(PROP_AREA_MAGIC, PROP_AREA_VERSION); 17 18 close(fd); 19 return pa; 20}
2.3.2.3.3__system_property_add
1//bionic/libc/bionic/system_property_api.cpp
2__BIONIC_WEAK_FOR_NATIVE_BRIDGE
3int __system_property_add(const char* name, unsigned int namelen, const char* value,
4                          unsigned int valuelen) {
5  return system_properties.Add(name, namelen, value, valuelen);
6}
system_properties.Add
 1//bionic/libc/system_properties/system_properties.cpp
 2int SystemProperties::Add(const char* name, unsigned int namelen, const char* value,
 3                          unsigned int valuelen) {
 4  ...
 5  //新增了一个serial_pa的prop_area安全上下文,对应文件名是/dev/__properties__/properties_serial
 6  prop_area* serial_pa = contexts_->GetSerialPropArea();
 7  if (serial_pa == nullptr) {
 8    return -1;
 9  }
10  //这里和前面一模一样,重新找到对应的prop_area安全上下文
11  prop_area* pa = contexts_->GetPropAreaForName(name);
12  if (!pa) {
13    async_safe_format_log(ANDROID_LOG_ERROR, "libc", "Access denied adding property \"%s\"", name);
14    return -1;
15  }
16  //在这个安全上下文文件中添加对应的属性
17  bool ret = pa->add(name, namelen, value, valuelen);
18  if (!ret) {
19    return -1;
20  }
21
22  //添加一个新属性,会使这个serial_pa对应的序列增加1
23  atomic_store_explicit(serial_pa->serial(),
24                        atomic_load_explicit(serial_pa->serial(), memory_order_relaxed) + 1,
25                        memory_order_release);
26  __futex_wake(serial_pa->serial(), INT32_MAX);
27  return 0;
28}
pa->add
1//bionic/libc/system_properties/prop_area.cpp
2//这里的添加操作和find方式区别就是,最后一个参数,最后一个参数找不到可以添加
3bool prop_area::add(const char* name, unsigned int namelen, const char* value,
4                    unsigned int valuelen) {
5  return find_property(root_node(), name, namelen, value, valuelen, true);
6}
比如新增加一个属性ro.boot.serialno为"1234567890",那么会更新对应的prop_info的name和value值,并且对应/dev/__properties__/properties_serial所在的prop_area中的serial_值会变成5。
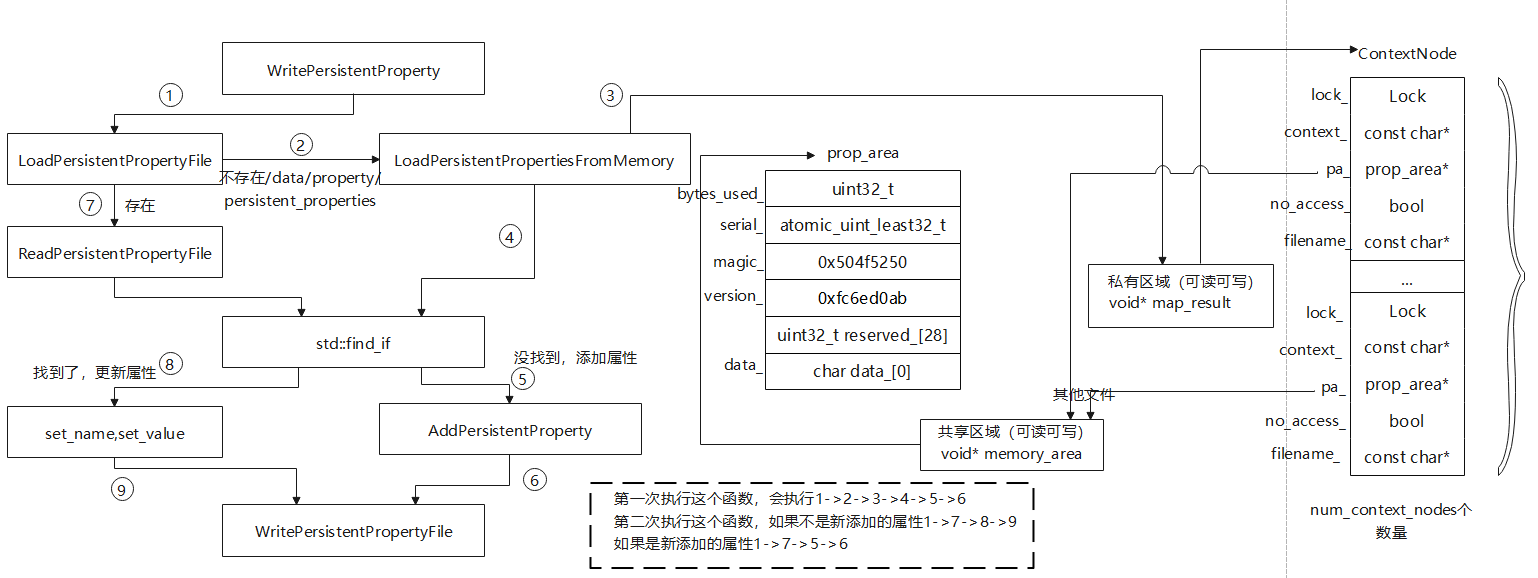
2.3.2.3.4WritePersistentProperty
 1//system/core/init/persistent_properties.cpp
 2void WritePersistentProperty(const std::string& name, const std::string& value) {
 3    //先找/data/property/persistent_properties,是否存在这个文件,存在这个文件那么直接导入
 4    auto persistent_properties = LoadPersistentPropertyFile();
 5
 6    if (!persistent_properties.ok()) {
 7        LOG(ERROR) << "Recovering persistent properties from memory: "
 8                   << persistent_properties.error();
 9        //没有这个文件从私有匿名内存中找,并且把key,value导入到对应序列化格式中persistent_properties
10        persistent_properties = LoadPersistentPropertiesFromMemory();
11    }
12    //在序列化格式中查找是否存在name
13    auto it = std::find_if(persistent_properties->mutable_properties()->begin(),
14                           persistent_properties->mutable_properties()->end(),
15                           [&name](const auto& record) { return record.name() == name; });
16    //如果存在,更新value值
17    if (it != persistent_properties->mutable_properties()->end()) {
18        it->set_name(name);
19        it->set_value(value);
20    //不存在的话新添加到序列化格式中
21    } else {
22        AddPersistentProperty(name, value, &persistent_properties.value());
23    }
24    //将序列化格式写入到对应的文件中,就是重新写入到/data/property/persistent_properties文件中
25    if (auto result = WritePersistentPropertyFile(*persistent_properties); !result.ok()) {
26        LOG(ERROR) << "Could not store persistent property: " << result.error();
27    }
28}
LoadPersistentPropertiesFromMemory
 1//system/core/init/persistent_properties.cpp
 2//相对来说这是一个比较高阶的用法,里面存在两个匿名的函数指针
 3//简单说一下值的传递6->5->4->3->2->1
 4PersistentProperties LoadPersistentPropertiesFromMemory() {
 5    PersistentProperties persistent_properties;
 6    __system_property_foreach(
 7        //这里的cookie实际上就是persistent_properties,设定为2
 8        [](const prop_info* pi, void* cookie) {
 9            __system_property_read_callback(
10                pi,
11                //这里cookie实际上是__system_property_read_callback中第三个参数,设定为4
12                [](void* cookie, const char* name, const char* value, unsigned serial) {
13                    if (StartsWith(name, "persist.")) {
14                        //这里的properties是__system_property_read_callback中的匿名函数指针参数cookie,设定为5
15                        auto properties = reinterpret_cast<PersistentProperties*>(cookie);
16                        //这里的properties的修改,会对应影响到上面cookie,设定为6
17                        AddPersistentProperty(name, value, properties);
18                    }
19                },
20                //这里的cookie实际上是前面__system_property_foreach的匿名函数指针的参数,设定为3
21                cookie);
22        },
23        //这个persistent_properties值是传入的原始值,设定为1
24        &persistent_properties);
25    return persistent_properties;
26}
这个函数,实际上是第一次导入persist文件内容的函数。读取私有匿名区域中的ContextNodes,遍历所有ContextNode中指向的SElinux安全上下文文件的prop_area所形成的的字典树。即这里是开始创建/data/property/persistent_properties的函数。
3获取属性
这里包括非init进程和init进程获取属性,这里非init进程有两种方式,一种是在App调用Java层或者Native层调用获取属性的方式,另一种是直接adb敲命令getprop。
3.1App读取属性流程分析(Java侧)
 1//App读取属性
 2//除了获取字符串属性,还有getInt、getLong、getBoolean,都可以用反射来获取,这里只说明获取字符串属性
 3import android.os.SystemProperties;
 4public static String getProperty(String key, String defaultValue) {
 5    String value = defaultValue;
 6    try {
 7        Class<?> c = Class.forName("android.os.SystemProperties");
 8        Method get = c.getMethod("get", String.class, String.class);
 9        value = (String) (get.invoke(c, key, defaultValue));
10    } catch (Exception e) {
11        e.printStackTrace();
12    }
13    return value;
14}
15
16String strValue = getProperty("persist.a.b.c", "0");
3.1.1SystemProperties.get
 1//frameworks/base/core/java/android/os/SystemProperties.java
 2//这四个对外提供的接口都是隐藏的,通常需要用反射来调用
 3//onKeyAccess是用于检查查询属性名的合法性
 4public static String get(@NonNull String key, @Nullable String def) {
 5    if (TRACK_KEY_ACCESS) onKeyAccess(key);
 6    return native_get(key, def);
 7}
 8
 9public static int getInt(@NonNull String key, int def) {
10    if (TRACK_KEY_ACCESS) onKeyAccess(key);
11    return native_get_int(key, def);
12}
13
14public static long getLong(@NonNull String key, long def) {
15    if (TRACK_KEY_ACCESS) onKeyAccess(key);
16    return native_get_long(key, def);
17}
18
19public static boolean getBoolean(@NonNull String key, boolean def) {
20    if (TRACK_KEY_ACCESS) onKeyAccess(key);
21    return native_get_boolean(key, def);
22}
3.1.2native_get
 1//frameworks\base\core\jni\android_os_SystemProperties.cpp
 2int register_android_os_SystemProperties(JNIEnv *env)
 3{
 4    const JNINativeMethod method_table[] = {
 5        //字符串就是对应SystemProperties_getSS这个函数名
 6        { "native_get",
 7          "(Ljava/lang/String;Ljava/lang/String;)Ljava/lang/String;",
 8          (void*) SystemProperties_getSS },
 9        { "native_get_int", "(Ljava/lang/String;I)I",
10          (void*) SystemProperties_get_integral<jint> },
11        { "native_get_long", "(Ljava/lang/String;J)J",
12          (void*) SystemProperties_get_integral<jlong> },
13        { "native_get_boolean", "(Ljava/lang/String;Z)Z",
14          (void*) SystemProperties_get_boolean },
15        { "native_find",
16          "(Ljava/lang/String;)J",
17          (void*) SystemProperties_find },
18        ...
19    };
20    return RegisterMethodsOrDie(env, "android/os/SystemProperties",
21                                method_table, NELEM(method_table));
22}
23//最终根据传入不同的函数指针来完成不同类型的属性获取
24template<typename Functor>
25void ReadProperty(JNIEnv* env, jstring keyJ, Functor&& functor)
26{
27    ScopedUtfChars key(env, keyJ);
28    if (!key.c_str()) {
29        return;
30    }
31//下面这个__BIONIC__,在一开始编译bionic的时候就已经编译进去了
32#if defined(__BIONIC__)
33    //1.寻找到属性名对应的Selinux的安全上下文名
34    const prop_info* prop = __system_property_find(key.c_str());
35    if (!prop) {
36        return;
37    }
38    ReadProperty(prop, std::forward<Functor>(functor));
39#else
40    std::forward<Functor>(functor)(
41        android::base::GetProperty(key.c_str(), "").c_str());
42#endif
43}
44
45template<typename Functor>
46void ReadProperty(const prop_info* prop, Functor&& functor)
47{
48#if defined(__BIONIC__)
49    auto thunk = [](void* cookie,
50                    const char* /*name*/,
51                    const char* value,
52                    uint32_t /*serial*/) {
53        std::forward<Functor>(*static_cast<Functor*>(cookie))(value);
54    };
55    //2.进行属性名的读取
56    __system_property_read_callback(prop, thunk, &functor);
57#else
58    LOG(FATAL) << "fast property access supported only on device";
59#endif
60}
61
62//这个是字符串的属性获取
63jstring SystemProperties_getSS(JNIEnv* env, jclass clazz, jstring keyJ,
64                               jstring defJ)
65{
66    jstring ret = defJ;
67    ReadProperty(env, keyJ, [&](const char* value) {
68        if (value[0]) {
69            ret = env->NewStringUTF(value);
70}
71    });
72    if (ret == nullptr && !env->ExceptionCheck()) {
73      ret = env->NewStringUTF("");  // Legacy behavior
74    }
75    return ret;
76}
77//这个是Int和Long的属性获取
78template <typename T>
79T SystemProperties_get_integral(JNIEnv *env, jclass, jstring keyJ,
80                                       T defJ)
81{
82    T ret = defJ;
83    ReadProperty(env, keyJ, [&](const char* value) {
84        android::base::ParseInt<T>(value, &ret);
85    });
86    return ret;
87}
88//这个是boolean的属性获取
89jboolean SystemProperties_get_boolean(JNIEnv *env, jclass, jstring keyJ,
90                                      jboolean defJ)
91{
92    ParseBoolResult parseResult = ParseBoolResult::kError;
93    ReadProperty(env, keyJ, [&](const char* value) {
94        parseResult = android::base::ParseBool(value);
95    });
96    return jbooleanFromParseBoolResult(parseResult, defJ);
97}
上面的逻辑就是如果定义了__BIONIC__,那么直接就是先调用__system_property_find,后调用__system_property_read_callback。没有定义__BIONIC__的话,只能调用GetProperty。
1//bionic/tools/versioner/current/sys/cdefs.h
2#define __BIONIC__ 1	//默认已经定义
3.1.2.1__system_property_find
1//bionic/libc/bionic/system_property_api.cpp
2__BIONIC_WEAK_FOR_NATIVE_BRIDGE
3const prop_info* __system_property_find(const char* name) {
4  return system_properties.Find(name);
5}
system_properties.Find
 1//bionic/libc/system_properties/system_properties.cpp
 2const prop_info* SystemProperties::Find(const char* name) {
 3  if (!initialized_) {
 4    return nullptr;
 5  }
 6
 7  prop_area* pa = contexts_->GetPropAreaForName(name);
 8  if (!pa) {
 9    async_safe_format_log(ANDROID_LOG_ERROR, "libc", "Access denied finding property \"%s\"", name);
10    return nullptr;
11  }
12
13  return pa->find(name);
14}
3.1.2.2__system_property_read_callback
1//bionic/libc/bionic/system_property_api.cpp
2__BIONIC_WEAK_FOR_NATIVE_BRIDGE
3void __system_property_read_callback(const prop_info* pi,
4                                     void (*callback)(void* cookie, const char* name,
5                                                      const char* value, uint32_t serial),
6                                     void* cookie) {
7  return system_properties.ReadCallback(pi, callback, cookie);
8}
system_properties.ReadCallback
 1//bionic/libc/system_properties/system_properties.cpp
 2void SystemProperties::ReadCallback(const prop_info* pi,
 3                                    void (*callback)(void* cookie, const char* name,
 4                                                     const char* value, uint32_t serial),
 5                                    void* cookie) {
 6  ...
 7  char value_buf[PROP_VALUE_MAX];
 8  uint32_t serial = ReadMutablePropertyValue(pi, value_buf);
 9  callback(cookie, pi->name, value_buf, serial);
10  }
11
12uint32_t SystemProperties::ReadMutablePropertyValue(const prop_info* pi, char* value) {
13  uint32_t new_serial = load_const_atomic(&pi->serial, memory_order_acquire);
14  uint32_t serial;
15  unsigned int len;
16  for (;;) {
17    serial = new_serial;
18    len = SERIAL_VALUE_LEN(serial);
19    if (__predict_false(SERIAL_DIRTY(serial))) {
20      ...
21    } else {
22      memcpy(value, pi->value, len + 1);
23  }
24    atomic_thread_fence(memory_order_acquire);
25    new_serial = load_const_atomic(&pi->serial, memory_order_relaxed);
26    if (__predict_true(serial == new_serial)) {
27      break;
28      }
29    atomic_thread_fence(memory_order_acquire);
30    }
31  return serial;
32}
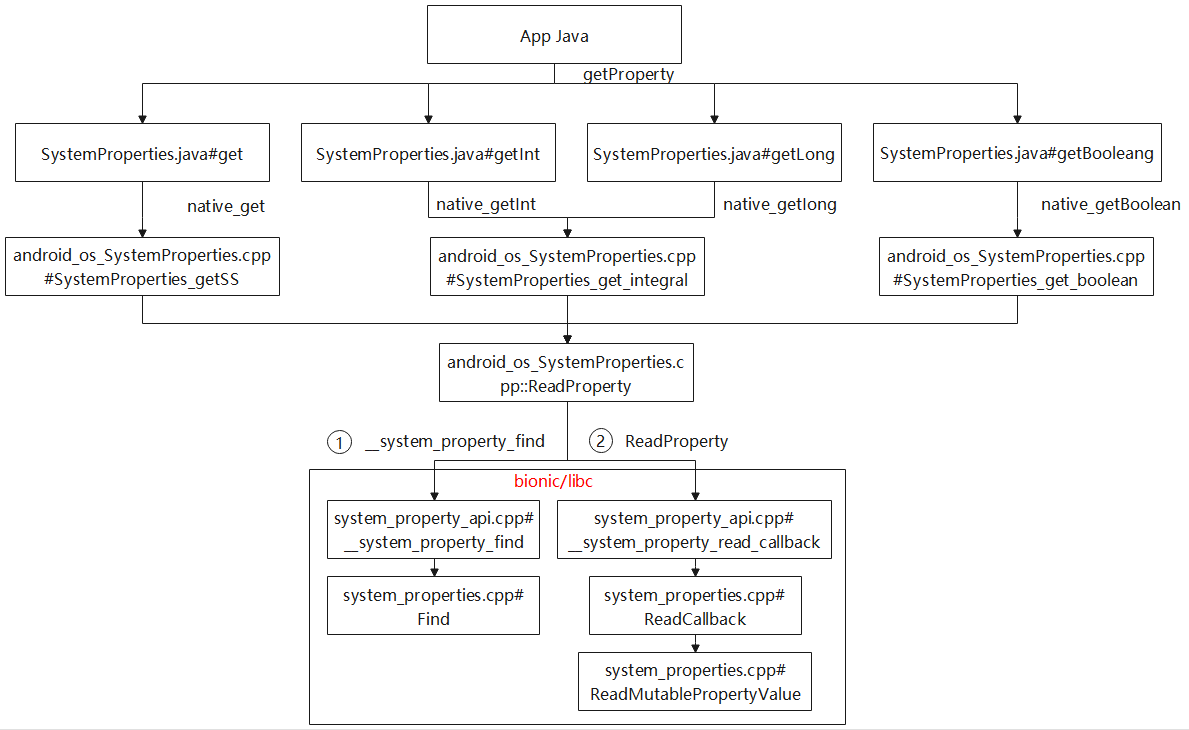
3.2App读取属性流程分析(native侧)
1//App通过封装的so进行读取属性
2#include <cutils/properties.h>
3#define PROPERTY_KEY_MAX   32
4#define PROPERTY_VALUE_MAX  92
5char *value= new char[PROPERTY_VALUE_MAX];
6property_get("persist.a.b.c", value, "0");
7property_get_int32("persist.a.b.c.int", 0);
8property_get_int64("persist.a.b.c.long", 0L);
9property_get_bool("persist.a.b.c.boolean", false);
3.2.1property_get
 1//system/core/libcutils/properties.cpp
 2//获取bool类型的属性,其实也是间接调用property_get,然后自己在封装成bool类型
 3int8_t property_get_bool(const char *key, int8_t default_value) {
 4    if (!key) {
 5        return default_value;
 6  }
 7
 8    int8_t result = default_value;
 9    char buf[PROPERTY_VALUE_MAX] = {'\0'};
10
11    int len = property_get(key, buf, "");
12    if (len == 1) {
13        char ch = buf[0];
14        if (ch == '0' || ch == 'n') {
15            result = false;
16        } else if (ch == '1' || ch == 'y') {
17            result = true;
18        }
19    } else if (len > 1) {
20        if (!strcmp(buf, "no") || !strcmp(buf, "false") || !strcmp(buf, "off")) {
21            result = false;
22        } else if (!strcmp(buf, "yes") || !strcmp(buf, "true") || !strcmp(buf, "on")) {
23            result = true;
24  }
25}
26
27    return result;
28}
29//获取Long和Int类型的属性,核心的内容是property_get,然后自己在封装成Long和Int类型
30static intmax_t property_get_imax(const char *key, intmax_t lower_bound, intmax_t upper_bound,
31                                  intmax_t default_value) {
32    ...
33    int len = property_get(key, buf, "");
34    if (len > 0) {
35        int tmp = errno;
36        errno = 0;
37
38        // Infer base automatically
39        result = strtoimax(buf, &end, /*base*/ 0);
40        if ((result == INTMAX_MIN || result == INTMAX_MAX) && errno == ERANGE) {
41            // Over or underflow
42            result = default_value;
43            ALOGV("%s(%s,%" PRIdMAX ") - overflow", __FUNCTION__, key, default_value);
44        } else if (result < lower_bound || result > upper_bound) {
45            // Out of range of requested bounds
46            result = default_value;
47            ALOGV("%s(%s,%" PRIdMAX ") - out of range", __FUNCTION__, key, default_value);
48        } else if (end == buf) {
49            // Numeric conversion failed
50            result = default_value;
51            ALOGV("%s(%s,%" PRIdMAX ") - numeric conversion failed", __FUNCTION__, key,
52                  default_value);
53        }
54
55        errno = tmp;
56  }
57
58    return result;
59  }
60
61//获取Long类型的属性
62int64_t property_get_int64(const char *key, int64_t default_value) {
63    return (int64_t)property_get_imax(key, INT64_MIN, INT64_MAX, default_value);
64}
65//获取Int类型的属性
66int32_t property_get_int32(const char *key, int32_t default_value) {
67    return (int32_t)property_get_imax(key, INT32_MIN, INT32_MAX, default_value);
68}
69//获取字符串类型的属性
70int property_get(const char *key, char *value, const char *default_value) {
71    //最终调用的就是__system_property_get函数
72    int len = __system_property_get(key, value);
73    if (len > 0) {
74        return len;
75    }
76    if (default_value) {
77        len = strnlen(default_value, PROPERTY_VALUE_MAX - 1);
78        memcpy(value, default_value, len);
79        value[len] = '\0';
80    }
81    return len;
82}
3.2.2__system_property_get
1//bionic/libc/bionic/system_property_api.cpp
2 __BIONIC_WEAK_FOR_NATIVE_BRIDGE
3int __system_property_get(const char* name, char* value) {
4    return system_properties.Get(name, value);
5}
3.2.3system_properties.Get
 1//bionic/libc/system_properties/system_properties.cpp
 2int SystemProperties::Get(const char* name, char* value) {
 3  const prop_info* pi = Find(name);
 4
 5  if (pi != nullptr) {
 6    return Read(pi, nullptr, value);
 7  } else {
 8    value[0] = 0;
 9    return 0;
10  }
11  }
12
13const prop_info* SystemProperties::Find(const char* name) {
14  if (!initialized_) {
15    return nullptr;
16  }
17
18  prop_area* pa = contexts_->GetPropAreaForName(name);
19  if (!pa) {
20    async_safe_format_log(ANDROID_LOG_ERROR, "libc", "Access denied finding property \"%s\"", name);
21    return nullptr;
22  }
23
24  return pa->find(name);
25  }
26
27int SystemProperties::Read(const prop_info* pi, char* name, char* value) {
28  uint32_t serial = ReadMutablePropertyValue(pi, value);
29  if (name != nullptr) {
30    size_t namelen = strlcpy(name, pi->name, PROP_NAME_MAX);
31    if (namelen >= PROP_NAME_MAX) {
32      async_safe_format_log(ANDROID_LOG_ERROR, "libc",
33                            "The property name length for \"%s\" is >= %d;"
34                            " please use __system_property_read_callback"
35                            " to read this property. (the name is truncated to \"%s\")",
36                            pi->name, PROP_NAME_MAX - 1, name);
37    }
38  }
39  if (is_read_only(pi->name) && pi->is_long()) {
40    async_safe_format_log(
41        ANDROID_LOG_ERROR, "libc",
42        "The property \"%s\" has a value with length %zu that is too large for"
43        " __system_property_get()/__system_property_read(); use"
44        " __system_property_read_callback() instead.",
45        pi->name, strlen(pi->long_value()));
46  }
47  return SERIAL_VALUE_LEN(serial);
48  }
49
50uint32_t SystemProperties::ReadMutablePropertyValue(const prop_info* pi, char* value) {
51  // We assume the memcpy below gets serialized by the acquire fence.
52  uint32_t new_serial = load_const_atomic(&pi->serial, memory_order_acquire);
53  uint32_t serial;
54  unsigned int len;
55  for (;;) {
56    serial = new_serial;
57    len = SERIAL_VALUE_LEN(serial);
58    if (__predict_false(SERIAL_DIRTY(serial))) {
59      // See the comment in the prop_area constructor.
60      prop_area* pa = contexts_->GetPropAreaForName(pi->name);
61      memcpy(value, pa->dirty_backup_area(), len + 1);
62    } else {
63      memcpy(value, pi->value, len + 1);
64}
65    atomic_thread_fence(memory_order_acquire);
66    new_serial = load_const_atomic(&pi->serial, memory_order_relaxed);
67    if (__predict_true(serial == new_serial)) {
68      break;
69  }
70    atomic_thread_fence(memory_order_acquire);
71  }
72  return serial;
73}
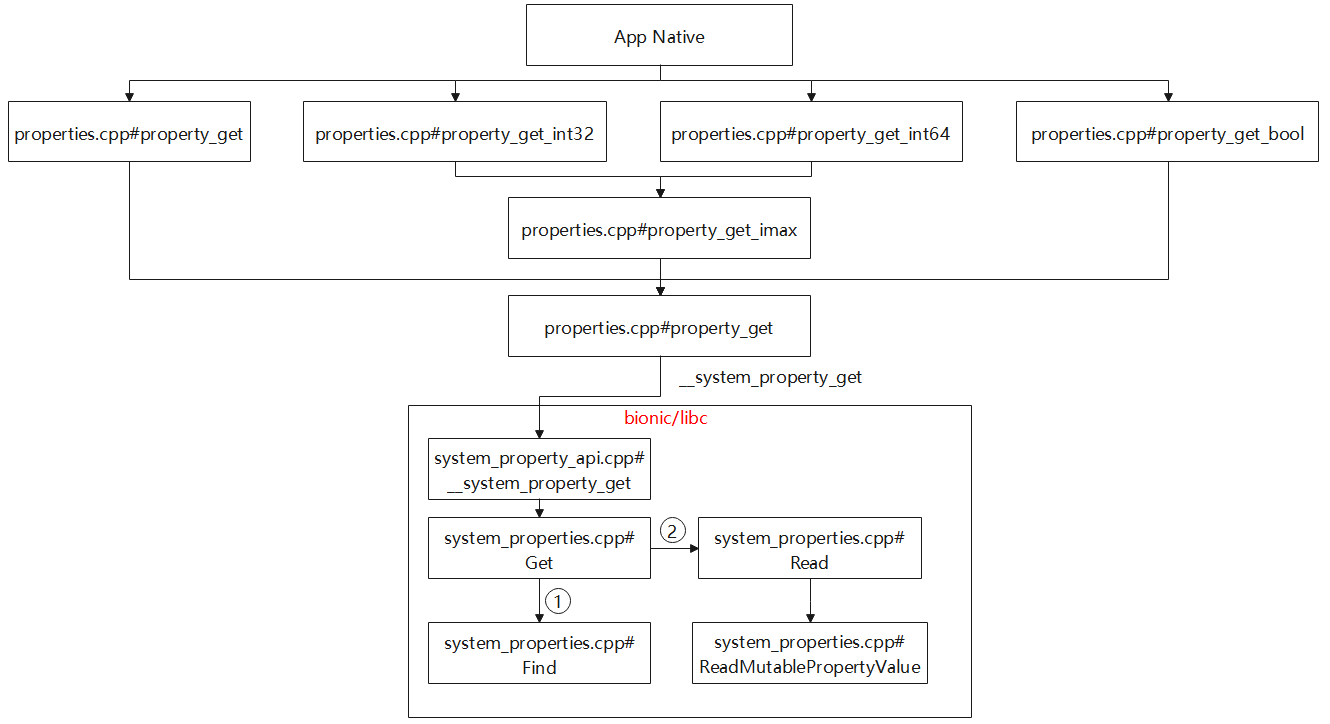
补充:关于
libc.so是什么时候初始化的关于在Android中的
libc.so,实际上是bionic/libc,根据以下规则来生成对应的libc.so1//bionic/libc/Android.bp 2cc_library_static { 3 name: "libc_init_dynamic", 4 defaults: ["libc_defaults"], 5 srcs: ["bionic/libc_init_dynamic.cpp"], 6 cflags: ["-fno-stack-protector"], 7} 8 9// ======================================================== 10// libc.a + libc.so 11// ======================================================== 12cc_library { 13 defaults: [ 14 "libc_defaults", 15 "libc_native_allocator_defaults", 16 ], 17 name: "libc", 18 static_ndk_lib: true, 19 export_include_dirs: ["include"], 20 product_variables: { 21 platform_sdk_version: { 22 asflags: ["-DPLATFORM_SDK_VERSION=%d"], 23 }, 24 }, 25 static: { 26 srcs: [ ":libc_sources_static" ], 27 cflags: ["-DLIBC_STATIC"], 28 whole_static_libs: [ 29 "gwp_asan", 30 "libc_init_static", 31 "libc_common_static", 32 "libc_unwind_static", 33 ], 34 }, 35 shared: { 36 srcs: [ ":libc_sources_shared" ], 37 whole_static_libs: [ 38 "gwp_asan", 39 "libc_init_dynamic", 40 "libc_common_shared", 41 ], 42 }, 43 ... 44}这里面实际上是
libc_init_dynamic.cpp为libc_init_dynamic.a的源文件,而libc.so是依赖于这个libc_init_dynamic.a的静态库,也就是间接也依赖于libc_init_dynamic.cpp文件。libc_init_dynamic.cpp文件,是用于初始化属性系统的,用于Api访问。1//bionic/libc/bionic/libc_init_dynamic.cpp 2__attribute__((constructor(1))) static void __libc_preinit() { 3 __stack_chk_guard = reinterpret_cast<uintptr_t>(__get_tls()[TLS_SLOT_STACK_GUARD]); 4 __libc_preinit_impl(); 5}关于constructor(1)特性。
constructor参数让系统执行main()函数之前调用函数(被__attribute__((constructor))修饰的函数).同理,destructor让系统在main()函数退出或者调用了exit()之后,调用我们的函数.带有这些修饰属性的函数,对于我们初始化一些在程序中使用的数据非常有用。具体原理可以点击这里。1//bionic/libc/bionic/libc_init_dynamic.cpp 2__attribute__((noinline)) 3static void __libc_preinit_impl() { 4 TlsModules& tls_modules = __libc_shared_globals()->tls_modules; 5 tls_modules.generation_libc_so = &__libc_tls_generation_copy; 6 __libc_tls_generation_copy = tls_modules.generation; 7 8 __libc_init_globals(); 9 __libc_init_common(); 10 ... 11 netdClientInit(); 12}用于初始化一些通用的环境变量
 1//bionic/libc/bionic/libc_init_common.cpp
 2void __libc_init_common() {
 3  // Initialize various globals.
 4  environ = __libc_shared_globals()->init_environ;
 5  errno = 0;
 6  setprogname(__libc_shared_globals()->init_progname ?: "<unknown>");
 7
 8#if !defined(__LP64__)
 9  __check_max_thread_id();
10#endif
11
12  __libc_add_main_thread();
13
14  __system_properties_init(); // Requires 'environ'.
15  __libc_init_fdsan(); // Requires system properties (for debug.fdsan).
16  __libc_init_fdtrack();
17
18  SetDefaultHeapTaggingLevel();
19}
__system_properties_init1//bionic/libc/bionic/system_property_api.cpp 2#define PROP_FILENAME "/dev/__properties__" 3int __system_properties_init() { 4 return system_properties.Init(PROP_FILENAME) ? 0 : -1; 5}
system_properties.Init1//bionic/libc/system_properties/system_properties.cpp 2bool SystemProperties::Init(const char* filename) { 3 // This is called from __libc_init_common, and should leave errno at 0 (http://b/37248982). 4 ErrnoRestorer errno_restorer; 5 6 if (initialized_) { 7 contexts_->ResetAccess(); 8 return true; 9 } 10 11 if (strlen(filename) >= PROP_FILENAME_MAX) { 12 return false; 13 } 14 strcpy(property_filename_, filename); 15 //最重要的从这里开始 16 if (is_dir(property_filename_)) { 17 if (access("/dev/__properties__/property_info", R_OK) == 0) { 18 contexts_ = new (contexts_data_) ContextsSerialized(); 19 if (!contexts_->Initialize(false, property_filename_, nullptr)) { 20 return false; 21 } 22 } 23 ... 24 } 25 initialized_ = true; 26 return true; 27}因为是App调用到
Init函数,这里的Initialize函数所传递的都为false,说明是没有可写入权限的。ContextsSerialized函数,是用于实例化序列化的对象,然后调用序列化对象的
Initialize函数。1//bionic/libc/system_properties/contexts_serialized.cpp 2bool ContextsSerialized::Initialize(bool writable, const char* filename, bool* fsetxattr_failed) { 3 filename_ = filename; 4 if (!InitializeProperties()) { 5 return false; 6 } 7 8 if (writable) { 9 ... 10 } 11 return true; 12}
InitializeProperties1//bionic/libc/system_properties/contexts_serialized.cpp 2bool ContextsSerialized::InitializeProperties() { 3 if (!property_info_area_file_.LoadDefaultPath()) { 4 return false; 5 } 6 7 if (!InitializeContextNodes()) { 8 FreeAndUnmap(); 9 return false; 10 } 11 12 return true; 13}这里的流程跟前面1.2中的
__system_property_area_init非常相似,但是区别是1.2中的__system_property_area_init初始化是在Init进程初始化的,具有可读写权限,而这里的__system_properties_init初始化是在bionic/libc这个so库初始化的,用于其他进程的调用,所以是没有可写权限的。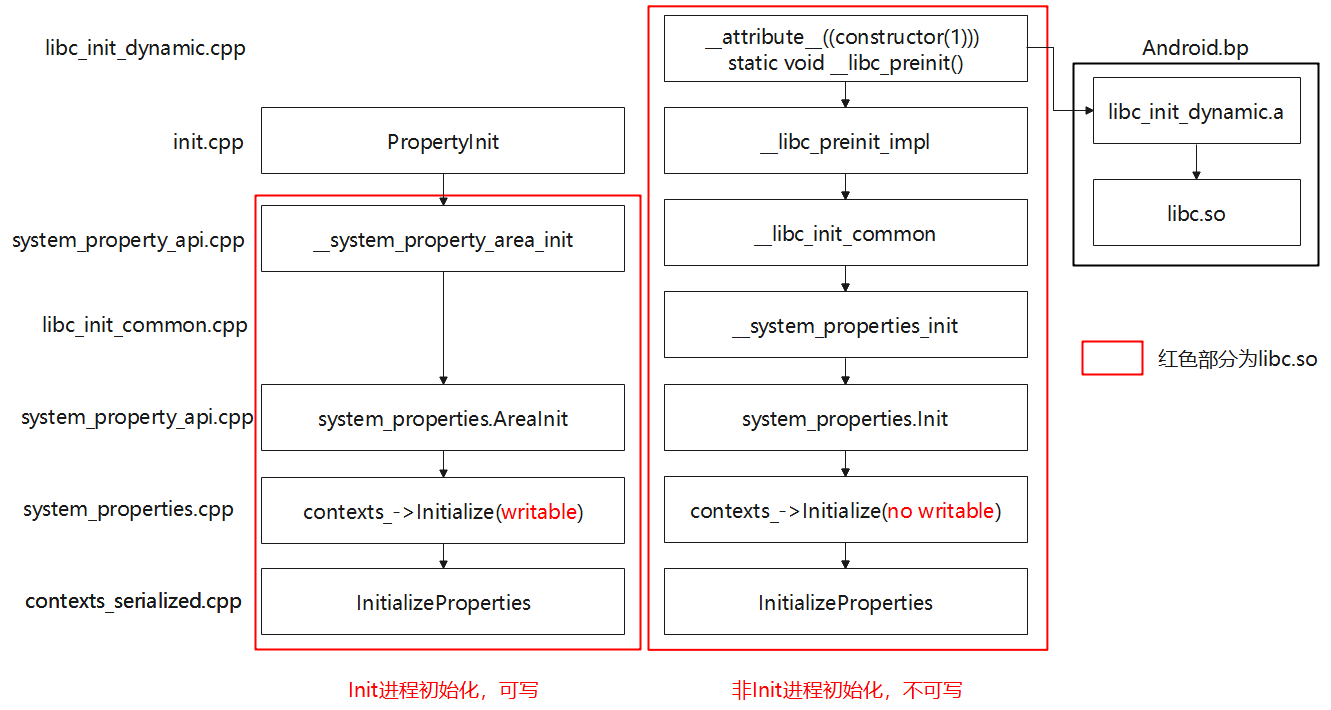
3.3adb获取属性
adb命令直接输入getprop,实际上是调用到一个toolbox当中的进程getprop,有两个参数ZT,不能一起使用,-Z是打印对应的SElinux安全上下文文件,-T是打印对应的value具体的类型,比如string,bool等。
 1//system/core/toolbox/getprop.cpp
 2extern "C" int getprop_main(int argc, char** argv) {
 3    auto result_type = ResultType::Value;
 4
 5    while (true) {
 6        ...
 7        switch (arg) {
 8            case 'h':
 9                std::cout << "usage: getprop [-TZ] [NAME [DEFAULT]]\n"
10                             "\n"
11                             "Gets an Android system property, or lists them all.\n"
12                             "\n"
13                             "-T\tShow property types instead of values\n"
14                             "-Z\tShow property contexts instead of values\n"
15                          << std::endl;
16                return 0;
17            case 'T':
18                ...
19                result_type = ResultType::Type;
20                break;
21            case 'Z':
22                ...
23                result_type = ResultType::Context;
24                break;
25            ...
26    }
27
28    if (optind >= argc) {
29        //不加任何参数答应所有的属性
30        PrintAllProperties(result_type);
31        return 0;
32    }
33    ...
34    PrintProperty(argv[optind], (optind == argc - 1) ? "" : argv[optind + 1], result_type);
35    return 0;
36}
PrintProperty
 1//system/core/toolbox/getprop.cpp
 2void PrintProperty(const char* name, const char* default_value, ResultType result_type) {
 3    switch (result_type) {
 4        case ResultType::Value:
 5            //实际上调用的GetProperty这个api方法
 6            std::cout << GetProperty(name, default_value) << std::endl;
 7            break;
 8        ...
 9    }
10}
到这里的GetProperty函数,就跟App的流程类似了。
GetProperty
 1//system/core/base/properties.cpp
 2std::string GetProperty(const std::string& key, const std::string& default_value) {
 3  std::string property_value;
 4#if defined(__BIONIC__)
 5  const prop_info* pi = __system_property_find(key.c_str());
 6  if (pi == nullptr) return default_value;
 7
 8  __system_property_read_callback(pi,
 9                                  [](void* cookie, const char*, const char* value, unsigned) {
10                                    auto property_value = reinterpret_cast<std::string*>(cookie);
11                                    *property_value = value;
12                                  },
13                                  &property_value);
14#else
15  auto it = g_properties.find(key);
16  if (it == g_properties.end()) return default_value;
17  property_value = it->second;
18#endif
19  return property_value.empty() ? default_value : property_value;
20}
GetProperty函数的内部逻辑,会根据__BIONIC__这个宏是否定义,分两个不同的逻辑。可以看到如果该宏已定义的话,会继续调用__system_property_find, 如果该宏未定义,则从全局变量g_properties中读取。
3.4Init进程获取属性
 1//system/core/init/property_service.cpp
 2//实际上这里获取属性直接使用GetProperty来调用,跟adb方式一致
 3static void ExportKernelBootProps() {
 4    constexpr const char* UNSET = "";
 5    struct {
 6        const char* src_prop;
 7        const char* dst_prop;
 8        const char* default_value;
 9    } prop_map[] = {
10            // clang-format off
11        { "ro.boot.serialno",   "ro.serialno",   UNSET, },
12        { "ro.boot.mode",       "ro.bootmode",   "unknown", },
13        { "ro.boot.baseband",   "ro.baseband",   "unknown", },
14        { "ro.boot.bootloader", "ro.bootloader", "unknown", },
15        { "ro.boot.hardware",   "ro.hardware",   "unknown", },
16        { "ro.boot.revision",   "ro.revision",   "0", },
17            // clang-format on
18    };
19    for (const auto& prop : prop_map) {
20        std::string value = GetProperty(prop.src_prop, prop.default_value);
21        if (value != UNSET) InitPropertySet(prop.dst_prop, value);
22    }
23}
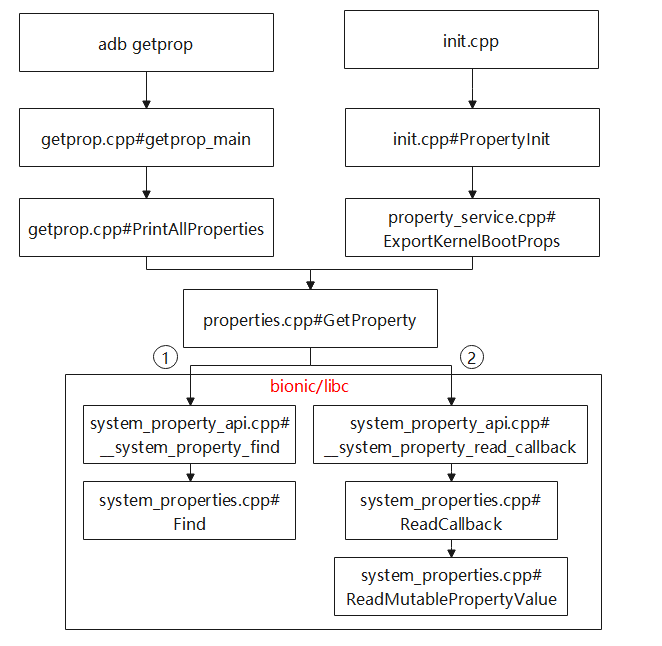
3.5获取属性总结
不管是Init进程还是非Init进程,最终都会调用到/bionic/libc这个动态库中,且会先后调用__system_property_find和__system_property_read_callback函数,前者函数是通过属性名,从/dev/__properties__/property_info找到属性名对应Selinux安全上下文,然后在/dev/__properties__目录中找到对应的Selinux安全上下文文件,根据字典树的方式来读取全属性名。后者函数在安全上下文文件中,如果能够找到对应的prop_info,那么读取对应的value值,如果找不到那么就会返回null(其中App调用的Java和Native层,在上层封装了默认值,会返回默认值)。
4设置属性
这里包括非init进程和init进程设置属性,这里非init进程有两种方式,一种是在App调用Java层或者Native层调用设置属性的方式,另一种是直接adb敲命令setprop。
4.1App写入属性流程分析(Java侧)
 1//App设置属性
 2import android.os.SystemProperties;
 3public static boolean setProperty(String key, String value) {
 4    try {
 5        Class<?> c = Class.forName("android.os.SystemProperties");
 6        Method set = c.getMethod("set", String.class, String.class);
 7        set.invoke(c, key, value);
 8        return true;
 9    } catch (Exception e) {
10        e.printStackTrace();
11    }
12    return false;
13}
14
15setProperty("persist.a.b.c", "1");
4.1.1setProperty
 1//frameworks/base/core/java/android/os/SystemProperties.java
 2//需要通过反射来设置
 3public static void set(@NonNull String key, @Nullable String val) {
 4    if (val != null && !val.startsWith("ro.") && val.length() > PROP_VALUE_MAX) {
 5        throw new IllegalArgumentException("value of system property '" + key
 6                                           + "' is longer than " + PROP_VALUE_MAX + " characters: " + val);
 7    }
 8    if (TRACK_KEY_ACCESS) onKeyAccess(key);
 9    native_set(key, val);
10}
4.1.2native_set
 1//frameworks\base\core\jni\android_os_SystemProperties.cpp
 2int register_android_os_SystemProperties(JNIEnv *env)
 3{
 4    const JNINativeMethod method_table[] = {
 5        ...
 6        //设置属性就是这个SystemProperties_set函数
 7        { "native_set", "(Ljava/lang/String;Ljava/lang/String;)V",
 8          (void*) SystemProperties_set },
 9    };
10    return RegisterMethodsOrDie(env, "android/os/SystemProperties",
11                                method_table, NELEM(method_table));
12}
13//这里是设置属性的地方
14void SystemProperties_set(JNIEnv *env, jobject clazz, jstring keyJ,
15                          jstring valJ)
16{
17    ScopedUtfChars key(env, keyJ);
18    if (!key.c_str()) {
19        return;
20    }
21    std::optional<ScopedUtfChars> value;
22    if (valJ != nullptr) {
23        value.emplace(env, valJ);
24        if (!value->c_str()) {
25            return;
26        }
27    }
28    bool success;
29    //最终会调用到这里的__system_property_set函数
30#if defined(__BIONIC__)
31    success = !__system_property_set(key.c_str(), value ? value->c_str() : "");
32#else
33    success = android::base::SetProperty(key.c_str(), value ? value->c_str() : "");
34#endif
35    if (!success) {
36        jniThrowException(env, "java/lang/RuntimeException",
37                          "failed to set system property (check logcat for reason)");
38    }
39}
4.1.3__system_property_set
 1//bionic/libc/bionic/system_property_set.cpp
 2__BIONIC_WEAK_FOR_NATIVE_BRIDGE
 3int __system_property_set(const char* key, const char* value) {
 4  if (key == nullptr) return -1;
 5  if (value == nullptr) value = "";
 6  //获取当前属性的版本号
 7  if (g_propservice_protocol_version == 0) {
 8    detect_protocol_version();
 9  }
10  //比较当前的版本号,属性系统启动的时候就是设置为ro.property_service.version为2
11  //1的话为Android 8或者更早的系统版本
12  if (g_propservice_protocol_version == kProtocolVersion1) {
13    // Old protocol does not support long names or values
14    ...
15  } else {
16    // New protocol only allows long values for ro. properties only.
17    if (strlen(value) >= PROP_VALUE_MAX && strncmp(key, "ro.", 3) != 0) return -1;
18    // Use proper protocol
19    PropertyServiceConnection connection;
20    ...
21    //建立socket连接,这里连接的就是Init进程启动时候的Property_Service
22    //内部使用了writev,writev面向的是分散的数据块,两个函数的最终结果都是将内容写入连续的空间。
23    SocketWriter writer(&connection);
24    //发送tcp消息,首先是MSG类型,这里是属性系统版本v2.0,然后追加key和value的值
25    if (!writer.WriteUint32(PROP_MSG_SETPROP2).WriteString(key).WriteString(value).Send()) {
26    ...
27  }
28}
SocketWriter的数据结构如下图所示
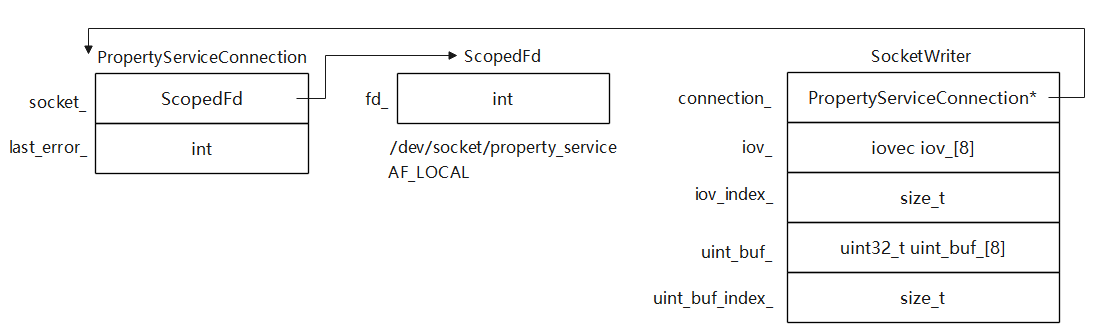
 1//bionic/libc/bionic/system_property_set.cpp
 2SocketWriter& WriteUint32(uint32_t value) {
 3    uint32_t* ptr = uint_buf_ + uint_buf_index_;
 4    uint_buf_[uint_buf_index_++] = value;
 5    iov_[iov_index_].iov_base = ptr;
 6    iov_[iov_index_].iov_len = sizeof(*ptr);
 7    ++iov_index_;
 8    return *this;
 9}
10
11SocketWriter& WriteString(const char* value) {
12    uint32_t valuelen = strlen(value);
13    WriteUint32(valuelen);
14    if (valuelen == 0) {
15    return *this;
16  }
17
18    CHECK(iov_index_ < kIovSize);
19    iov_[iov_index_].iov_base = const_cast<char*>(value);
20    iov_[iov_index_].iov_len = valuelen;
21    ++iov_index_;
22    return *this;
23}
4.1.3.1WriteUint32(PROP_MSG_SETPROP2)
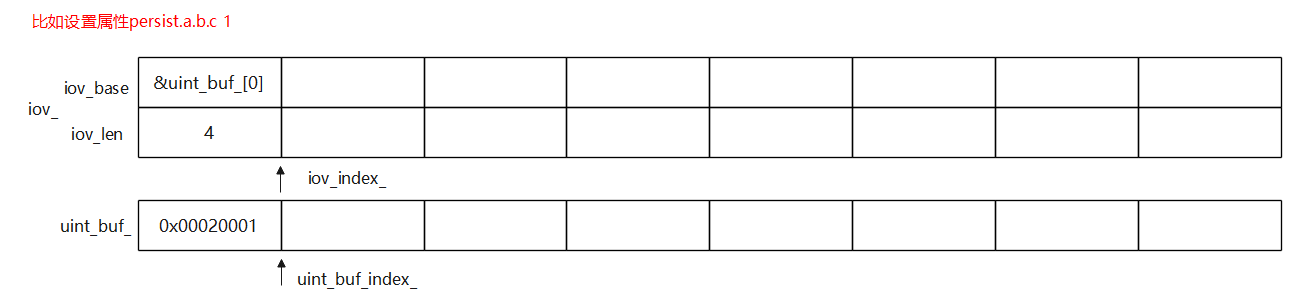
4.1.3.2WriteString("persist.a.b.c")
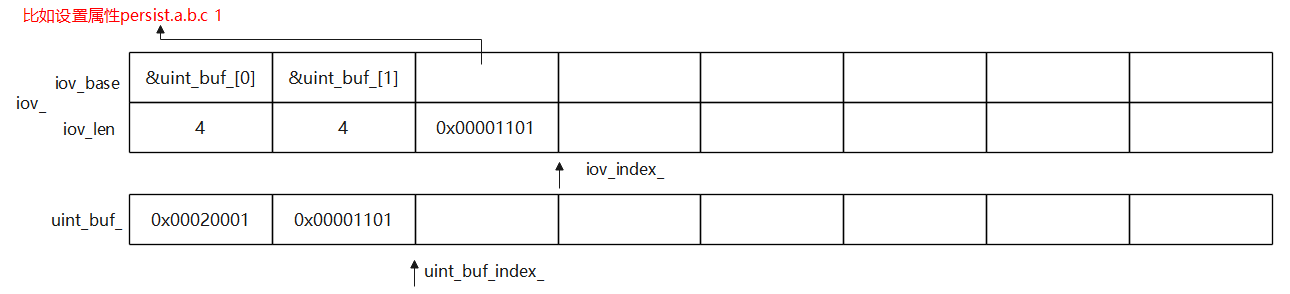
4.3.3.3WriteString("1")
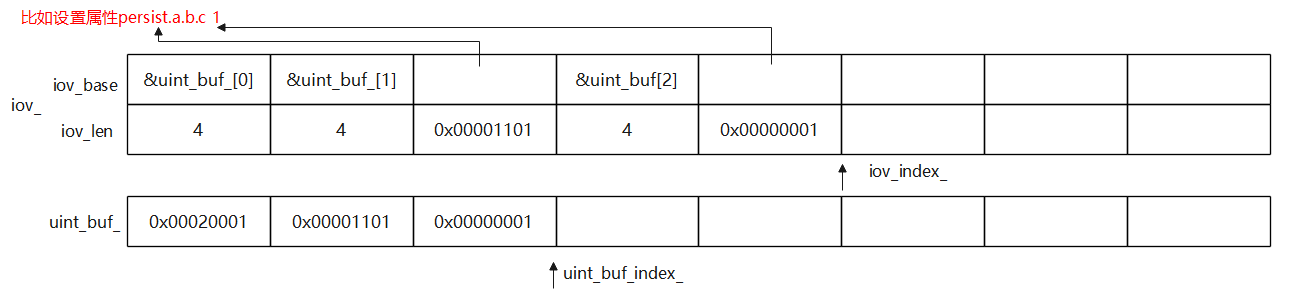
4.2App写入属性流程分析(Native侧)
1//App通过封装的so进行读取属性
2#include <cutils/properties.h>
3#define PROPERTY_KEY_MAX   32
4#define PROPERTY_VALUE_MAX  92
5property_set("persist.a.b.c", "1");
property_set
1//system/core/libcutils/properties.cpp
2int property_set(const char *key, const char *value) {
3    return __system_property_set(key, value);
4}
__system_property_set跟上面4.1的流程一致,这里就不继续展开。
4.3adb写入属性
adb命令直接输入setprop,实际上是调用到一个toolbox当中的进程setprop,需要有两个参数,name和value,且name和value必须符合规范(name长度小于32,value长度小于92)。
 1//system/core/toolbox/setprop.cpp
 2extern "C" int setprop_main(int argc, char** argv) {
 3    ...
 4    auto name = std::string{argv[1]};
 5    auto value = std::string{argv[2]};
 6    ...
 7    if (!SetProperty(name, value)) {
 8        std::cerr << "Failed to set property '" << name << "' to '" << value
 9                  << "'.\nSee dmesg for error reason." << std::endl;
10        return EXIT_FAILURE;
11    }
12
13    return EXIT_SUCCESS;
14}
SetProperty
1//system/core/base/properties.cpp
2bool SetProperty(const std::string& key, const std::string& value) {
3  return (__system_property_set(key.c_str(), value.c_str()) == 0);
4}
__system_property_set跟上面4.1的流程一致,这里就不继续展开。
4.4Init进程写入属性
1static void update_sys_usb_config() {
2    ...
3    if (config.empty() || config == "none") {
4        InitPropertySet("persist.sys.usb.config", is_debuggable ? "adb" : "none");
5    } else if (is_debuggable && config.find("adb") == std::string::npos &&
6        ...
7        InitPropertySet("persist.sys.usb.config", config);
8    }
9}
InitPropertySet
 1//system/core/init/property_service.cpp
 2uint32_t InitPropertySet(const std::string& name, const std::string& value) {
 3    uint32_t result = 0;
 4    ucred cr = {.pid = 1, .uid = 0, .gid = 0};
 5    std::string error;
 6    result = HandlePropertySet(name, value, kInitContext, cr, nullptr, &error);
 7    if (result != PROP_SUCCESS) {
 8        LOG(ERROR) << "Init cannot set '" << name << "' to '" << value << "': " << error;
 9    }
10
11    return result;
12}
HandlePropertySet
 1//system/core/init/property_service.cpp
 2uint32_t HandlePropertySet(const std::string& name, const std::string& value,
 3                           const std::string& source_context, const ucred& cr,
 4                           SocketConnection* socket, std::string* error) {
 5    if (auto ret = CheckPermissions(name, value, source_context, cr, error); ret != PROP_SUCCESS) {
 6        return ret;
 7    }
 8
 9    if (StartsWith(name, "ctl.")) {
10        return SendControlMessage(name.c_str() + 4, value, cr.pid, socket, error);
11    }
12    ...
13    return PropertySet(name, value, error);
14}
这个PropertySet又回到了2.3.2.3,具体不继续展开。
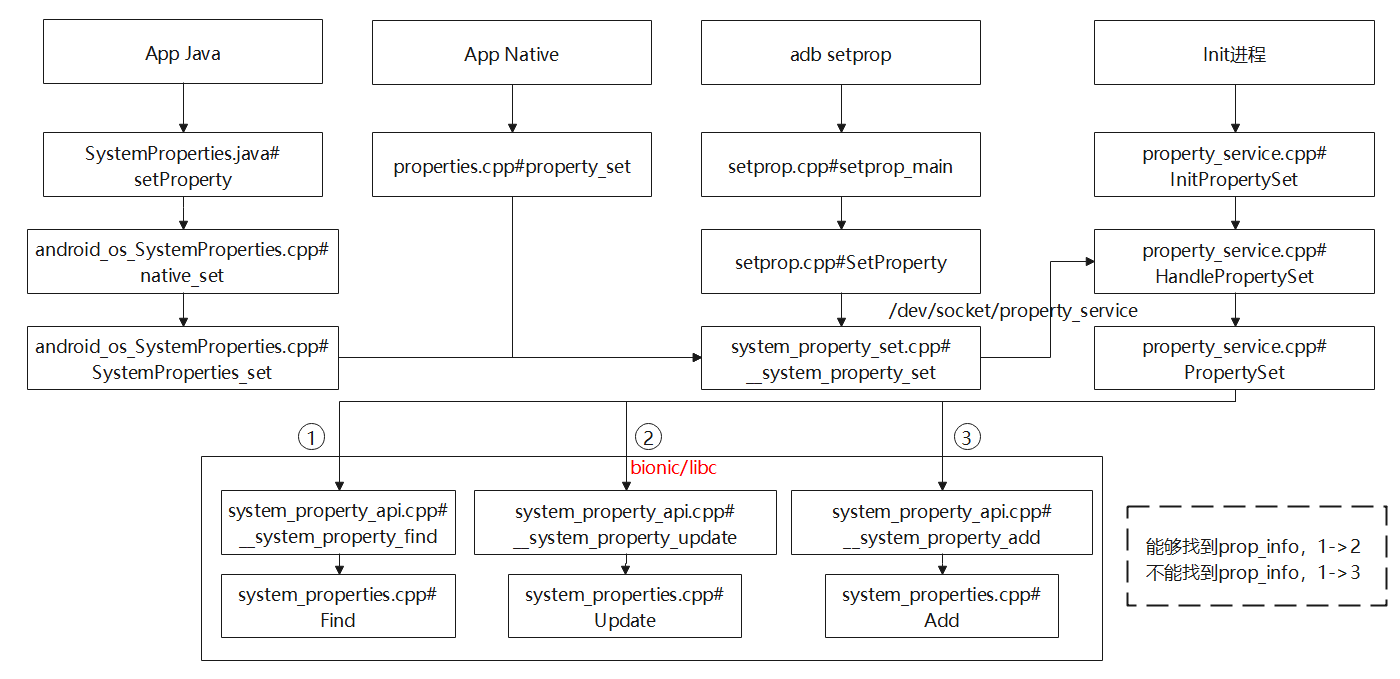
4.5设置属性总结
不管是Init进程还是非Init进程,设置属性需要调用到Init进程去操作。如果是非Init进程,会通过本地socket通信,路径为/dev/socket/property_service与Init中的属性服务建立通信,让所有非Init进程的设置操作,全部在Init进程中操作。最终都会调用到/bionic/libc这个动态库中,且会先调用__system_property_find函数,通过属性名,从/dev/__properties__/property_info找到属性名对应Selinux域,然后在/dev/__properties__目录中找到对应的Selinux域文件。如果返回的prop_info存在,那么接着调用__system_property_update函数更新value值,如果prop_info不存在,那么接着调用__system_property_Add函数在域文件中按照字典树规则添加一个属性值。
5关于属性变化
在这个基础上Android推出了一个init.rc的机制,即类似通过读取配置文件的方式,来启动不同的进程,而不是通过传exec在代码中一个个的来执行进程。
rc是一个配置文件,内部由Android初始化语言编写(Android Init Language)编写的脚本。具体可以参考**
/system/core/init/README.md**这个文件,详细介绍了rc文件的语法。
当属性变化之后,rc文件就会执行对应的Command,这个流程又是怎么样的呢?
我们知道,其它进程可以直接进行属性的读操作,但是属性系统的写操作只能在 init 进程中进行,其它进程进行属性的写操作也需要通过 init 进程。
1//system/core/init/property_service.cpp
2static uint32_t PropertySet(const std::string& name, const std::string& value, std::string* error) {
3    ...
4    auto lock = std::lock_guard{accept_messages_lock};
5    if (accept_messages) {
6        PropertyChanged(name, value);
7    }
8    return PROP_SUCCESS;
9}
其实就是在上述属性设置的末尾有一个判断是否接受信息的判断,默认是打开的,在StartPropertyService函数的时候就有打开
 1void StartPropertyService(int* epoll_socket) {
 2    ...
 3    StartSendingMessages();
 4    ...
 5}
 6
 7void StartSendingMessages() {
 8    auto lock = std::lock_guard{accept_messages_lock};
 9    accept_messages = true;
10}
PropertyChanged
如果属性是 sys.powerctl,我们绕过事件队列并立即处理它。这是为了确保 init 将始终立即关闭/重新启动,无论是否有其他待处理的事件要处理,或者 init 是否正在等待 exec 服务或等待属性。在非热关机情况下,将触发“关机”触发器以执行设备特定的命令。
 1//system/core/init/init.cpp
 2void PropertyChanged(const std::string& name, const std::string& value) {
 3
 4    if (name == "sys.powerctl") {
 5        trigger_shutdown(value);
 6    }
 7	//将rc文件中属性改变发生的命令或者事件添加到ActionManager内部队列中,等待轮询执行
 8    if (property_triggers_enabled) {
 9        ActionManager::GetInstance().QueuePropertyChange(name, value);
10        WakeMainInitThread();
11    }
12
13    prop_waiter_state.CheckAndResetWait(name, value);
14}
其中ActionManager定义是在属性服务初始化之后,立刻初始化
 1//system/core/init/init.cpp
 2//用于存放动作,包括init.cpp和rc文件
 3int SecondStageMain(int argc, char** argv) {
 4    ...
 5    ActionManager& am = ActionManager::GetInstance();
 6    //用于存放服务,包括init.cpp和rc文件
 7    ServiceList& sm = ServiceList::GetInstance();
 8    //解析rc文件,如果没有特殊配置ro.boot.init_rc,则解析./init.rc把/system/etc/init、/product/etc/init、/product_services/etc/init、/odm/etc/init、/vendor/etc/init 这几个路径加入init.rc之后解析的路径,在init.rc解析完成后,解析这些目录里的rc文件。
 9    LoadBootScripts(am, sm);
10    ...
11    while (true) {
12        ...
13        //处理rc文件触发的事件
14        if (!(prop_waiter_state.MightBeWaiting() || Service::is_exec_service_running())) {
15            m.ExecuteOneCommand();
16        }
17        //处理关机/重启事件
18        if (!IsShuttingDown()) {
19            HandleControlMessages();
20            SetUsbController();
21        }
22    }
23    return 0;
24}
从代码中可以看到,property_triggers_enabled 是 <属性变化触发 action> 的使能点,开启之后每次属性发生变化都会调用 ActionManager.QueuePropertyChange(name, value) 函数
1//system/core/init/action_manager.cpp
2void ActionManager::QueueEventTrigger(const std::string& trigger) {
3    auto lock = std::lock_guard{event_queue_lock_};
4    event_queue_.emplace(trigger);
5}
QueuePropertyChange 函数同样填充了 event_queue_ 队列,将已改变属性的键值对作为参数。
运行队列中已经添加了该属性的变化触发条件,同样通过 am.ExecuteOneCommand() 函数遍历所有的 _actions 链表,执行相应的 commands。
总结
本文主要对属性系统的初始化原理PropertyInit、StartPropertyService,获取属性、设置属性和属性变化这五个方面来展开详解,围绕着属性,SElinux,mmap,共享内存,匿名私有内存,Trie,rc文件,persist属性做了一个流程的介绍和分析。总的来说,属性看起来简单,内部机制还是比较复杂的。特别是由于笔者水平有限,可能属性系统某些细节的介绍不够深入,这个需要读者发挥自己的主观能动性进一步完善。
下载
本文源码点击这里
几个问题
1)SElinux怎么跟属性对应起来的
首先,SElinux是一种权限系统,也就是说每个文件都有自己对应的标签,比如每个文件都会有自己的标签。如果需要访问这个文件,需要有对应标签的类型的权限,访问/sdcard/..ccdid需要这个u:object_r:sdcardfs:s0标签的dir和file类型的read,search等权限,因为我需要访问到这个文件。
 1# 这里的第五列实际上就是标签,文件会有标签。
 2picasso:/sdcard $ ls -laZ
 3total 12946
 4drwxrwx--x 220 root sdcard_rw u:object_r:sdcardfs:s0   20480 2022-09-10 02:20 .
 5drwx--x--x   4 root sdcard_rw u:object_r:sdcardfs:s0    3488 2022-09-07 18:41 ..
 6-rw-rw----   1 root sdcard_rw u:object_r:sdcardfs:s0     301 2022-09-08 08:51 ..ccdid
 7-rw-rw----   1 root sdcard_rw u:object_r:sdcardfs:s0      57 2022-09-08 08:51 ..ccvid
 8-rw-rw----   1 root sdcard_rw u:object_r:sdcardfs:s0      96 2020-06-27 10:59 .3deaedc28469674418c57af6b7cc832b
 9drwxrwx--x   2 root sdcard_rw u:object_r:sdcardfs:s0    3488 2022-03-01 17:48 .6226f7cbe59e99a90b5cef6f94f966fd
10drwxrwx--x   3 root sdcard_rw u:object_r:sdcardfs:s0    3488 2020-05-30 14:01 .7934039a
11-rw-rw----   1 root sdcard_rw u:object_r:sdcardfs:s0      16 2021-01-25 14:22 .AID_SYS
12drwxrwx--x   2 root sdcard_rw u:object_r:sdcardfs:s0    3488 2022-09-10 13:35 .DataStorage
13drwxrwx--x   2 root sdcard_rw u:object_r:sdcardfs:s0    3488 2020-12-10 14:03 .Download
14drwxrwx--x   3 root sdcard_rw u:object_r:sdcardfs:s0    3488 2020-06-10 11:33 .INSTALLATION
15drwxrwx--x   2 root sdcard_rw u:object_r:sdcardfs:s0    3488 2021-11-24 15:27 .RtcDataStorage
16-rw-rw----   1 root sdcard_rw u:object_r:sdcardfs:s0      36 2021-01-25 14:22 .SID_SYS
17drwxrwx--x   2 root sdcard_rw u:object_r:sdcardfs:s0    3488 2020-12-10 14:03 .Trusfort
18-rw-rw----   1 root sdcard_rw u:object_r:sdcardfs:s0     169 2021-01-25 14:22 .UA_SYS
而属性安全上下文文件也是一样,所有的属性都会对应到一个标签,然后将默认设置的属性全部导入到一个文件中,也就是在本文1.1序列化的一个操作,/dev/__properties__/property_info,这里面保存了默认的所有属性对应的标签。再者,新建了一系列的属性安全上下文文件,包含了标签和对应的属性。访问一个属性的时候,首先会找到这个属性对应的标签,然后在/dev/__properties__/找到对应的属性安全上下文文件,找到之后,通过字典树的形式最终找到对应的属性。
2)自定义属性怎么添加上去的
自定义属性也是属于设置属性的范畴。其实就是简单的来说,分成三部分。
- 找到对应属性的标签,如果没有找到那么就是缺省标签,
u:object_r:default_prop:s0 - 找到
/dev/__properties__/xxx对应的文件,xxx为对应属性的标签,然后通过字典树访问,没有找到这个属性 - 重新添加这个属性,根据字典树的添加原理,按照方式添加这个自定义属性
3)自定义属性会对应哪个
SElinux标签呢
这个需要根据设置对前缀来区分,比如bluetooth.开头的属性都属于u:object_r:bluetooth_prop:s0标签的,访问对应的bluetooth.需要有u:object_r:bluetooth_prop:s0标签类型的权限。有些默认定义的属性访问权限很高,并不是随意一个进程或者App可以自由访问的。
1bluetooth.              u:object_r:bluetooth_prop:s0
2config.                 u:object_r:config_prop:s0
比如自定义一个属性,没有任何与默认属性定义的冲突,那么就是默认缺省属性
1persist.a.b.c.d u:object_r:default_prop:s0
4)persist属性为什么重启存在,我怎么删除自定义的persist属性呢
i)首先回答第一个问题,为什么重启存在,因为除了像其他的属性一样会保存在/dev/__properties__/目录中,persist.开头的属性还会被保存在/data/property/persistent_properties这个文件中。开机的时候除了会重新初始化默认属性,还会将/data/property/persistent_properties这个文件中属性读到对应的/dev/__properties__/目录对应的安全上下文文件中。和上面的2.3.2.2.4的流程一样,只不过因为在第一次设置属性的时候用到了LoadPersistentPropertiesFromMemory,/data/property/persistent_properties文件已经创建。所以直接将该文件的内容从proto变成字符串的访问来设置即可。
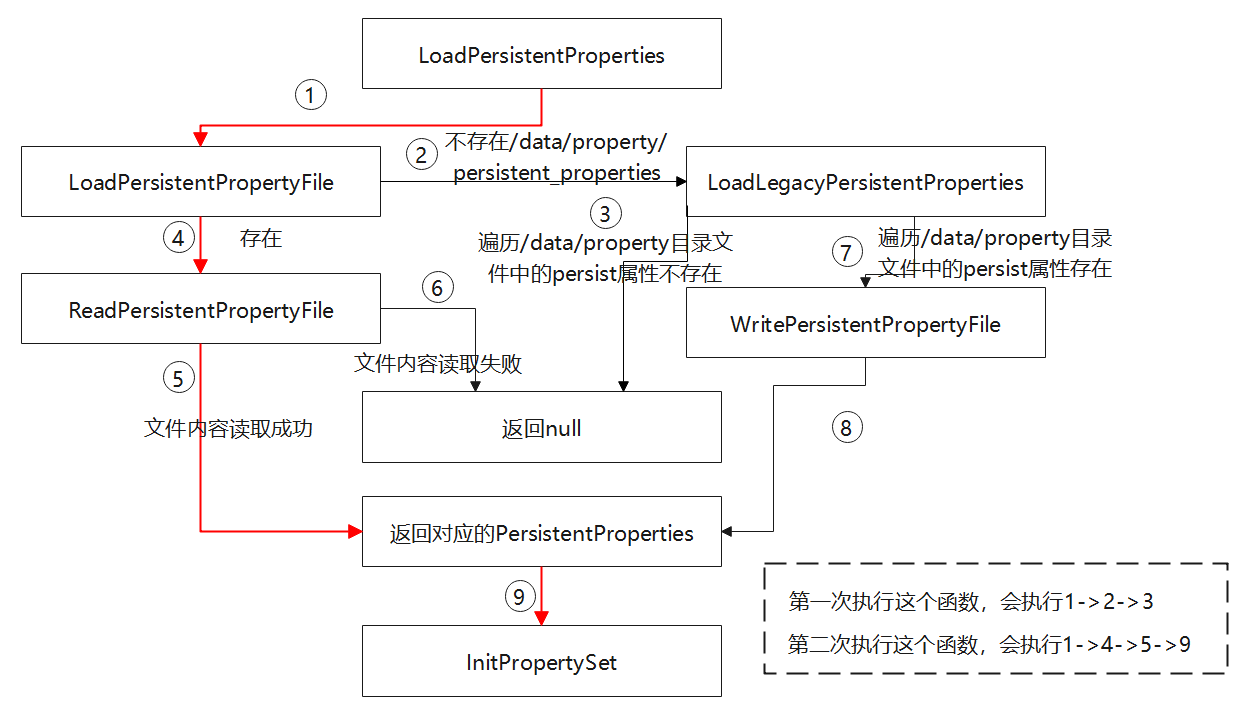
ii)怎么删除自定义的persist属性,比如persist.a.b.c.d
Android8.0或者更低版本,只需要删除/data/property/persist.a.b.c.d的文件,并且删除/data/property/persist.a.b.c.d在/dev/__properties__/目录中的安全上下文文件。
Android11版本,只需要删除或者更名/data/property/目录,并且删除/data/property/persist.a.b.c.d在/dev/__properties__/目录中的安全上下文文件。
删除自定义的persist属性,需要知其所以然,原理是清理掉/data/property/persistent_properties,并且不能让属性在下一次启动的时候,还原清理掉的文件/data/property/persistent_properties。
这里需要了解几件事
重启的过程中关机会设置属性
persist.sys.boot.reason。这里假定我是通过adb方式重启,那么1[persist.sys.boot.reason]: [reboot,shell]mmap在删除硬盘文件之后,进程依然能够让映射的内存区域进行读写操作,具体原理可以点击这里。简单的来讲就是,mmap机制,文件映射到逻辑地址空间的内存中,实际上也进程是一个持有文件句柄的过程。在建映射以后、解除映射之前,如果文件被删除,单个进程读写是没有问题,或者是多个进程在建映射以后、解除映射之前,如果文件被删除,多个进程读读没有问题。
高版本中,必须删除或者更名/data/property/目录,如果不对这个目录做处理,一旦重启依然会生效。
 1//system/core/init/persistent_properties.cpp
 2//这里才是真正让persist属性起不起作用的函数
 3Result<void> WritePersistentPropertyFile(const PersistentProperties& persistent_properties) {
 4    //创建一个临时文件/data/property/persistent_properties.tmp
 5    const std::string temp_filename = persistent_property_filename + ".tmp";
 6    //打开这个临时文件
 7    unique_fd fd(TEMP_FAILURE_RETRY(
 8        open(temp_filename.c_str(), O_WRONLY | O_CREAT | O_NOFOLLOW | O_TRUNC | O_CLOEXEC, 0600)));
 9    if (fd == -1) {
10        return ErrnoError() << "Could not open temporary properties file";
11    }
12    std::string serialized_string;
13    if (!persistent_properties.SerializeToString(&serialized_string)) {
14        return Error() << "Unable to serialize properties";
15    }
16    //将所有属性,这里的属性依然是包括persist.a.b.c.d的,写入到这个临时文件中
17    if (!WriteStringToFd(serialized_string, fd)) {
18        return ErrnoError() << "Unable to write file contents";
19    }
20    fsync(fd);
21    fd.reset();
22    //将临时文件重命名为/data/property/persistent_properties
23    if (rename(temp_filename.c_str(), persistent_property_filename.c_str())) {
24        int saved_errno = errno;
25        unlink(temp_filename.c_str());
26        return Error(saved_errno) << "Unable to rename persistent property file";
27    }
28    //这里是最关键的,找到/data/property/persistent_properties文件的目录,即/data/property
29    //因为我们已经将这个目录更改,所以磁盘中已经找不到这个目录,直接返回添加所有属性失败,属性中包括persist.a.b.c.d
30    auto dir = Dirname(persistent_property_filename);
31    auto dir_fd = unique_fd{open(dir.c_str(), O_DIRECTORY | O_RDONLY | O_CLOEXEC)};
32    if (dir_fd < 0) {
33        return ErrnoError() << "Unable to open persistent properties directory for fsync()";
34    }
35    fsync(dir_fd);
36
37    return {};
38}
删除/data/property/persistent_properties和删除persist.a.b.c.d在/dev/__properties__/目录中的安全上下文文件。重启关机过程中,会设置关机的原因属性,那么会重新导入/dev/__properties__/定义的Selinux安全上下文对应的所有的ContextNode中的属性(删除persist.a.b.c.d在/dev/__properties__/目录中的安全上下文文件,进程依然可以读文件所映射的逻辑地址),其中包括persist.a.b.c.d属性,那么在关机的过程中会重新生成/data/property/persistent_properties文件,那么下一次开机过程中,会从/data/property/persistent_properties文件导入所有的persist.开头的属性,那么自然persist.a.b.c.d属性也会被导入。因此,必须对/data/property目录进行更改。
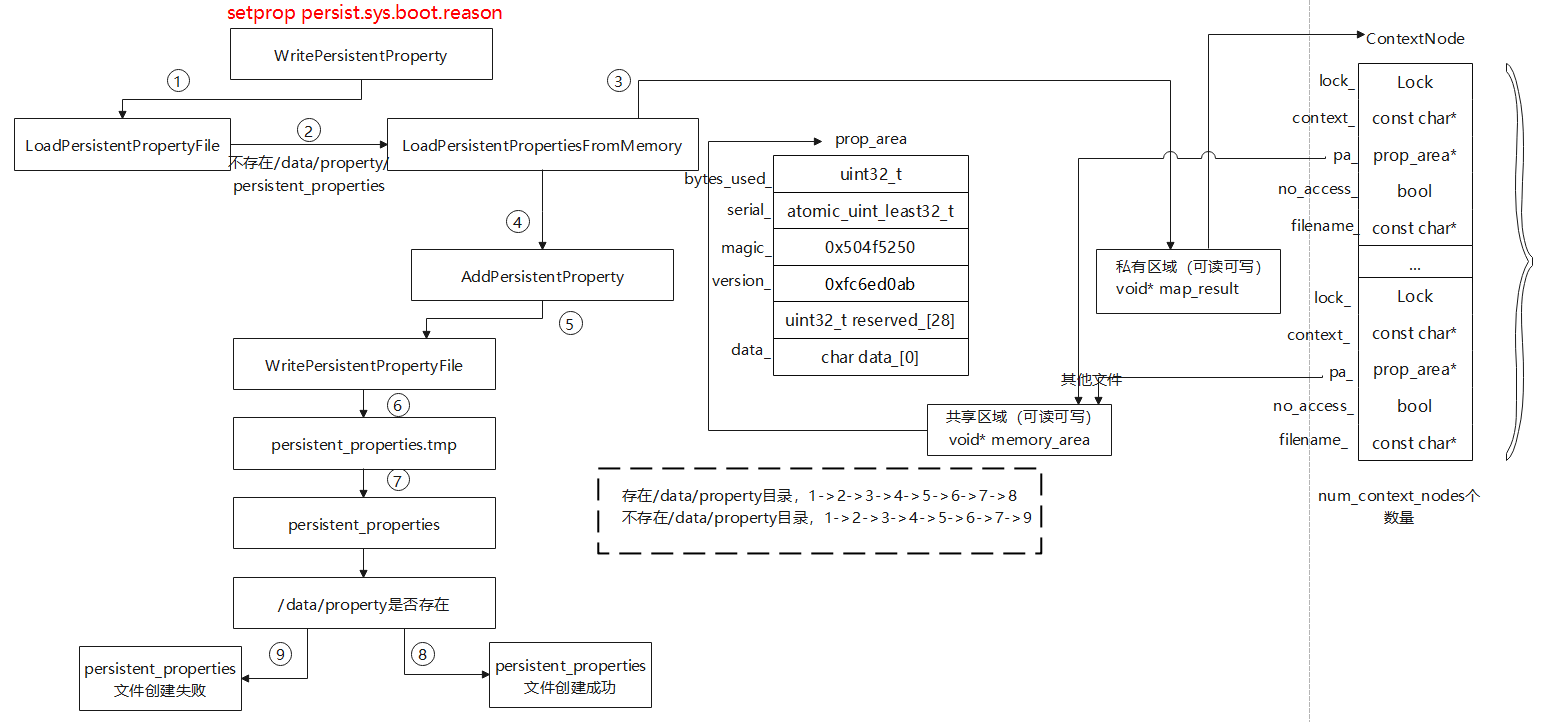
5)属性系统预置的
SElinux规则文件和预置写入的属性文件在哪个目录
SElinux规则文件,通常是下面几个目录文件,其中这些带有selinux目录是通过mmm system/sepolicy生成的,重启系统之后SElinux新的规则就能生效,通常对于SElinux修改都是在/device对应的sepolicy目录修改。
1/system/etc/selinux/plat_property_contexts
2/system_ext/etc/selinux/system_ext_property_contexts
3/vendor/etc/selinux/vendor_property_contexts
4/product/etc/selinux/product_property_contexts
5/odm/etc/selinux/odm_property_contexts
预置写入的属性文件,通常是下面几个目录文件,也是在/device对应目录mk中修改,修改完成之后更新几个目录文件,重启之后即可生效。当然如果是修改类似ro.boot这种属性需要在uboot修改,mk修改是不起作用的。
 1#并不是所有的文件都会存在设置属性的值
 2/system/etc/prop.default
 3/prop.default              #recovery path
 4/default.prop              #legacy path
 5/system/build.prop
 6/system_ext/build.prop
 7/vendor/default.prop
 8/vendor/build.prop
 9/odm/etc/build.prop
10/product/build.prop
11/factory/factory.prop
参考
[1] 低调小一, Android init进程——属性服务, 2015.
[2] 昨夜星辰_zhangjg, Android是如何使用selinux来保护系统属性的, 2021.
[3] apigfly, 深入Android系统(二)Bionic库, 2020.
[4] 悠然红茶, 深入讲解Android Property机制, 2015.
[5] sanchuyayun, SEAndroid策略分析, 2017.
[6] thl789, Android属性之build.prop生成过程分析, 2011.
[7] 淡陌羿格, 安卓property service系统分析, 2021.
[8] BestW2Y, [Android 基础] – Android 属性系统简介, 2021.
[9] YJer, Notepad++ 安装 HexEditor 插件, 2022.
[10] 流金岁月5789651, Framework学习之旅:init 进程启动过程, 2022.
[11] 微信终端开发团队, 快速缓解 32 位 Android 环境下虚拟内存地址空间不足的“黑科技”, 2021.
[12] canyie, Android Property 实现解析与黑魔法, 2022.
[13] Dufresne, Android 系统属性SystemProperty分析, 2012.
[15] iteye_563, SEAndroid安全机制对Android属性访问的保护分析, 2014.
[16] 岁月斑驳7, Android 8.1 开机流程分析(2), 2018.
[17] 流金岁月5789651, Framework学习之旅:init 进程启动过程, 2022.
[18] 静思心远, C语言变长数组(柔性数组) struct中char data[0]的用法, 2020.
[19] itzyjr, ❥关于C++之私有继承, 2022.
[20] 2013我笑了, android property属性property_set()&& property_get() selinux权限问题, 2019.
[21] 水墨长天, std::lock_guard的原理和应用, 2022.
[22] i校长, 深入理解MMAP原理,大厂爱不释手的技术手段, 2022.
[23] beOkWithAnything, mmap 父子进程共享内存通信, 2020.
[24] GarfieldEr007, Protobuf 语法指南, 2018.
[25] yaoyz105, Protobuf 学习(一)proto文件, 2022.
[26] 私房菜, Android protobuf 生成c++ 文件详解, 2021.
[27] OrangeAdmin, 专注于中台化代码生成器, 2013.
[28] 水墨长天, std::lock_guard的原理和应用, 2022.
[29] 深度Java, ACCEPT()和ACCEPT4(), 2012.
[30] konga, open中的 O_CLOEXEC 标志, 2014.
[31] Thinbug, 删除文件后删除mmap(), 2017.
[32] cxz7531, mmap函数建立文件的内存映射后,删除文件,能正常读取内容吗?, 2011.
[33] weaiken, __attribute__ 机制详解, 2019.
[34] kenny肉桂, __attribute__((constructor))用法解析, 2016.
[36] winsonCCCC, Linux网络编程之sockaddr与sockaddr_in,sockaddr_un分析, 2021.