
dumpsys简介 以media.camera为例
6200 Words|Read in about 29 Min|本文总阅读量次
dumpsys是一种在Android设备上运行的工具,可提供有关系统服务的信息。在相机开发的过程中,关于一些相机的配置可以直接dumpsyss media.camera来查看。
1dumpsys
dumpsys是一种在Android设备上运行的工具,可提供有关系统服务的信息。可以通过ADB命令行调用dumpsys获取在连接的设备上运行的系统服务的诊断输出。
1.1dumpsys 常见指令
1.1.1dumpsys –help
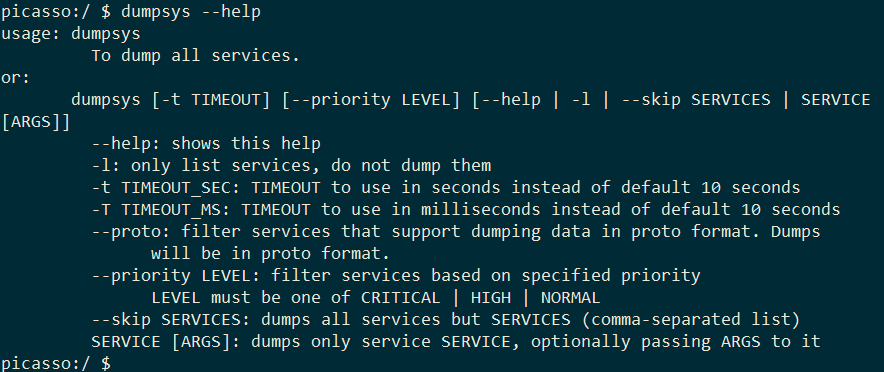
dumpsys工具的帮助文本
1dumpsys --help
对上面的AEGS打印整理
选项 说明 -t timeout 指定超时期限(秒)。如果未指定,默认值为 10 秒。 -T TIMEOUT_MS 指定超时期限(毫秒)。如果未指定,默认值为 10 秒。 –help 输出 dumpsys工具的帮助文本-l 输出可与 dumpsys配合使用的系统服务的完整列表–skip services 指定不希望包含在输出中的 services service [arguments] 指定希望输出的 service。某些服务可能允许您传递可选 arguments,可以通过将 -h选项与服务名称一起传递来了解这些可选参数dumpsys activity -h-c 指定某些服务时,附加此选项能以计算机可读的格式输出数据 -h 对于某些服务,附加此选项可查看该服务的帮助文本和其他选项 –proto 过滤支持以proto格式dump数据的服务,默认是全部打印,proto用于种结构化数据进行序列化 –priority LEVEL 根据指定的优先级过滤服务,LEVEL只能是三种里面选择,CRITICAL | HIGH | NORMAL,分别是紧急,高和普通三种选项
1.1.2dumpsys -l
输出所有支持dumpsys工具的系统服务的完整列表
1dumpsys -l
内容比较多,笔者这里划分成了常用服务和不常用服务用于区分。
服务名 功能 activity AMS相关信息,可以打印一些activity的信息 adb adb调试相关,adb的状态和一些信息 appops app使用情况 audio 查看声音信息 cpuinfo CPU统计相关 input IMS,可以打印一些输入相关信息 media.audio_flinger 音频管理器 media.audio_policy 音频配置 media.camera 相机信息,具体会在后面详述 meminfo 内存相关,用于查看当前的内存使用情况 netstats 网络接口状态信息,监控TCP/IP网络的情况 permission 权限相关 package PMS相关,打印一些package的信息 SurfaceFlinger 图像相关 window WMS相关,主要是布局相关,可以查看栈顶的activity wifi 网络相关,历史连接信心等等 不常用的服务,除了本身的系统之外,一些芯片产商和手机产商会有自定义的服务
accessibility account activity_task alarm android.security.keystore app_binding app_prediction appwidget autofill ashmem_device_service backup battery batteryproperties batterystats binder_calls_stats biometric bluetooth_manager bsgamepad bugreport carrier_config clipboard color_display companiondevice com.goodix.FingerprintService connectivity connmetrics consumer_ir content com.qualcomm.location.izat.IzatService content_suggestions contexthub crossprofileapps country_detector DockObserver dbinfo device_config device_identifiers devicestoragemonitor device_policy deviceidle diskstats display drm.drmManager dpmservice dreams dropbox dynamic_system ethernet extphone external_vibrator_service fingerprint gfxinfo gpu graphicsstats hardware_properties idmap imms input_method inputflinger incidentcompanion ions ipsec ircs isms iphonesubinfo isub jobscheduler launcherapps location locationpolicy lock_settings looper_stats media.aaudio media.camera.proxy media.drm media.extractor media.resource_manager media.metrics media.player media_projection media_router media.sound_trigger_hw media_session midi mount media_resource_monitor miui.fdpp miui.face.FaceService miui.sedc miui.shell miui.contentcatcher.ContentCatcherService miui.whetstone.klo miui.whetstone.mcd miuiboosterservice miui.mqsas.MQSService miui.mqsas.IMQSNative miui.whetstone.power MiuiBackup MiuiInit netd_listener netpolicy netstats network_score network_management network_stack network_watchlist nfc notification network_time_update_service oem_lock otadexopt overlay ProcessManager package_native perfshielder phone persistent_data_block pinner power processinfo procstats qspmsvc recovery restrictions role rollback runtime search secure_element security scheduling_policy sec_key_att_app_id_provider sensor_privacy sensorservice serial settings servicediscovery shortcut sip slice simphonebook soundtrigger stats statscompanion statusbar storaged storaged_pri storagestats system_update telecom testharness textclassification textservices telephony.registry thermalservice time_detector trust uimode updatelock uri_grants usagestats usb user vibrator voiceinteraction vendor.perfservice vendor.audio.vrservice wallpaper webviewupdate wifi wifiaware whetstone.activity wificond wifip2p wifirtt wifiscanner xiaomi.joyose
1.1.3dumpsys -t
指定dumpsys工具的超时期限
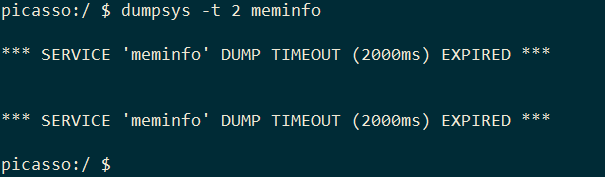
举一个例子,dumpsys中meminfo的dump输出会比较耗时。
1dumpsys -t 2 meminfo
1.1.4dumpsys –skip
指定不希望包含在输出中的 services
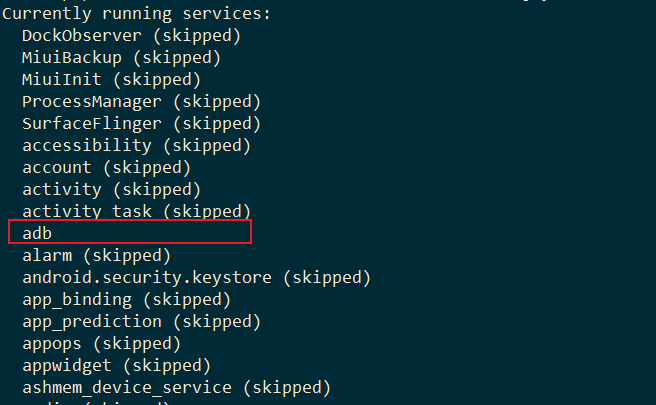
笔者这里去除所有,只留下adb的服务,这样一下就能发现
1dumpsys --skip DockObserver MiuiBackup MiuiInit ProcessManager SurfaceFlinger accessibility account activity activity_task alarm android.security.keystore app_binding app_prediction appops appwidget ashmem_device_service audio autofill backup battery batteryproperties batterystats binder_calls_stats biometric bluetooth_manager bsgamepad bugreport carrier_config clipboard color_display com.goodix.FingerprintService com.qualcomm.location.izat.IzatService companiondevice connectivity connmetrics consumer_ir content content_suggestions contexthub country_detector cpuinfo crossprofileapps dbinfo device_config device_identifiers device_policy deviceidle devicestoragemonitor diskstats display dpmservice dreams drm.drmManager dropbox dynamic_system ethernet external_vibrator_service extphone fingerprint gfxinfo gpu graphicsstats hardware_properties idmap imms incidentcompanion input input_method inputflinger ions iphonesubinfo ipsec ircs isms isub jobscheduler launcherapps location locationpolicy lock_settings looper_stats media.aaudio media.audio_flinger media.audio_policy media.camera media.camera.proxy media.drm media.extractor media.metrics media.player media.resource_manager media.sound_trigger_hw media_projection media_resource_monitor media_router media_session meminfo midi miui.contentcatcher.ContentCatcherService miui.face.FaceService miui.fdpp miui.mqsas.IMQSNative miui.mqsas.MQSService miui.sedc miui.shell miui.whetstone.klo miui.whetstone.mcd miui.whetstone.power miuiboosterservice mount netd_listener netpolicy netstats network_management network_score network_stack network_time_update_service network_watchlist nfc notification oem_lock otadexopt overlay package package_native perfshielder permission persistent_data_block phone pinner power print processinfo procstats qspmsvc recovery restrictions role rollback runtime scheduling_policy search sec_key_att_app_id_provider secure_element security sensor_privacy sensorservice serial servicediscovery settings shortcut simphonebook sip slice soundtrigger stats statscompanion statusbar storaged storaged_pri storagestats system_update telecom telephony.registry testharness textclassification textservices thermalservice time_detector trust uimode updatelock uri_grants usagestats usb user vendor.audio.vrservice vendor.perfservice vibrator voiceinteraction wallpaper webviewupdate whetstone.activity wifi wifiaware wificond wifip2p wifirtt wifiscanner window xiaomi.joyose
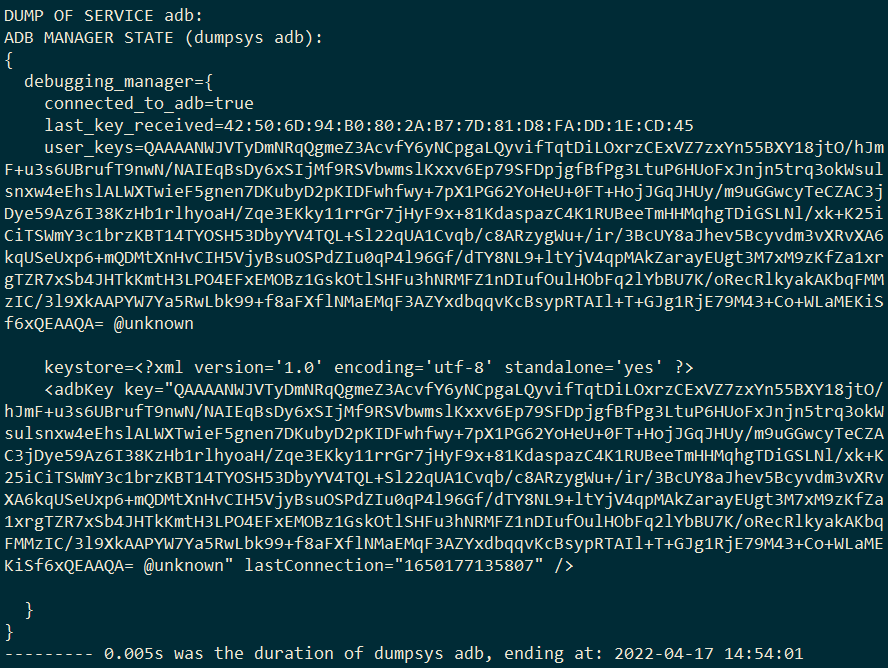
这里截取部分输出信息,可以看到如果被skip包含进去的service,后面会被追加skipped的标志位,然后输出的时候就会被自动过滤掉。然后接着会输出未被skipped标志的所有服务,这里只有adb服务,那么下面就会输出dump这个adb的服务内容。
1.1.5dumpsys –priority
根据指定的优先级过滤服务,LEVEL只能是三种里面选择
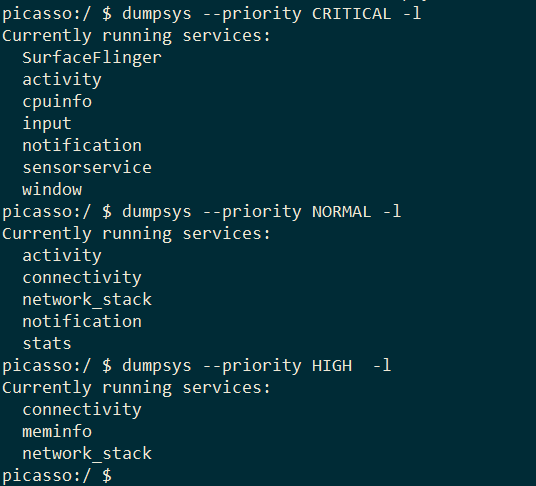
这里默认有三种等级的服务,分别有CRITICAL | HIGH | NORMAL。这里只能打印显示三种优先级的服务,如果需要自定义添加删除,需要在对应的服务添加的时候去修改。这里暂且按下不表,在后面的源码过程中会比较清楚。
1.1.6dumpsys SERVICE
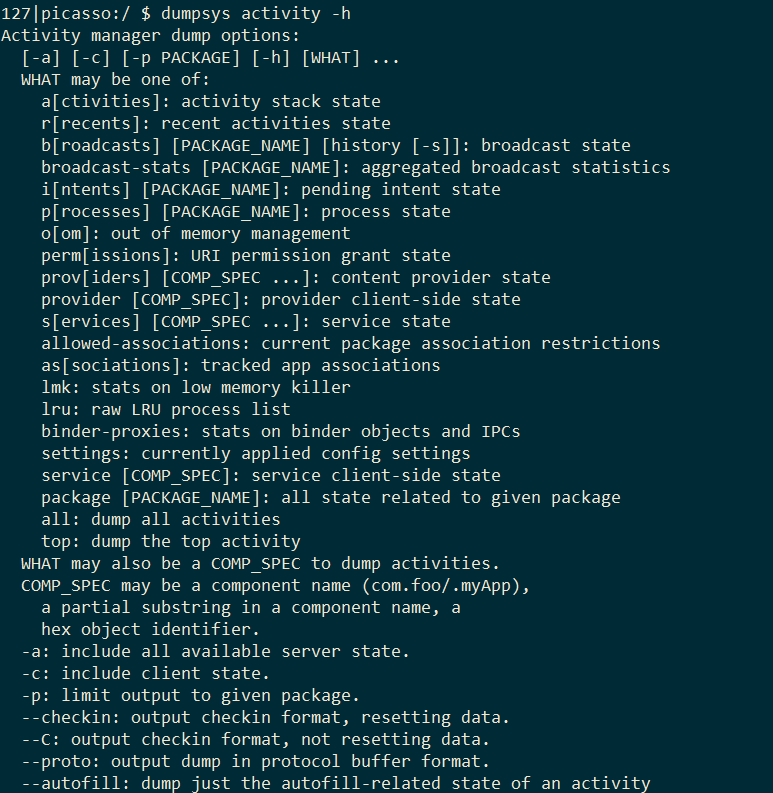
指定希望输出的 service。某些服务可能允许您传递可选 arguments
这里包含两部分,一部分是指定service,另一部分除了指定service之外,还可以增加参数
有些是支持参数的,可以通过-h查询
1dumpsys activity -h
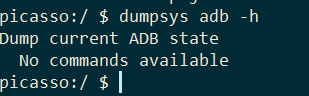
还有一些是不支持的,比如adb
1dumpsys adb -h
1.1.7dumpsys –proto
过滤支持以proto格式dump数据的服务
可以看到比如window这个服务是支持proto的,那么我可以直接以这种方式输出,proto可以认为是一种序列化方式。
关于是否支持proto,可以通过直接在一个服务中-h,先查询是否可以有–proto的选项,有的话那就支持。
1dumpsys window --proto
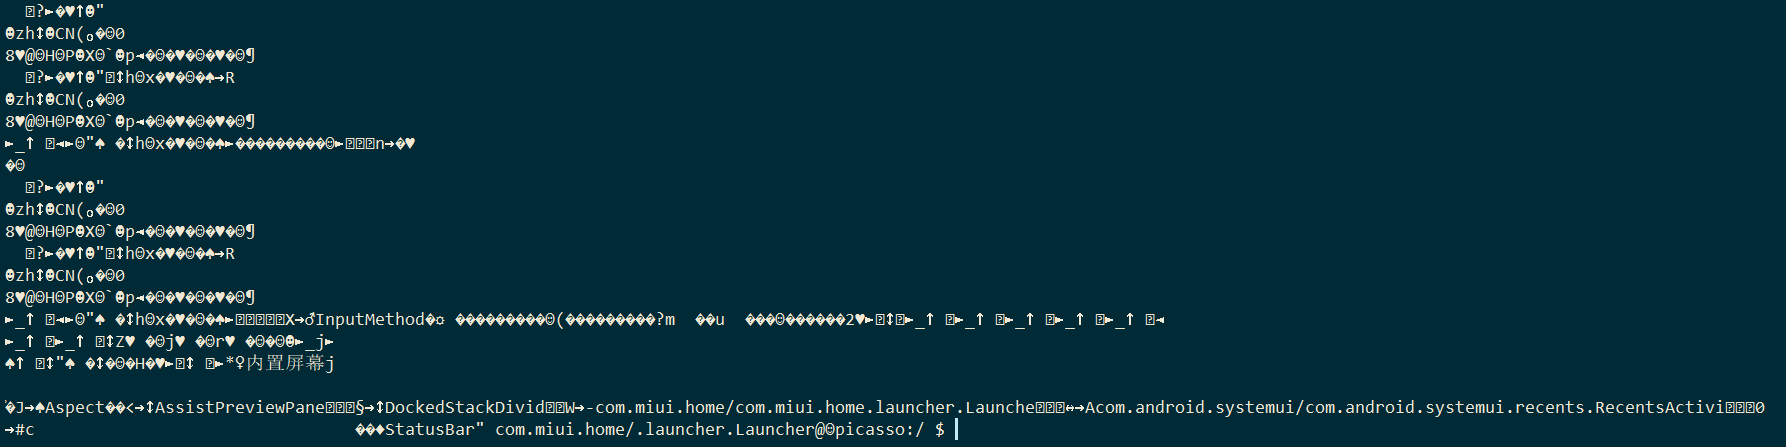
打印出来是乱码,这是因为输出默认就是protocol的格式,是一种二进制文件,需要特定的方式还原到可以阅读的方式,具体dump出来的proto数据,如何解析可以查看这里。
1.2实例
例如常见的指令
1dumpsys --help
2dumpsys adb
3dumpsys window -h
4dumpsys activity --proto
5dumpsys --skip meminfo
6dumpsys --priority HIGH -l
2dumpsys源码分析
dumpsys是Android自带的强大debug工具,它其实是一个进程,类似源码目录下的external目录下的一些工程文件用于自定义进程,apk等等。本文以android 11源码做分析。
目录结构如下所示
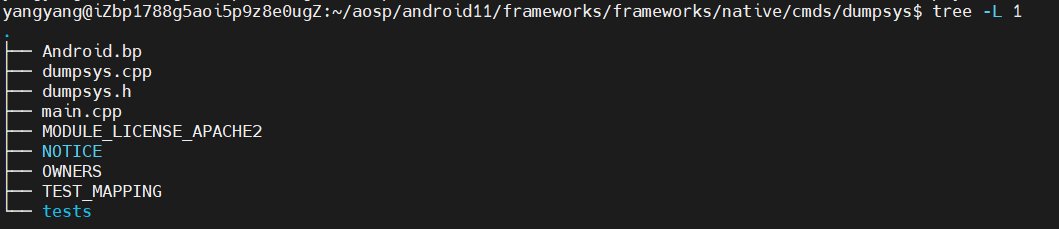
因为这个dumpsys是一个进程没被定义在bp文件中,dumpsys是被编译成了一个可执行的文件,并放在了系统中,路径在/system/bin目录下面
 1//frameworks/native/cmds/dumpsys/Android.bp
 2//
 3// Executable
 4//
 5
 6cc_binary {
 7    name: "dumpsys",
 8
 9    defaults: ["dumpsys_defaults"],
10
11    srcs: [
12        "main.cpp",
13    ],
14}
通过bp文件调用到main.cpp的函数入口,main函数
 1//frameworks/native/cmds/dumpsys/main.cpp#main
 2int main(int argc, char* const argv[]) {
 3    signal(SIGPIPE, SIG_IGN);
 4    //获取大管家serviceManager
 5    sp<IServiceManager> sm = defaultServiceManager();
 6    fflush(stdout);
 7    if (sm == nullptr) {
 8        ALOGE("Unable to get default service manager!");
 9        std::cerr << "dumpsys: Unable to get default service manager!" << std::endl;
10        return 20;
11    }
12    //最终调用到了这里的main
13    Dumpsys dumpsys(sm.get());
14    return dumpsys.main(argc, argv);
15}
最终会调用到这里,因为代码比较冗长,这里笔者人为的分成三段。
2.1Dumpsys的Option处理
 1//frameworks/native/cmds/dumpsys/dumpsys.cpp#Dumpsys::main#1
 2int Dumpsys::main(int argc, char* const argv[]) {
 3    Vector<String16> services;
 4    Vector<String16> args;
 5    String16 priorityType;
 6    Vector<String16> skippedServices;
 7    Vector<String16> protoServices;
 8    bool showListOnly = false;
 9    bool skipServices = false;
10    bool asProto = false;
11    Type type = Type::DUMP;
12    int timeoutArgMs = 10000;
13    int priorityFlags = IServiceManager::DUMP_FLAG_PRIORITY_ALL;
14    static struct option longOptions[] = {{"pid", no_argument, 0, 0},
15                                          {"priority", required_argument, 0, 0},
16                                          {"proto", no_argument, 0, 0},
17                                          {"skip", no_argument, 0, 0},
18                                          {"help", no_argument, 0, 0},
19                                          {0, 0, 0, 0}};
20    optind = 1;
21    while (1) {
22        int c;
23        int optionIndex = 0;
24		//这个函数比较重要,需要结合longOptions分析
25        c = getopt_long(argc, argv, "+t:T:l", longOptions, &optionIndex);
26
27        if (c == -1) {
28            break;
29        }
30
31        switch (c) {
32        case 0:
33            if (!strcmp(longOptions[optionIndex].name, "skip")) {
34                skipServices = true;
35            } else if (!strcmp(longOptions[optionIndex].name, "proto")) {
36                asProto = true;
37            } else if (!strcmp(longOptions[optionIndex].name, "help")) {
38                usage();
39                return 0;
40            } else if (!strcmp(longOptions[optionIndex].name, "priority")) {
41                priorityType = String16(String8(optarg));
42                if (!ConvertPriorityTypeToBitmask(priorityType, priorityFlags)) {
43                    fprintf(stderr, "\n");
44                    usage();
45                    return -1;
46                }
47            } else if (!strcmp(longOptions[optionIndex].name, "pid")) {
48                type = Type::PID;
49            }
50            break;
51
52        case 't':
53            {
54                char* endptr;
55                timeoutArgMs = strtol(optarg, &endptr, 10);
56                timeoutArgMs = timeoutArgMs * 1000;
57                if (*endptr != '\0' || timeoutArgMs <= 0) {
58                    fprintf(stderr, "Error: invalid timeout(seconds) number: '%s'\n", optarg);
59                    return -1;
60                }
61            }
62            break;
63
64        case 'T':
65            {
66                char* endptr;
67                timeoutArgMs = strtol(optarg, &endptr, 10);
68                if (*endptr != '\0' || timeoutArgMs <= 0) {
69                    fprintf(stderr, "Error: invalid timeout(milliseconds) number: '%s'\n", optarg);
70                    return -1;
71                }
72            }
73            break;
74
75        case 'l':
76            showListOnly = true;
77            break;
78
79        default:
80            fprintf(stderr, "\n");
81            usage();
82            return -1;
83        }
84    }
85    ...
86}
上述有几个陌生的函数,这里稍微提一下
getopt_long
1int getopt_long(int argc, char * const argv[], const char *optstring, const struct option *longopts, int *longindex);1、argc和argv和main函数的两个参数一致
2、optstring: 表示短选项字符串。这里用到了"+t:T:l",实际上是由三个函数,t和T都带一个参数,l后面不带参数,
1形式如“a:b::cd:“,分别表示程序支持的命令行短选项有-a、-b、-c、-d,冒号含义如下: 2(1)只有一个字符,不带冒号——只表示选项, 如-c 3(2)一个字符,后接一个冒号——表示选项后面带一个参数,如-a 100 4(3)一个字符,后接两个冒号——表示选项后面带一个可选参数,即参数可有可无, 如果带参数,则选项与参数直接不能有空格 5 形式应该如-b2003、longopts:表示长选项结构体,这里可自定义参数
 1struct option
 2{
 3    const char *name;
 4    int         has_arg;
 5    int        *flag;
 6    int         val;
 7};
 8//本文自定的内容如下
 9static struct option longOptions[] = {{"pid", no_argument, 0, 0},
10                                      {"priority", required_argument, 0, 0},
11                                      {"proto", no_argument, 0, 0},
12                                      {"skip", no_argument, 0, 0},
13                                      {"help", no_argument, 0, 0},
14                                      {0, 0, 0, 0}};
这里的option结构体有四个成员
name:表示选项的名称,比如pid,priority,proto等。
has_arg:表示选项后面是否携带参数。该参数有三个不同值,如下:
a: no_argument(或者是0)时 ——参数后面不跟参数值,eg: –help
b: required_argument(或者是1)时 ——参数输入格式为:–参数 值 或者 –参数=值。eg:–dir=/home
c: optional_argument(或者是2)时 ——参数输入格式只能为:–参数=值
flag:这个参数有两个意思,空或者非空。
a:如果参数为空NULL,那么当选中某个长选项的时候,getopt_long将返回val值。
eg,可执行程序 –help,getopt_long的返回值为h.
b:如果参数不为空,那么当选中某个长选项的时候,getopt_long将返回0,并且将flag指针参数指向val值。
eg: 可执行程序 –http-proxy=127.0.0.1:80 那么getopt_long返回值为0,并且flag指向的值为1。
1static struct option longOpts[] = {
2    { "daemon", no_argument, NULL, 'D' },
3    { "dir", required_argument, NULL, 'd' },
4    { "http-proxy", required_argument, &flag, 1 },
5    { "version", no_argument, NULL, 'v' },
6    { "help", no_argument, NULL, 'h' },
7    { 0, 0, 0, 0 }
8};
val:表示指定函数找到该选项时的返回值,或者当flag非空时指定flag指向的数据的值val。
4、longindex:longindex非空,它指向的变量将记录当前找到参数符合longopts里的第几个元素的描述,即是longopts的下标值
补充注意点:
- 如果 optstring 的第一个字符是 '+' 或设置了环境变量 POSIXLY_CORRECT,则一旦遇到非选项参数,选项处理就会停止
- 如果 optstring 的第一个字符是 ‘-',则每个非选项 argv 元素都被处理为就好像它是具有字符代码 1 的选项的参数一样
- 如果 getopt() 不能识别选项字符,它会向 stderr 打印一条错误消息,将该字符存储在 optopt 中,然后返回“?”
- 如果 optstring 的第一个字符(在上述任何可选的 ‘+’ 或 ‘-’ 之后)是冒号 (':'),则 getopt() 返回 ‘:’ 而不是 ‘?',表示缺少选项参数。
- 如果检测到错误,并且 optstring 的第一个字符不是冒号,并且外部变量 opterr 不为零(这是默认值),则 getopt() 会打印一条错误消息。
- 更多详细的内容,可通过man getopt_long在linux c函数中查看。
2.1.1 getopt_long
那么本文的getopt_long(argc, argv, “+t:T:l”, longOptions, &optionIndex);含义就是
总共会有四种返回值,分别是t,T,l和0。因为自定义的longOpts里面的val都为0,所以返回值为0的又会有5种情况,分别对应结构体的5个name,“pid”,“priority”,“proto”,“skip”,“help”。
2.1.2 ConvertPriorityTypeToBitmask
 1//frameworks/native/cmds/dumpsys/dumpsys.cpp#ConvertPriorityTypeToBitmask
 2static bool ConvertPriorityTypeToBitmask(const String16& type, int& bitmask) {
 3    if (type == PriorityDumper::PRIORITY_ARG_CRITICAL) {
 4        bitmask = IServiceManager::DUMP_FLAG_PRIORITY_CRITICAL;
 5        return true;
 6    }
 7    if (type == PriorityDumper::PRIORITY_ARG_HIGH) {
 8        bitmask = IServiceManager::DUMP_FLAG_PRIORITY_HIGH;
 9        return true;
10    }
11    if (type == PriorityDumper::PRIORITY_ARG_NORMAL) {
12        bitmask = IServiceManager::DUMP_FLAG_PRIORITY_NORMAL;
13        return true;
14    }
15    return false;
16}
这个函数用来打印优先级的服务,比如根据上述1.1.5过程中的图片,我们只能打印优先级的服务
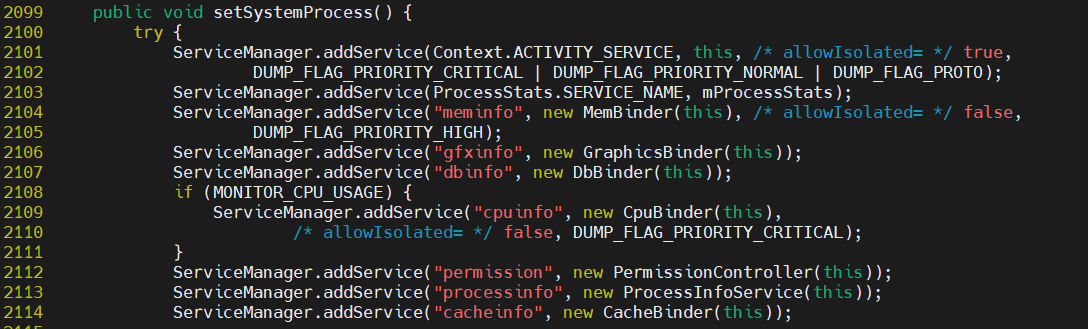
如果我们需要自己添加删除服务优先级的话,也是可以的。比如对于activity的修改,首先打开AMS。可以看到只要对应修改DUMP_FLAG_PRIORITY_的值即可。
 1//framworks/base/services/core/java/com/android/server/am/ActivityManagerService.java
 2public void setSystemProcess() {
 3    try {
 4        //这里的Context.ACTIVITY_SERVICE里面有CRITICAL和NORMAL,如果需要在HIGH中添加,在添加一个DUMP_FLAG_PRIORITY_HIGH即可
 5        ServiceManager.addService(Context.ACTIVITY_SERVICE, this, /* allowIsolated= */ true,
 6                                  DUMP_FLAG_PRIORITY_CRITICAL | DUMP_FLAG_PRIORITY_NORMAL | DUMP_FLAG_PROTO);
 7        ServiceManager.addService(ProcessStats.SERVICE_NAME, mProcessStats);
 8        //对应的meminfo,默认是在优先级HIGH中的
 9        ServiceManager.addService("meminfo", new MemBinder(this), /* allowIsolated= */ false,
10                                  DUMP_FLAG_PRIORITY_HIGH);
11        ServiceManager.addService("gfxinfo", new GraphicsBinder(this));
12        ServiceManager.addService("dbinfo", new DbBinder(this));
13        if (MONITOR_CPU_USAGE) {
14            ServiceManager.addService("cpuinfo", new CpuBinder(this),
15                                      /* allowIsolated= */ false, DUMP_FLAG_PRIORITY_CRITICAL);
16        }
17        ServiceManager.addService("permission", new PermissionController(this));
18        ServiceManager.addService("processinfo", new ProcessInfoService(this));
19        ServiceManager.addService("cacheinfo", new CacheBinder(this));
20        ...
21    } catch (PackageManager.NameNotFoundException e) {
22        throw new RuntimeException(
23            "Unable to find android system package", e);
24    }
25
26    ...
27}
28
2.2Dumpsys services的处理
这里做了service的操作,用于标记是否为skipped,标记过skipped的服务,会在最后打印过程中列出,并且显示(skipped)
 1//frameworks/native/cmds/dumpsys/dumpsys.cpp#Dumpsys::main#2
 2int Dumpsys::main(int argc, char* const argv[]) {
 3    ...
 4    for (int i = optind; i < argc; i++) {
 5        if (skipServices) {
 6            //如果是skip关键字后的服务,那么就存到这个数组中
 7            skippedServices.add(String16(argv[i]));
 8        } else {
 9            if (i == optind) {
10                //这个optind实际上是保存的service,类似dumpsys activity
11                services.add(String16(argv[i]));
12            } else {
13                const String16 arg(argv[i]);
14                args.add(arg);
15				//这里面的PriorityDumper::PROTO_ARG为 u"--proto"
16                //用于判断单个服务后面跟的参数是proto类型
17                //比如dumpsys activity --proto就会走到这里
18                if (!asProto && !arg.compare(String16(PriorityDumper::PROTO_ARG))) {
19                    asProto = true;
20                }
21            }
22        }
23    }
24
25    if ((skipServices && skippedServices.empty()) ||
26            (showListOnly && (!services.empty() || !skippedServices.empty()))) {
27        usage();
28        return -1;
29    }
30
31    if (services.empty() || showListOnly) {
32        //有两种情况会把所有的服务添加到services数组,一个进行skip操作,另外一种-l或者是什么参数都不加
33        services = listServices(priorityFlags, asProto);
34        setServiceArgs(args, asProto, priorityFlags);
35    }
36
37    const size_t N = services.size();
38    if (N > 1) {
39        // first print a list of the current services
40        std::cout << "Currently running services:" << std::endl;
41
42        for (size_t i=0; i<N; i++) {
43            //校验是否service存在,如果没有这个服务就会有提示不存在
44            sp<IBinder> service = sm_->checkService(services[i]);
45            //这里主要判断是都需要加(skipped)标记
46            if (service != nullptr) {
47                bool skipped = IsSkipped(skippedServices, services[i]);
48                std::cout << "  " << services[i] << (skipped ? " (skipped)" : "") << std::endl;
49            }
50        }
51    }
52
53    if (showListOnly) {
54        return 0;
55    }
56    ...
57}
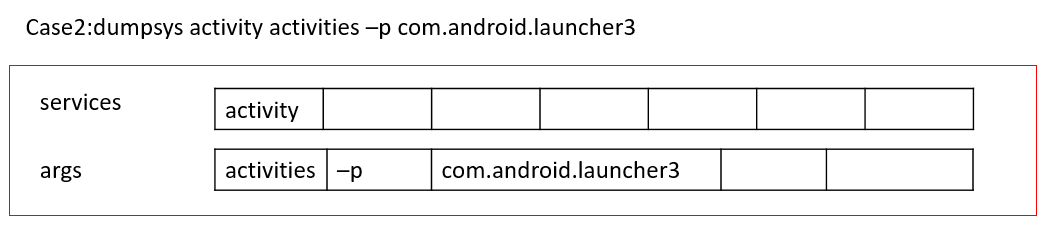
这里的逻辑比较简单,主要是判断是否存在–skip的存在,并将一系列的skip的services保存起来。
有两种情况,一种只有skip标志位,还有一种是service+可加参数组合

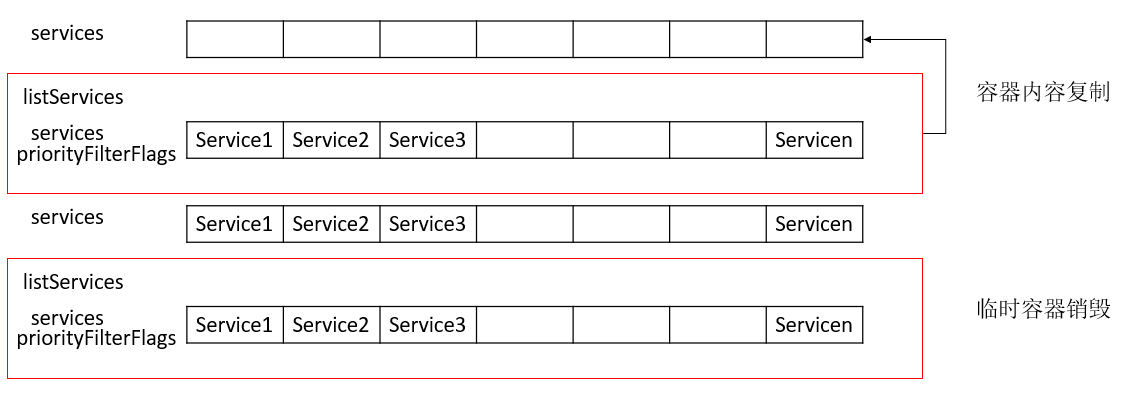
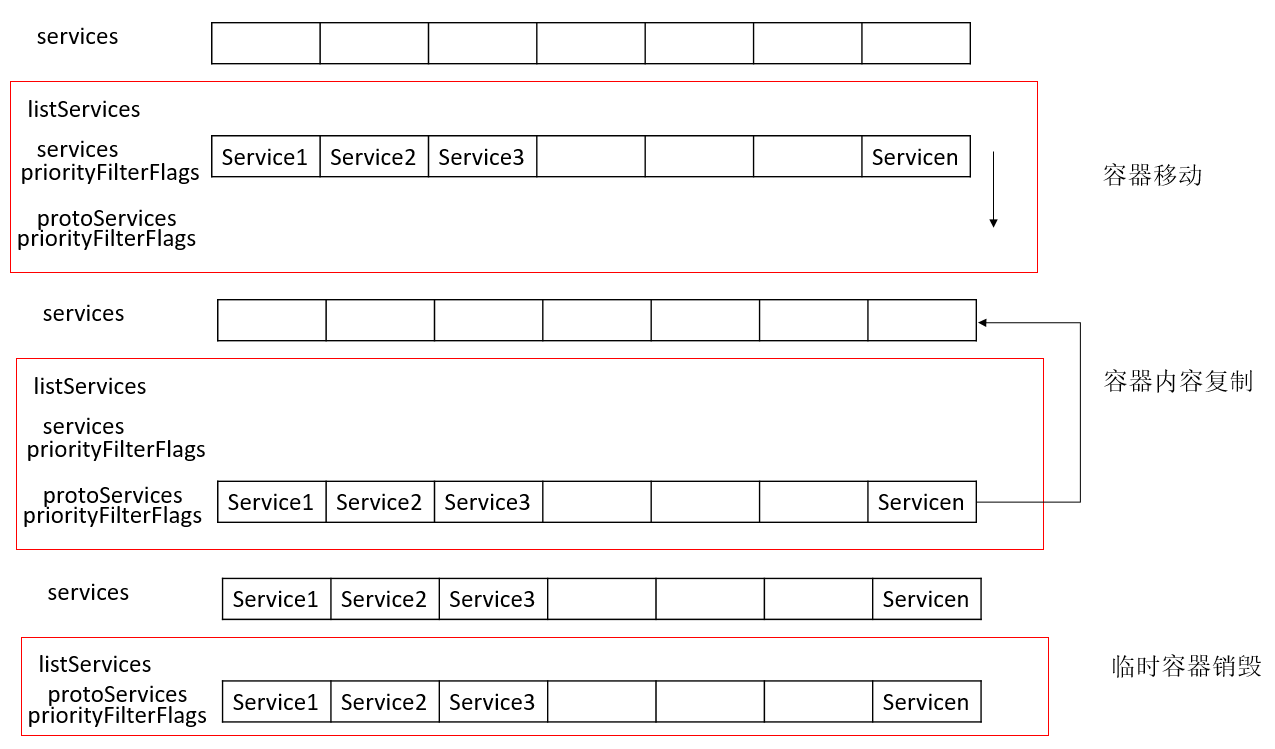
2.2.1listServices
这个函数的作用,是将priorityFilterFlags类型的服务添加到services数组中,对做一个排序,这里排序用到了STL的仿函数,仿函数为sort_func。
如果这个函数的filterByProto是true,那么这些服务可以进行proto操作,会将原本存在services数组中的服务数组转移到另外一个叫protoServices的数组中。
 1//frameworks/native/cmds/dumpsys/dumpsys.cpp#Dumpsys::listServices
 2Vector<String16> Dumpsys::listServices(int priorityFilterFlags, bool filterByProto) const {
 3    Vector<String16> services = sm_->listServices(priorityFilterFlags);
 4    services.sort(sort_func);
 5    if (filterByProto) {
 6        Vector<String16> protoServices = sm_->listServices(IServiceManager::DUMP_FLAG_PROTO);
 7        protoServices.sort(sort_func);
 8        Vector<String16> intersection;
 9        std::set_intersection(services.begin(), services.end(), protoServices.begin(),
10                              protoServices.end(), std::back_inserter(intersection));
11        services = std::move(intersection);
12    }
13    return services;
14}
15
16//仿函数
17static int sort_func(const String16* lhs, const String16* rhs)
18{
19    return lhs->compare(*rhs);
20}
无proto操作
proto操作
这个函数调用listServices(priorityFlags, asProto),入参为priorityFlags和asProto,默认priorityFlags为DUMP_FLAG_PRIORITY_ALL。其中的DUMP_FLAG_PRIORITY_ALL就是15,也就是包含所有服务的意思。asProto是判断这个服务是否可以进行Proto序列化的操作输出。
1//frameworks/native/libs/binder/include/binder/IServiceManager.h
2static const int DUMP_FLAG_PRIORITY_CRITICAL = 1 << 0;									//1
3static const int DUMP_FLAG_PRIORITY_HIGH = 1 << 1;										//2
4static const int DUMP_FLAG_PRIORITY_NORMAL = 1 << 2;									//4
5static const int DUMP_FLAG_PRIORITY_DEFAULT = 1 << 3;									//8
6static const int DUMP_FLAG_PRIORITY_ALL = DUMP_FLAG_PRIORITY_CRITICAL |
7    DUMP_FLAG_PRIORITY_HIGH | DUMP_FLAG_PRIORITY_NORMAL | DUMP_FLAG_PRIORITY_DEFAULT;	//15
8static const int DUMP_FLAG_PROTO = 1 << 4;												//16
2.3dumpsys services的实现
通过上面的三个vector数组和标志位,再加上对services的检查,开始针对对应的services进行dumpsys数据。默认不加参数也是dumpsys所有的services。
 1//frameworks/native/cmds/dumpsys/dumpsys.cpp#Dumpsys::main#3
 2int Dumpsys::main(int argc, char* const argv[]) {
 3    ...
 4    for (size_t i = 0; i < N; i++) {
 5        const String16& serviceName = services[i];
 6        if (IsSkipped(skippedServices, serviceName)) continue;
 7
 8        //检查是否状态值为OK
 9        if (startDumpThread(type, serviceName, args) == OK) {
10            bool addSeparator = (N > 1);
11            if (addSeparator) {
12                writeDumpHeader(STDOUT_FILENO, serviceName, priorityFlags);
13            }
14            std::chrono::duration<double> elapsedDuration;
15            size_t bytesWritten = 0;
16
17            status_t status =
18                writeDump(STDOUT_FILENO, serviceName, std::chrono::milliseconds(timeoutArgMs),
19                          asProto, elapsedDuration, bytesWritten);
20
21            if (status == TIMED_OUT) {
22                std::cout << std::endl
23                     << "*** SERVICE '" << serviceName << "' DUMP TIMEOUT (" << timeoutArgMs
24                     << "ms) EXPIRED ***" << std::endl
25                     << std::endl;
26            }
27
28            if (addSeparator) {
29                writeDumpFooter(STDOUT_FILENO, serviceName, elapsedDuration);
30            }
31            bool dumpComplete = (status == OK);
32            stopDumpThread(dumpComplete);
33        }
34    }
35    return 0;
36}
2.3.1startDumpThread
 1//frameworks/native/cmds/dumpsys/dumpsys.cpp#Dumpsys::startDumpThread
 2status_t Dumpsys::startDumpThread(Type type, const String16& serviceName,
 3                                  const Vector<String16>& args) {
 4    //如果输入的只有一个service,那么这里需要去进行服务校验
 5    sp<IBinder> service = sm_->checkService(serviceName);
 6    if (service == nullptr) {
 7        std::cerr << "Can't find service: " << serviceName << std::endl;
 8        return NAME_NOT_FOUND;
 9    }
10
11
12    int sfd[2];
13    if (pipe(sfd) != 0) {
14        std::cerr << "Failed to create pipe to dump service info for " << serviceName << ": "
15             << strerror(errno) << std::endl;
16        return -errno;
17    }
18
19    redirectFd_ = unique_fd(sfd[0]);
20    unique_fd remote_end(sfd[1]);
21    sfd[0] = sfd[1] = -1;
22
23    //用异步回调的方式调用到真是的service->dump
24    activeThread_ = std::thread([=, remote_end{std::move(remote_end)}]() mutable {
25        status_t err = 0;
26
27        switch (type) {
28        case Type::DUMP:
29            //这里是默认的dump
30            err = service->dump(remote_end.get(), args);
31            break;
32        case Type::PID:
33            err = dumpPidToFd(service, remote_end);
34            break;
35        default:
36            std::cerr << "Unknown dump type" << static_cast<int>(type) << std::endl;
37            return;
38        }
39
40        if (err != OK) {
41            std::cerr << "Error dumping service info status_t: " << statusToString(err) << " "
42                 << serviceName << std::endl;
43        }
44    });
45    return OK;
46}
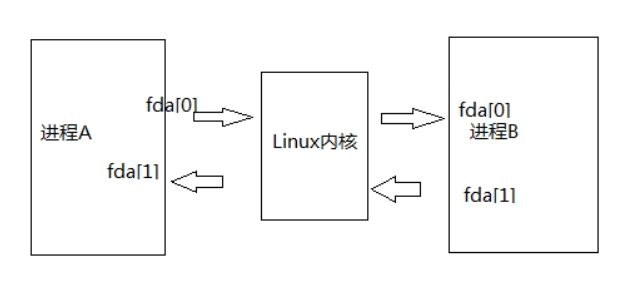
这里用到了管道pipe函数,管道是一种把两个进程之间的标准输入和标准输出连接起来的机制,从而提供一种让多个进程间通信的方法。如下图所示。
特别如下:
- 数据只能从管道的一端写入,从另一端读出
- 写入管道的数据遵循先入先从出的规则
- 管道不是普通的文件,不属于某个文件系统,其只存在于内存中
- 管道在内存中对应一个缓冲区,不同的系统其大小不一定相同
- 从管道读数据是一次性操作,数据一旦被读走,它就从管道中丢弃,释放空间以便写更多的数据
而本文中的通过新启动一个线程,将fd数组的fd[0]去做读的操作,fd[1]去做write操作,如下unique_fd参数中的读写操作。
1//system/core/base/include/android-base/unique_fd.h
2template <typename Closer>
3inline bool Pipe(unique_fd_impl<Closer>* read, unique_fd_impl<Closer>* write,
4                 int flags = O_CLOEXEC) {
5    ...
6    read->reset(pipefd[0]);
7    write->reset(pipefd[1]);
8    return true;
9}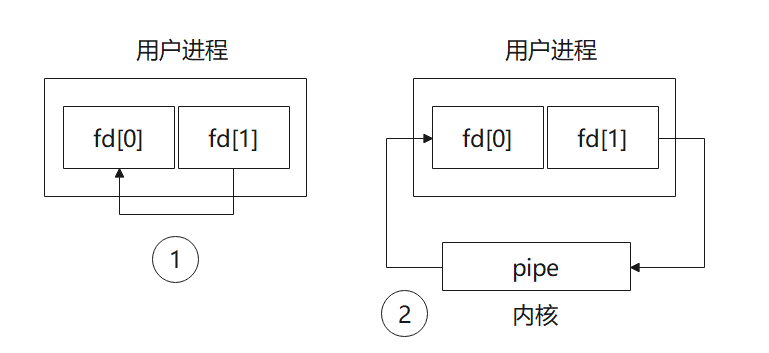
写入操作的fd[1]就是remote_end,会传入到对应service::dump中去,把dump的数据写入到管道中。
1//这里是默认的dump
2err = service->dump(remote_end.get(), args);
关于如何获取ServiceManager和Service这个后续会在Binder篇章中详细解析,这个先按下不表。
由前面的原理可知, 先要查询sm->checkService(“media.camera”),这里得到的是CameraService,那么也就意味着上述命令等价于调用CameraService.dump()。 同理其他的命令也是类似的方式。
2.3.2writeDump
这个函数比较复杂,涉及到linux的poll机制。跟上面的写入管道操作对应,这里是从管道中读出,redirectFd_对应是fd[0],这里的redirectFd_是全局变量,所以在startDumpThread的异步操作写入到管道中,这里的writeDump可以从管道中读出数据。
 1//frameworks/native/cmds/dumpsys/dumpsys.cpp#Dumpsys::writeDump
 2status_t Dumpsys::writeDump(int fd, const String16& serviceName, std::chrono::milliseconds timeout,
 3                            bool asProto, std::chrono::duration<double>& elapsedDuration,
 4                            size_t& bytesWritten) const {
 5    status_t status = OK;
 6    size_t totalBytes = 0;
 7    auto start = std::chrono::steady_clock::now();
 8    auto end = start + timeout;
 9
10    int serviceDumpFd = redirectFd_.get();
11    if (serviceDumpFd == -1) {
12        return INVALID_OPERATION;
13    }
14
15    struct pollfd pfd = {.fd = serviceDumpFd, .events = POLLIN};
16
17    while (true) {
18        // Wrap this in a lambda so that TEMP_FAILURE_RETRY recalculates the timeout.
19        auto time_left_ms = [end]() {
20            auto now = std::chrono::steady_clock::now();
21            auto diff = std::chrono::duration_cast<std::chrono::milliseconds>(end - now);
22            return std::max(diff.count(), 0LL);
23        };
24
25        int rc = TEMP_FAILURE_RETRY(poll(&pfd, 1, time_left_ms()));
26        if (rc < 0) {
27            std::cerr << "Error in poll while dumping service " << serviceName << " : "
28                 << strerror(errno) << std::endl;
29            status = -errno;
30            break;
31        } else if (rc == 0) {
32            status = TIMED_OUT;
33            break;
34        }
35
36        char buf[4096];
37        //从管道中读出数据,每次管道输出4096个字节大小
38        rc = TEMP_FAILURE_RETRY(read(redirectFd_.get(), buf, sizeof(buf)));
39        if (rc < 0) {
40            std::cerr << "Failed to read while dumping service " << serviceName << ": "
41                 << strerror(errno) << std::endl;
42            status = -errno;
43            break;
44        } else if (rc == 0) {
45            // EOF.
46            break;
47        }
48
49        if (!WriteFully(fd, buf, rc)) {
50            std::cerr << "Failed to write while dumping service " << serviceName << ": "
51                 << strerror(errno) << std::endl;
52            status = -errno;
53            break;
54        }
55        totalBytes += rc;
56    }
57
58    if ((status == TIMED_OUT) && (!asProto)) {
59        std::string msg = StringPrintf("\n*** SERVICE '%s' DUMP TIMEOUT (%llums) EXPIRED ***\n\n",
60                                       String8(serviceName).string(), timeout.count());
61        WriteStringToFd(msg, fd);
62    }
63
64    elapsedDuration = std::chrono::steady_clock::now() - start;
65    bytesWritten = totalBytes;
66    return status;
67}
3dumpsys media.camera
3.1打印结果
这里开始解释一下名词,和详细的信息,因为笔者没有高通对接的Camera源码,也只能通过例子结合网上说明去解释。
这里的打印主要分成这六种信息,下面对几种信息简单概述,具体可在文末可以下载具体的dump信息。
3.1.1Service global info
 1Number of camera devices: 10
 2Number of normal camera devices: 6
 3    Device 0 maps to "0"
 4    Device 1 maps to "1"
 5    Device 2 maps to "2"
 6    Device 3 maps to "3"
 7    Device 4 maps to "8"
 8    Device 5 maps to "9"
 9Active Camera Clients:
10[
11(Camera ID: 0, Cost: 99, PID: 14259, Score: -900, State: 0User Id: 0, Client Package Name: com.android.camera, Conflicting Client Devices: {6, })
12]
13Allowed user IDs: 0, 999
上面的含义是总共有十个摄像头可支持,但是目前能用的是6个,其中当前用的摄像头是设备0。
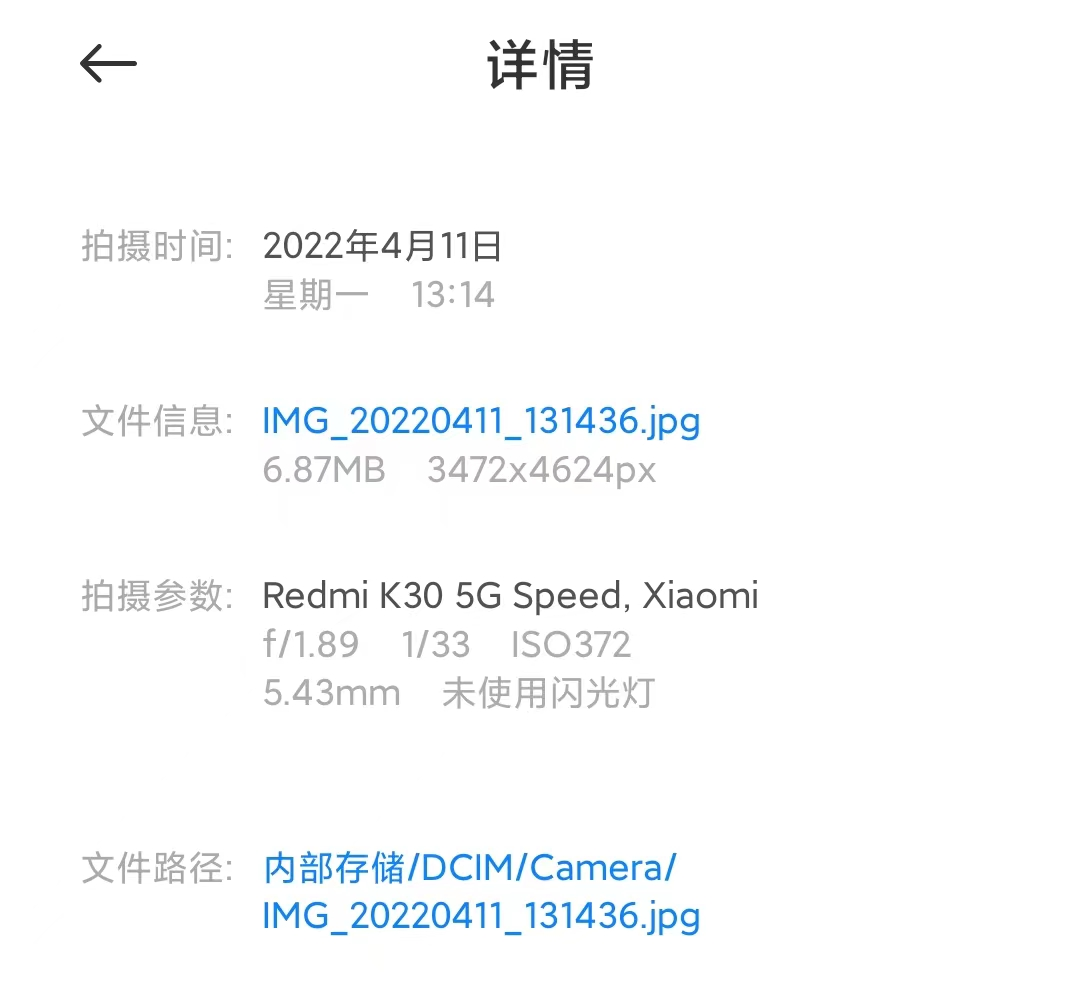
这里解释一下,以红米K30说明。其中的device 0是后摄,device 1是前摄,device 2是微距,device 3是专业模式,device 6是人像模式。
3.1.2EventLog
104-15 22:35:16 : CONNECT device 0 client for package com.android.camera (PID 14259)
204-15 16:12:04 : DISCONNECT device 0 client for package com.eg.android.AlipayGphone (PID 30996)
304-15 16:12:00 : CONNECT device 0 client for package com.eg.android.AlipayGphone (PID 30996)
404-15 14:55:08 : DISCONNECT device 0 client for package com.zte.softda (PID 24784)
504-15 14:55:06 : CONNECT device 0 client for package com.zte.softda (PID 24784)
604-15 10:17:27 : DISCONNECT device 0 client for package com.tencent.mm (PID 13858)
704-15 10:17:24 : CONNECT device 0 client for package com.tencent.mm (PID 13858)
8...
正常能够容纳100条,历史使用摄像头记录。包括时间,哪种设备连接摄像头,以及连接哪个device的摄像头情况。
3.1.3Camera device dynamic info
 1  Camera1 API shim is using parameters:
 2        CameraParameters::dump: mMap.size = 59
 3        antibanding: auto
 4        antibanding-values: off,50hz,60hz,auto
 5        auto-exposure-lock: false
 6        auto-exposure-lock-supported: true
 7        auto-whitebalance-lock: false
 8        auto-whitebalance-lock-supported: true
 9        effect: none
10        effect-values: none,mono,negative,solarize,sepia,posterize,aqua,blackboard,whiteboard
11        exposure-compensation: 0
12        exposure-compensation-step: 0.166667
13        flash-mode: off
14        flash-mode-values: off,auto,on,torch
15        focal-length: 5.43
16        focus-areas: (0,0,0,0,0)
17        focus-distances: Infinity,Infinity,Infinity
18        focus-mode: auto
19        focus-mode-values: infinity,auto,macro,continuous-video,continuous-picture
20        horizontal-view-angle: 68.5295
21        jpeg-quality: 90
22        jpeg-thumbnail-height: 154
23        jpeg-thumbnail-quality: 90
24        jpeg-thumbnail-size-values: 0x0,176x144,205x154,240x144,256x144,240x160,256x154,246x184,240x240,320x240
25        jpeg-thumbnail-width: 205
26        max-exposure-compensation: 24
27        max-num-detected-faces-hw: 10
28        max-num-detected-faces-sw: 0
29        max-num-focus-areas: 1
30        max-num-metering-areas: 1
31        max-zoom: 99
32        metering-areas: (0,0,0,0,0)
33        min-exposure-compensation: -24
34        picture-format: jpeg
35        picture-format-values: jpeg
36        picture-size: 4624x3472
37        picture-size-values: 4624x3472,4624x2600,4624x2080,3472x3472,4096x2160,3840x2160,3264x2448,2592x1944,2592x1940,2400x1080,2160x1080,1920x1080,1600x1200,1440x1080,1280x960,1560x720,1440x720,1280x720,864x480,800x600,800x480,800x400,720x480,640x480,640x360,
38        preferred-preview-size-for-video: 1920x1080
39        preview-format: yuv420sp
40        preview-format-values: yuv420p,yuv420sp,
41        preview-fps-range: 14000,30000
42        preview-fps-range-values: (15000,15000),(14000,20000),(20000,20000),(14000,30000),(30000,30000)
43        preview-frame-rate: 30
44        preview-frame-rate-values: 15,20,30
45        preview-size: 1920x1080
46        preview-size-values: 1920x1080,1600x1200,1440x1080,1280x960,1560x720,1440x720,1280x720,864x480,800x600,800x480,800x400,720x480,640x480,640x360,352x288,320x240,176x144
47        recording-hint: false
48        rotation: 0
49        smooth-zoom-supported: false
50        vertical-view-angle: 54.1821
51        video-frame-format: android-opaque
52        video-size: 1920x1080
53        video-size-values: 4096x2160,3840x2160,2592x1944,2592x1940,2400x1080,2160x1080,1920x1080,1600x1200,1440x1080,1280x960,1560x720,1440x720,1280x720,864x480,800x600,800x480,800x400,720x480,640x480,640x360,352x288,320x240,176x144
54        video-snapshot-supported: false
55        video-stabilization: false
56        video-stabilization-supported: true
57        whitebalance: auto
58        whitebalance-values: auto,incandescent,fluorescent,warm-fluorescent,daylight,cloudy-daylight,twilight,shade,
59        zoom: 0
60        zoom-ratios: 100,109,118,127,136,145,154,163,172,181,190,200,209,218,227,236,245,254,263,272,281,290,299,309,318,327,336,345,354,363,372,381,390,399,409,418,427,436,445,454,463,472,481,490,499,509,518,527,536,545,554,563,572,581,590,599,609,618,627,636,
61        zoom-supported: true
62        ...
主要记录摄像头的一些基本信息,包括图像格式,分辨率,缩放大小,帧率,旋转角度等等。
其中还包含图像的histogram图,从0-255,分别对应四个通道的颜色,BGGR,这个需要按照sensor的Bayer pattern layout
  1[363760 84623 85493 96276 ]
  2[98224 98574 103085 106812 ]
  3[106479 109762 108894 109744 ]
  4[110569 109656 107188 105870 ]
  5[103437 101058 98766 95246 ]
  6[93007 90480 87229 83466 ]
  7[80494 77153 73958 70434 ]
  8[66901 64467 60989 57368 ]
  9[54882 51618 49085 45944 ]
 10[43575 40909 38256 36107 ]
 11[34225 31701 29517 27736 ]
 12[25599 24098 22416 20808 ]
 13[19247 18045 16468 15184 ]
 14[14115 13101 11864 10886 ]
 15[10162 9292 8389 7766 ]
 16[7243 6516 5858 5336 ]
 17[4904 4508 4042 3583 ]
 18[3239 2890 2661 2466 ]
 19[2239 1977 1764 1637 ]
 20[1420 1269 1135 1002 ]
 21[881 825 686 591 ]
 22[561 475 411 419 ]
 23[339 293 244 219 ]
 24[200 160 160 146 ]
 25[122 109 92 72 ]
 26[63 56 61 40 ]
 27[35 28 28 24 ]
 28[17 18 21 17 ]
 29[9 8 12 2 ]
 30[4 5 8 2 ]
 31[5 2 3 1 ]
 32[1 0 1 1 ]
 33[1 0 1 3 ]
 34[1 0 0 1 ]
 35[0 2 0 0 ]
 36[0 0 0 0 ]
 37[0 0 0 0 ]
 38[0 0 0 0 ]
 39[0 0 0 0 ]
 40[0 0 0 0 ]
 41[0 0 0 0 ]
 42[0 0 0 0 ]
 43[0 0 0 0 ]
 44[0 0 0 0 ]
 45[0 0 0 0 ]
 46[0 0 0 0 ]
 47[0 0 0 0 ]
 48[0 0 0 0 ]
 49[0 0 0 0 ]
 50[0 0 0 0 ]
 51[0 0 0 0 ]
 52[0 0 0 0 ]
 53[0 0 0 0 ]
 54[0 0 0 0 ]
 55[0 0 0 0 ]
 56[0 0 0 0 ]
 57[0 0 0 0 ]
 58[0 0 0 0 ]
 59[0 0 0 0 ]
 60[0 0 0 0 ]
 61[0 0 0 0 ]
 62[0 0 0 0 ]
 63[0 0 0 0 ]
 64[0 0 0 0 ]
 65[0 0 0 0 ]
 66[0 0 0 0 ]
 67[0 0 0 0 ]
 68[0 0 0 0 ]
 69[0 0 0 0 ]
 70[0 0 0 0 ]
 71[0 0 0 0 ]
 72[0 0 0 0 ]
 73[0 0 0 0 ]
 74[0 0 0 0 ]
 75[0 0 0 0 ]
 76[0 0 0 0 ]
 77[0 0 0 0 ]
 78[0 0 0 0 ]
 79[0 0 0 0 ]
 80[0 0 0 0 ]
 81[0 0 0 0 ]
 82[0 0 0 0 ]
 83[0 0 0 0 ]
 84[0 0 0 0 ]
 85[0 0 0 0 ]
 86[0 0 0 0 ]
 87[0 0 0 0 ]
 88[0 0 0 0 ]
 89[0 0 0 0 ]
 90[0 0 0 0 ]
 91[0 0 0 0 ]
 92[0 0 0 0 ]
 93[0 0 0 0 ]
 94[0 0 0 0 ]
 95[0 0 0 0 ]
 96[0 0 0 0 ]
 97[0 0 0 0 ]
 98[0 0 0 0 ]
 99[0 0 0 0 ]
100[0 0 0 0 ]
101[0 0 0 0 ]
102[0 0 0 0 ]
103[0 0 0 0 ]
104[0 0 0 0 ]
105[0 0 0 0 ]
106[0 0 0 0 ]
107[0 0 0 0 ]
108[0 0 0 0 ]
109[0 0 0 0 ]
110[0 0 0 0 ]
111[0 0 0 0 ]
112[0 0 0 0 ]
113[0 0 0 0 ]
114[0 0 0 0 ]
115[0 0 0 0 ]
116[0 0 0 0 ]
117[0 0 0 0 ]
118[0 0 0 0 ]
119[0 0 0 0 ]
120[0 0 0 0 ]
121[0 0 0 0 ]
122[0 0 0 0 ]
123[0 0 0 0 ]
124[0 0 0 0 ]
125[0 0 0 0 ]
126[0 0 0 0 ]
127[0 0 0 0 ]
128[0 0 0 0 ]
129[0 0 0 0 ]
130[0 0 0 0 ]
131[0 0 0 0 ]
132[0 0 0 0 ]
133[0 0 0 0 ]
134[0 0 0 0 ]
135[0 0 0 0 ]
136[0 0 0 0 ]
137[0 0 0 0 ]
138[0 0 0 0 ]
139[0 0 0 0 ]
140[0 0 0 0 ]
141[0 0 0 0 ]
142[0 0 0 0 ]
143[0 0 0 0 ]
144[0 0 0 0 ]
145[0 0 0 0 ]
146[0 0 0 0 ]
147[0 0 0 0 ]
148[0 0 0 0 ]
149[0 0 0 0 ]
150[0 0 0 0 ]
151[0 0 0 0 ]
152[0 0 0 0 ]
153[0 0 0 0 ]
154[0 0 0 0 ]
155[0 0 0 0 ]
156[0 0 0 0 ]
157[0 0 0 0 ]
158[0 0 0 0 ]
159[0 0 0 0 ]
160[0 0 0 0 ]
161[0 0 0 0 ]
162[0 0 0 0 ]
163[0 0 0 0 ]
164[0 0 0 0 ]
165[0 0 0 0 ]
166[0 0 0 0 ]
167[0 0 0 0 ]
168[0 0 0 0 ]
169[0 0 0 0 ]
170[0 0 0 0 ]
171[0 0 0 0 ]
172[0 0 0 0 ]
173[0 0 0 0 ]
174[0 0 0 0 ]
175[0 0 0 0 ]
176[0 0 0 0 ]
177[0 0 0 0 ]
178[0 0 0 0 ]
179[0 0 0 0 ]
180[0 0 0 0 ]
181[0 0 0 0 ]
182[0 0 0 0 ]
183[0 0 0 0 ]
184[0 0 0 0 ]
185[0 0 0 0 ]
186[0 0 0 0 ]
187[0 0 0 0 ]
188[0 0 0 0 ]
189[0 0 0 0 ]
190[0 0 0 0 ]
191[0 0 0 0 ]
192[0 0 0 0 ]
193[0 0 0 0 ]
194[0 0 0 0 ]
195[0 0 0 0 ]
196[0 0 0 0 ]
197[0 0 0 0 ]
198[0 0 0 0 ]
199[0 0 0 0 ]
200[0 0 0 0 ]
201[0 0 0 0 ]
202[0 0 0 0 ]
203[0 0 0 0 ]
204[0 0 0 0 ]
205[0 0 0 0 ]
206[0 0 0 0 ]
207[0 0 0 0 ]
208[0 0 0 0 ]
209[0 0 0 0 ]
210[0 0 0 0 ]
211[0 0 0 0 ]
212[0 0 0 0 ]
213[0 0 0 0 ]
214[0 0 0 0 ]
215[0 0 0 0 ]
216[0 0 0 0 ]
217[0 0 0 0 ]
218[0 0 0 0 ]
219[0 0 0 0 ]
220[0 0 0 0 ]
221[0 0 0 0 ]
222[0 0 0 0 ]
223[0 0 0 0 ]
224[0 0 0 0 ]
225[0 0 0 0 ]
226[0 0 0 0 ]
227[0 0 0 0 ]
228[0 0 0 0 ]
229[0 0 0 0 ]
230[0 0 0 0 ]
231[0 0 0 0 ]
232[0 0 0 0 ]
233[0 0 0 0 ]
234[0 0 0 0 ]
235[0 0 0 0 ]
236[0 0 0 0 ]
237[0 0 0 0 ]
238[0 0 0 0 ]
239[0 0 0 0 ]
240[0 0 0 0 ]
241[0 0 0 0 ]
242[0 0 0 0 ]
243[0 0 0 0 ]
244[0 0 0 0 ]
245[0 0 0 0 ]
246[0 0 0 0 ]
247[0 0 0 0 ]
248[0 0 0 0 ]
249[0 0 0 0 ]
250[0 0 0 0 ]
251[0 0 0 0 ]
252[0 0 0 0 ]
253[0 0 0 0 ]
254[0 0 0 0 ]
255[0 0 0 0 ]
256[0 0 0 0 ]
会有两个通道的输出
 1Stream[0]: Output
 2      Consumer name: SurfaceTexture-1-14259-1
 3      State: 4
 4      Dims: 1440 x 1080, format 0x22, dataspace 0x0
 5      Max size: 0
 6      Combined usage: 133376, max HAL buffers: 8
 7      Frames produced: 43, last timestamp: 1430362607248159 ns
 8      Total buffers: 10, currently dequeued: 6
 9      DequeueBuffer latency histogram: (49) samples
10        5     10     15     20     25     30     35     40     45    inf (max ms)
11     95.92   4.08   0.00   0.00   0.00   0.00   0.00   0.00   0.00   0.00 (%)
12Stream[1]: Output
13      Consumer name: ImageReader-4624x3472f23m10-14259-1
14      State: 4
15      Dims: 4624 x 3472, format 0x23, dataspace 0x8c20000
16      Max size: 0
17      Combined usage: 131075, max HAL buffers: 8
18      Frames produced: 0, last timestamp: 0 ns
19      Total buffers: 18, currently dequeued: 0
3.1.4CameraProviderManager
 1== Camera Provider HAL legacy/0 (v2.5, remote) static info: 10 devices: ==
 2== Camera HAL device device@3.5/legacy/0 (v3.5) static information: ==
 3  Resource cost: 99
 4  Conflicting devices:
 5    6
 6  API1 info:
 7    Has a flash unit: true
 8    Facing: Back
 9    Orientation: 90
10  API2 camera characteristics:
11    Dumping camera metadata array: 141 / 141 entries, 18344 / 18344 bytes of extra data.
12
13      Version: 1, Flags: 00000000
14      android.colorCorrection.availableAberrationModes (00004): byte[3]
15        [0 1 2 ]
16      android.control.aeAvailableAntibandingModes (10012): byte[4]
17        [0 1 2 3 ]
18      android.control.aeAvailableModes (10013): byte[4]
19        [0 1 2 3 ]
20      android.control.aeAvailableTargetFpsRanges (10014): int32[10]
21        [15 15 14 20 ]
22        [20 20 14 30 ]
23        [30 30 ]
24      android.control.aeCompensationRange (10015): int32[2]
25        [-24 24 ]
26      android.control.aeCompensationStep (10016): rational[1]
27        [(1 / 6) ]
28      android.control.afAvailableModes (10017): byte[5]
29        [0 1 2 3 4 ]
30      android.control.availableEffects (10018): byte[9]
31        [0 1 2 3 4 5 8 7 6 ]
32      android.control.availableSceneModes (10019): byte[16]
33        [0 1 2 3 4 5 6 7 8 9 10 12 13 14 15 18 ]
34        ...
这里的CameraProvider和Camera Hal是在一起出现的,这里用的是Provider2.5版本,Hal3.5版本,从/legacy/0到/legacy/9。主要是用于isp参数的配置还有通过预设一些参数和操作,某些平台可以拍raw图,qcom平台不太熟悉,可能也会有这种操作。
1//查看相机支持的preview size和picture size
2HAL_PIXEL_FORMAT_RAW16 = 32;
3HAL_PIXEL_FORMAT_BLOB = 33;
4HAL_PIXEL_FORMAT_IMPLEMENTATION_DEFINED = 34;
5HAL_PIXEL_FORMAT_YCbCr_420_888 = 35;
6HAL_PIXEL_FORMAT_RAW_OPAQUE = 36;
7HAL_PIXEL_FORMAT_RAW10 = 37;
8HAL_PIXEL_FORMAT_RAW12 = 38;
这里可以看出,preview和capture最大尺寸都是4624*3472,从拍照的图片信息也同样确认是正确的。
1[34 4624 3472 OUTPUT ]//最大预览尺寸
2[34 4624 3472 INPUT ]
3[35 4624 3472 OUTPUT ]
4[35 4624 3472 INPUT ]
5[33 4624 3472 OUTPUT ]//最大图片尺寸
RAW的尺寸设置可以更大,9248*6944的大小
1android.scaler.availableRawSizes (d0008): int32[14]
2[9248 6944 4624 3472 ]
3[1152 1720 4624 2600 ]
4[1152 1296 2312 1300 ]
5[2312 1300 ]
实际帧率范围
1android.control.aeTargetFpsRange (10005): int32[2]
2[14 30 ]
3.1.5GlobalVendorTagDescriptor
 1== Vendor tags: ==
 2  Dumping vendor tag descriptors for vendor with id 3854507339
 3  Dumping configured vendor tag descriptors: 617 entries
 4    0x80000000 (private_property) with type 0 (byte) defined in section org.codeaurora.qcamera3.internal_private
 5    0x80010000 (exposure_metering_mode) with type 1 (int32) defined in section org.codeaurora.qcamera3.exposure_metering
 6    0x80010001 (available_modes) with type 1 (int32) defined in section org.codeaurora.qcamera3.exposure_metering
 7    0x80020000 (aec_speed) with type 2 (float) defined in section org.codeaurora.qcamera3.aec_convergence_speed
 8    0x80030000 (strength) with type 1 (int32) defined in section org.codeaurora.qcamera3.sharpness
 9    0x80030001 (range) with type 1 (int32) defined in section org.codeaurora.qcamera3.sharpness
10    0x80040000 (level) with type 1 (int32) defined in section org.codeaurora.qcamera3.contrast
这里就是entry的描述,大概有617条,用于描述一些vendor的细节,这里不展开
3.1.6CameraTraces
1== Camera error traces (0): ==
2  No camera traces collected.
通常来说,这里没有systrace,也没有出现异常,所以不会出现trace,是正常现象。
3.2从dumpsys到CameraService
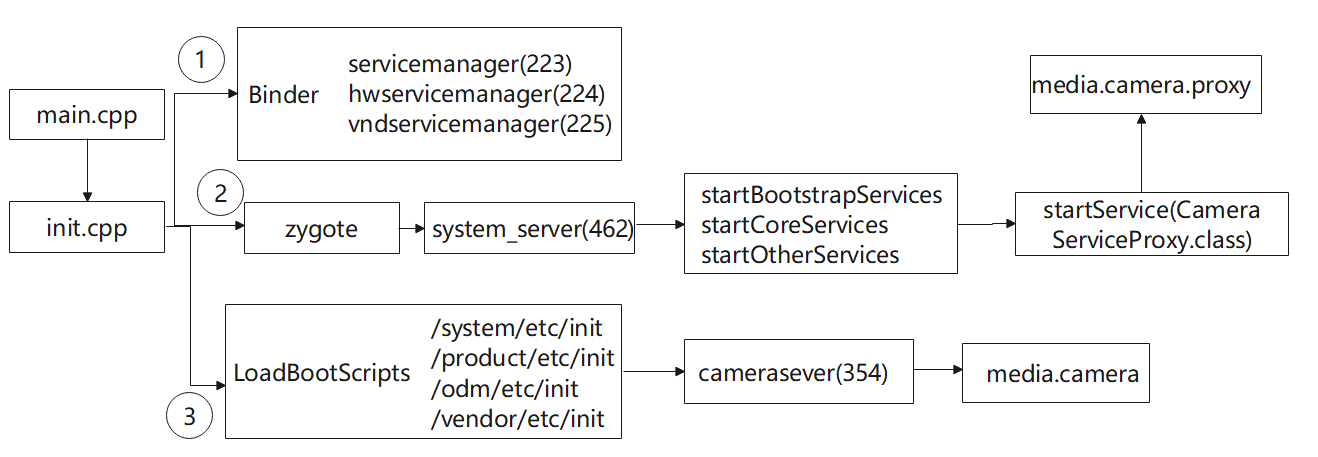
这里主要分成几步,从CameraSever启动,启动CameraService服务并添加到servicemanager,启动CameraServiceProxy服务和CameraService服务的AIDL使用。其实说白了,也是一种Binder通信的实例,关于CameraService的AIDL通信,可以点击这里。
总的顺序图如下所示,其中进程后面的括号是实际开发板中的进程号,进程号越小越早启动。
3.2.1CameraSever启动
关于CameraService启动流程,这里展开描述一下。
首先分成几个过程,涉及到android系统的开机流程,这里只描述CameraService部分。
3.2.1.1init进程会初始化属性服务,并且解析.rc文件
开机之后,Linux内核启动1号进程,对应的源文件是system/core/init/main.cpp。而这个文件源文件,会调用到system/core/init/init.cpp。这个init.cpp非常关键,会去解析init.rc配置文件和其他文件。我们这边只看解析部分。
 1//system/core/init/init.cpp
 2static void LoadBootScripts(ActionManager& action_manager, ServiceList& service_list) {
 3    Parser parser = CreateParser(action_manager, service_list);
 4
 5    std::string bootscript = GetProperty("ro.boot.init_rc", "");
 6    if (bootscript.empty()) {
 7        parser.ParseConfig("/system/etc/init/hw/init.rc");
 8        if (!parser.ParseConfig("/system/etc/init")) {
 9            late_import_paths.emplace_back("/system/etc/init");
10        }
11        parser.ParseConfig("/system_ext/etc/init");
12        if (!parser.ParseConfig("/product/etc/init")) {
13            late_import_paths.emplace_back("/product/etc/init");
14        }
15        if (!parser.ParseConfig("/odm/etc/init")) {
16            late_import_paths.emplace_back("/odm/etc/init");
17        }
18        if (!parser.ParseConfig("/vendor/etc/init")) {
19            late_import_paths.emplace_back("/vendor/etc/init");
20        }
21    } else {
22        parser.ParseConfig(bootscript);
23    }
24}
可以看到这里有4个目录"/system/etc/init","/product/etc/init","/odm/etc/init","/vendor/etc/init"。等init.rc解析完成后,会来解析4个目录中的rc文件,用来执行相关的动作。
3.2.1.2解析cameraserver.rc文件,并启动cameraserver
下面的Android.bp可以看到init_rc: [“cameraserver.rc”],说明rc文件编译到/system/etc/init中。而上面的开机流程的init.cpp中会去解析这个目录,那么这个cameraserver.rc这个目录就会被解析出来。那么实际上,解析完成之后,就会启动"cameraserver.rc"。
 1#frameworks/av/camera/cameraserver/Android.bp
 2cc_binary {
 3    name: "cameraserver",
 4
 5    srcs: ["main_cameraserver.cpp"],
 6
 7    header_libs: [
 8        "libmedia_headers",
 9    ],
10
11    shared_libs: [
12        "libcameraservice",
13        "liblog",
14        "libutils",
15        "libui",
16        "libgui",
17        "libbinder",
18        "libhidlbase",
19        "android.hardware.camera.common@1.0",
20        "android.hardware.camera.provider@2.4",
21        "android.hardware.camera.provider@2.5",
22        "android.hardware.camera.provider@2.6",
23        "android.hardware.camera.device@1.0",
24        "android.hardware.camera.device@3.2",
25        "android.hardware.camera.device@3.4",
26    ],
27    compile_multilib: "32",
28    cflags: [
29        "-Wall",
30        "-Wextra",
31        "-Werror",
32        "-Wno-unused-parameter",
33    ],
34    #rc文件编译到/system/etc/init中
35    init_rc: ["cameraserver.rc"],
36
37    vintf_fragments: [
38        "manifest_android.frameworks.cameraservice.service@2.1.xml",
39    ],
40}
可以看到这个rc文件解析之后,被开启cameraserver,这个cameraserver实际上是一个进程,位于/system/bin/cameraserver。这里的cameraserver的rc文件,里面没有设置oneshot,说明当service退出后会自重启,没有设置disable,说明这个服务会随着它的类启动而自动启动,具体rc语法点击这里。
1#frameworks/av/camera/cameraserver/cameraserver.rc
2service cameraserver /system/bin/cameraserver
3    class main
4     user cameraserver
5     group audio camera input drmrpc
6     ioprio rt 4
7     task_profiles CameraServiceCapacity MaxPerformance
8     rlimit rtprio 10 10
3.2.1.3CameraService::instantiate
最终会进入到进程的的main函数中,这个main_cameraserver.cpp中有CameraService::instantiate(),这个是后续添加服务到ServiceManager中。
 1//frameworks/av/camera/cameraserver/main_cameraserver.cpp
 2int main(int argc __unused, char **argv __unused)
 3{
 4    signal(SIGPIPE, SIG_IGN);
 5
 6    hardware::configureRpcThreadpool(5, /*willjoin*/ false);
 7
 8    sp<ProcessState> proc(ProcessState::self());
 9    sp<IServiceManager> sm = defaultServiceManager();
10    ALOGI("ServiceManager: %p", sm.get());
11    CameraService::instantiate();
12    ALOGI("ServiceManager: %p done instantiate", sm.get());
13    ProcessState::self()->startThreadPool();
14    IPCThreadState::self()->joinThreadPool();
15}
来看CameraService类的定义(截取部分):
 1//frameworks/av/services/camera/libcameraservice/CameraService.h
 2class CameraService :
 3    public BinderService<CameraService>,
 4    public virtual ::android::hardware::BnCameraService,
 5    public virtual IBinder::DeathRecipient,
 6    public virtual CameraProviderManager::StatusListener
 7{
 8    friend class BinderService<CameraService>;
 9    friend class CameraClient;
10    friend class CameraOfflineSessionClient;
11public:
12    class Client;
13    class BasicClient;
14    class OfflineClient;
15
16    // Implementation of BinderService<T>
17    static char const* getServiceName() { return "media.camera"; }
18
19                        CameraService();
20    virtual             ~CameraService();
21
22    virtual status_t    dump(int fd, const Vector<String16>& args);
23    ...
24}
可以看到主要是getService和dump这两个类成员函数会用到,其他的函数暂时先不管。
3.2.2启动CameraService服务并添加到servicemanager
dumpsys那些信息的打印就是上述的dump函数负责实现的。
instantiate()来自 CameraService的父类BinderService,BinderService是一个模版类。最终这个会真正启动CameraService,对应的对应的binder是"media.camera"。
 1//frameworks/native/libs/binder/include/binder/BinderService.h
 2template<typename SERVICE>
 3class BinderService
 4{
 5public:
 6    static status_t publish(bool allowIsolated = false,
 7                            int dumpFlags = IServiceManager::DUMP_FLAG_PRIORITY_DEFAULT) {
 8        sp<IServiceManager> sm(defaultServiceManager());
 9        return sm->addService(String16(SERVICE::getServiceName()), new SERVICE(), allowIsolated,
10                              dumpFlags);
11    }
12
13    static void publishAndJoinThreadPool(
14            bool allowIsolated = false,
15            int dumpFlags = IServiceManager::DUMP_FLAG_PRIORITY_DEFAULT) {
16        publish(allowIsolated, dumpFlags);
17        joinThreadPool();
18    }
19
20    static void instantiate() { publish(); }
21
22    static status_t shutdown() { return NO_ERROR; }
23
24private:
25    static void joinThreadPool() {
26        sp<ProcessState> ps(ProcessState::self());
27        ps->startThreadPool();
28        ps->giveThreadPoolName();
29        IPCThreadState::self()->joinThreadPool();
30    }
31};
用 CameraService替换模版之后:
 1class BinderService
 2{
 3public:
 4    static status_t publish(bool allowIsolated = false) {
 5        sp<IServiceManager> sm(defaultServiceManager());
 6        //这里面涉及到两个过程:
 7        //1.new CameraService会去真正启动CameraService
 8        //2.sm->addService将实例化的CameraService添加到servicemanager中,标记binder为"media.camera",其他进程可以在sm中唱过这个"media.camera"来获取这个服务,从而可以实现跨进程的Binder通信
 9        return sm->addService(
10                String16(CameraService::getServiceName()),
11                new CameraService(), allowIsolated);
12    }
13
14    static void instantiate() { publish(); }
15};
这样,通过IServiceManager#addService()服务 “media.camera”就被添加到了系统中。
3.2.3启动CameraServiceProxy服务
3.2.3.1启动system_server进程
在上述解析init.rc配置文件和其他.rc文件之后,会启动zygote进程,而这个zygote进程会启动system_server
 1private static Runnable forkSystemServer(String abiList, String socketName,
 2        ZygoteServer zygoteServer) {
 3
 4    //启动system_server的命令行参数
 5    String args[] = {
 6            "--setuid=1000",
 7            "--setgid=1000",
 8            "--setgroups=1001,1002,1003,1004,1005,1006,1007,1008,1009,1010,1018,1021,1023,"
 9                    + "1024,1032,1065,3001,3002,3003,3006,3007,3009,3010,3011",
10            "--capabilities=" + capabilities + "," + capabilities,
11            "--nice-name=system_server",
12            "--runtime-args",
13            "--target-sdk-version=" + VMRuntime.SDK_VERSION_CUR_DEVELOPMENT,
14            "com.android.server.SystemServer",
15    };
16    ZygoteArguments parsedArgs = null;
17
18    int pid;
19
20        pid = Zygote.forkSystemServer(
21                parsedArgs.mUid, parsedArgs.mGid,
22                parsedArgs.mGids,
23                parsedArgs.mRuntimeFlags,
24                null,
25                parsedArgs.mPermittedCapabilities,
26                parsedArgs.mEffectiveCapabilities);
27    } catch (IllegalArgumentException ex) {
28        throw new RuntimeException(ex);
29    }
30
31    /* For child process */
32    if (pid == 0) {
33        if (hasSecondZygote(abiList)) {
34            waitForSecondaryZygote(socketName);
35        }
36
37        zygoteServer.closeServerSocket();
38        //这里真正启动SystemServer
39        return handleSystemServerProcess(parsedArgs);
40    }
41
42    return null;
43}
system_server进程的执行过程,回调用到run方法
1//frameworks/base/services/java/com/android/server/SystemServer.java#run
2public static void main(String[] args) {
3    new SystemServer().run();
4}
这个run方法有几个功能。创建 SystemServiceManager(用于管理后面服务的生命周期)、启动引导服务、启动核心服、启动其他服务等
 1private void run() {
 2    ...
 3    // 加载libandroid_servers.so
 4    System.loadLibrary("android_servers");
 5
 6    // 创建 SystemContext
 7    createSystemContext();
 8
 9    // 创建 SystemServiceManager
10    mSystemServiceManager = new SystemServiceManager(mSystemContext);
11    LocalServices.addService(SystemServiceManager.class, mSystemServiceManager);       SystemServerInitThreadPool.start();
12    ...
13    // Start services.
14    try {
15        t.traceBegin("StartServices");
16        //启动引导服务
17        startBootstrapServices(t);
18        //启动核心服务
19        startCoreServices(t);
20        //启动其他服务
21        startOtherServices(t);
22    } catch (Throwable ex) {
23        ...
24    } finally {
25        t.traceEnd(); // StartServices
26    }
27    ...
28}
3.2.3.2启动CameraServiceProxy服务
因为上述system_server会创建其他服务,而这个CameraService就在其他服务中。这里截取小段,可知会真实启动CameraServiceProxy,对应的binder是"media.camera.proxy"
1//framworks/base/services/java/com/android/server/SystemServer.java#
2if (!disableCameraService) {
3    t.traceBegin("StartCameraServiceProxy");
4    mSystemServiceManager.startService(CameraServiceProxy.class);
5    t.traceEnd();
6}
3.2.4CameraService服务的AIDL使用
CameraManager类获取"media.camera"服务,通过它和摄像头打交道,通过AIDL将App的相机进程和CameraService进程互相通信。这里的getService,就是获取CameraService进程,因为之前的getname已经将"media.camera"和CameraService绑定,那么这里就可以直接调用到CameraService。App相机进程在servicemanager中查询"media.camera"这个标记binder的服务,查询之后和CameraService建立Binder通信,通过App进程中jar包Api,对应调用到CameraService中相应的实现。
 1//以camera2为例
 2//frameworks/base/core/java/android/hardware/camera2/CameraManager.java
 3private static final String CAMERA_SERVICE_BINDER_NAME = "media.camera";
 4private final ICameraService mCameraService;
 5private void connectCameraServiceLocked() {
 6    Log.i(TAG, "Connecting to camera service");
 7
 8    IBinder cameraServiceBinder = ServiceManager.getService(CAMERA_SERVICE_BINDER_NAME);
 9
10    ICameraService cameraService = ICameraService.Stub.asInterface(cameraServiceBinder);
11
12    try {
13        CameraStatus[] cameraStatuses = cameraService.addListener(this);
14        for (CameraStatus c : cameraStatuses) {
15            onStatusChangedLocked(c.status, c.cameraId);
16
17            if (c.unavailablePhysicalCameras != null) {
18                for (String unavailPhysicalCamera : c.unavailablePhysicalCameras) {
19                    onPhysicalCameraStatusChangedLocked(
20                        ICameraServiceListener.STATUS_NOT_PRESENT,
21                        c.cameraId, unavailPhysicalCamera);
22                }
23            }
24        }
25        mCameraService = cameraService;
26
27    } catch(ServiceSpecificException e) {
28        // Unexpected failure
29        throw new IllegalStateException("Failed to register a camera service listener", e);
30    } catch (RemoteException e) {
31        // Camera service is now down, leave mCameraService as null
32    }
33}
3.3CameraService::dump
最终调用到CameraService这个动态库中,实际上是调用到CameraService.cpp
这里主要dump几点Service global info、EventLog、Camera device dynamic info、CameraProviderManager、GlobalVendorTagDescriptor、CameraTraces,这里的6项跟上述3.1的打印信息一一对应。
  1//frameworks/av/services/camera/libcameraservice/CameraService.cpp
  2status_t CameraService::dump(int fd, const Vector<String16>& args) {
  3    ATRACE_CALL();
  4
  5    if (checkCallingPermission(sDumpPermission) == false) {
  6        dprintf(fd, "Permission Denial: can't dump CameraService from pid=%d, uid=%d\n",
  7                CameraThreadState::getCallingPid(),
  8                CameraThreadState::getCallingUid());
  9        return NO_ERROR;
 10    }
 11    bool locked = tryLock(mServiceLock);
 12    // failed to lock - CameraService is probably deadlocked
 13    if (!locked) {
 14        dprintf(fd, "!! CameraService may be deadlocked !!\n");
 15    }
 16
 17    if (!mInitialized) {
 18        dprintf(fd, "!! No camera HAL available !!\n");
 19
 20        // Dump event log for error information
 21        dumpEventLog(fd);
 22
 23        if (locked) mServiceLock.unlock();
 24        return NO_ERROR;
 25    }
 26    dprintf(fd, "\n== Service global info: ==\n\n");
 27    dprintf(fd, "Number of camera devices: %d\n", mNumberOfCameras);
 28    dprintf(fd, "Number of normal camera devices: %zu\n", mNormalDeviceIds.size());
 29    dprintf(fd, "Number of public camera devices visible to API1: %zu\n",
 30            mNormalDeviceIdsWithoutSystemCamera.size());
 31    for (size_t i = 0; i < mNormalDeviceIds.size(); i++) {
 32        dprintf(fd, "    Device %zu maps to \"%s\"\n", i, mNormalDeviceIds[i].c_str());
 33    }
 34    String8 activeClientString = mActiveClientManager.toString();
 35    dprintf(fd, "Active Camera Clients:\n%s", activeClientString.string());
 36    dprintf(fd, "Allowed user IDs: %s\n", toString(mAllowedUsers).string());
 37
 38    dumpEventLog(fd);
 39
 40    bool stateLocked = tryLock(mCameraStatesLock);
 41    if (!stateLocked) {
 42        dprintf(fd, "CameraStates in use, may be deadlocked\n");
 43    }
 44
 45    int argSize = args.size();
 46    for (int i = 0; i < argSize; i++) {
 47        if (args[i] == TagMonitor::kMonitorOption) {
 48            if (i + 1 < argSize) {
 49                mMonitorTags = String8(args[i + 1]);
 50            }
 51            break;
 52        }
 53    }
 54
 55    for (auto& state : mCameraStates) {
 56        String8 cameraId = state.first;
 57
 58        dprintf(fd, "== Camera device %s dynamic info: ==\n", cameraId.string());
 59
 60        CameraParameters p = state.second->getShimParams();
 61        if (!p.isEmpty()) {
 62            dprintf(fd, "  Camera1 API shim is using parameters:\n        ");
 63            p.dump(fd, args);
 64        }
 65
 66        auto clientDescriptor = mActiveClientManager.get(cameraId);
 67        if (clientDescriptor != nullptr) {
 68            dprintf(fd, "  Device %s is open. Client instance dump:\n",
 69                    cameraId.string());
 70            dprintf(fd, "    Client priority score: %d state: %d\n",
 71                    clientDescriptor->getPriority().getScore(),
 72                    clientDescriptor->getPriority().getState());
 73            dprintf(fd, "    Client PID: %d\n", clientDescriptor->getOwnerId());
 74
 75            auto client = clientDescriptor->getValue();
 76            dprintf(fd, "    Client package: %s\n",
 77                    String8(client->getPackageName()).string());
 78
 79            client->dumpClient(fd, args);
 80        } else {
 81            dprintf(fd, "  Device %s is closed, no client instance\n",
 82                    cameraId.string());
 83        }
 84
 85    }
 86
 87    if (stateLocked) mCameraStatesLock.unlock();
 88
 89    if (locked) mServiceLock.unlock();
 90
 91    mCameraProviderManager->dump(fd, args);
 92
 93    dprintf(fd, "\n== Vendor tags: ==\n\n");
 94
 95    sp<VendorTagDescriptor> desc = VendorTagDescriptor::getGlobalVendorTagDescriptor();
 96    if (desc == NULL) {
 97        sp<VendorTagDescriptorCache> cache =
 98                VendorTagDescriptorCache::getGlobalVendorTagCache();
 99        if (cache == NULL) {
100            dprintf(fd, "No vendor tags.\n");
101        } else {
102            cache->dump(fd, /*verbosity*/2, /*indentation*/2);
103        }
104    } else {
105        desc->dump(fd, /*verbosity*/2, /*indentation*/2);
106    }
107
108    // Dump camera traces if there were any
109    dprintf(fd, "\n");
110    camera3::CameraTraces::dump(fd, args);
111
112    // Process dump arguments, if any
113    int n = args.size();
114    String16 verboseOption("-v");
115    String16 unreachableOption("--unreachable");
116    for (int i = 0; i < n; i++) {
117        if (args[i] == verboseOption) {
118            // change logging level
119            if (i + 1 >= n) continue;
120            String8 levelStr(args[i+1]);
121            int level = atoi(levelStr.string());
122            dprintf(fd, "\nSetting log level to %d.\n", level);
123            setLogLevel(level);
124        } else if (args[i] == unreachableOption) {
125            // Dump memory analysis
126            // TODO - should limit be an argument parameter?
127            UnreachableMemoryInfo info;
128            bool success = GetUnreachableMemory(info, /*limit*/ 10000);
129            if (!success) {
130                dprintf(fd, "\n== Unable to dump unreachable memory. "
131                        "Try disabling SELinux enforcement. ==\n");
132            } else {
133                dprintf(fd, "\n== Dumping unreachable memory: ==\n");
134                std::string s = info.ToString(/*log_contents*/ true);
135                write(fd, s.c_str(), s.size());
136            }
137        }
138    }
139    return NO_ERROR;
140}
关于什么是dprintf,实际上跟printf是非常类似的。相对于printf加了一个句柄的指向。可以通过在linux中man dprintf查看。
NAME printf, fprintf, dprintf, sprintf, snprintf, vprintf, vfprintf, vdprintf, vsprintf, vsnprintf - formatted output conversion
SYNOPSIS #include <stdio.h>
   int printf(const char *format, ...);
   int fprintf(FILE *stream, const char *format, ...);
   int dprintf(int fd, const char *format, ...);
   int sprintf(char *str, const char *format, ...);
   int snprintf(char *str, size_t size, const char *format, ...);
总结
总的来说,就是通过简单的dumpsys进程的api调用,深入查看dumpsys media.camera背后做的事,里面其实涉及到Binder通信,管道,poll机制,主要的流程比较能够理解。本文是笔者用api和源码的角度去熟悉media.camera的过程,因为dumpsys里面的服务比较多,这里只是以一个Camera为例子,来说明整个dumpsys过程。
下载
本文dumpsys的源码点击这里
本文CameraService启动的源码点击这里
本文以手机红米K30为例的dumpsys的数据点击这里
本文以手机空米K30为例的dumpsys的proto数据点击这里
参考
[1] 小驰笔记, Dump media.camera分析, 2021.
[2] 2017, Android框架之Camera(1)Camera服务的前世今生, 2017.
[3] weixin_39970855, adb命令打开摄像头_Camera(一):查看Camera设备详细信息, 2020.
[5] 拥抱@, 详解C语言中的 %*s 和 %.*s, 2018.
[7] Little丶Jerry, Android 解析 Protocol Buffers 格式数据, 2018.
[8] 猿氏悟语, Android Dumpsys命令使用以及实现原理详解, 2020.
[9] andy cong, 浅谈linux的命令行解析参数之getopt_long函数, 2018.
[10] 伟子时代, Android系统启动流程, 2021.
[11] 菜鸡UP, Android Camera之CameraServer的启动过程, 2022.
[13] astro-yang, init.rc语法详解, 2015.