
ByteBuffer使用
800 Words|Read in about 4 Min|本文总阅读量次
ByteBuffer,一个字节缓冲区。我们通常通过这类缓冲区(Buffer)在内存中预留指定大小的存储空间用来对输入/输出(I/O)的数据作临时存储。
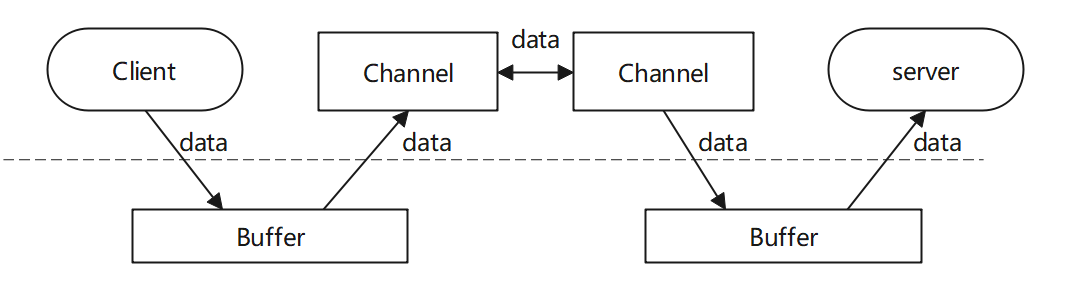 缓冲区的概念图
缓冲区的概念如上图所示。
1.ByteBuffer说明
1public abstract class ByteBuffer extends Buffer implements Comparable<ByteBuffer>;
ByteBuffer的扩展
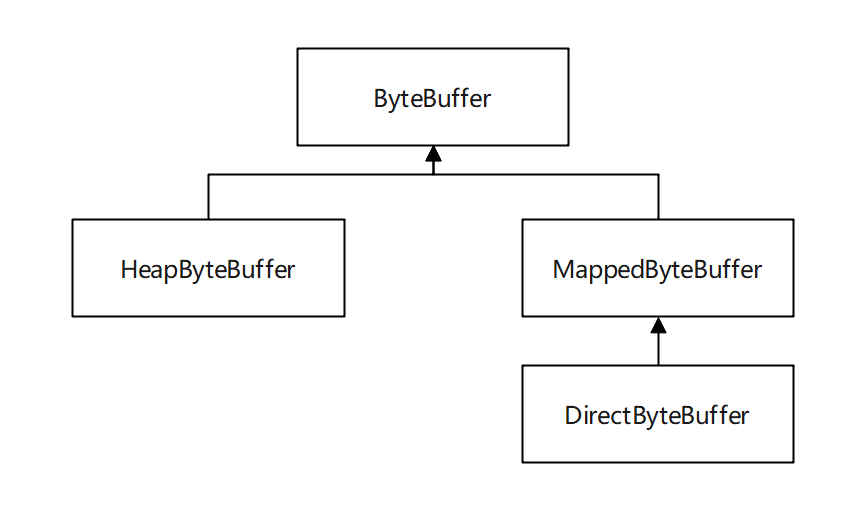 ByteBuffer类图
ByteBuffer的属性及方法
ByteBuffer的属性
| 属性 | 属性说明 |
|---|---|
position |
当前读取的位置 |
capacity |
初始化时候的容量 |
limit |
当写数据到buffer中时,limit一般和capacity相等,当读数据时,limit代表buffer中有效数据的长度 |
mark |
为某一读过的位置做标记,便于某些时候回退到该位置,这个一般不太使用 |
这些属性总是满足以下条件:
10 <= mark <= position <= limit <= capacity
ByteBuffer的方法
| 常规函数 | 函数说明 |
|---|---|
allocate |
从堆空间中分配一个容量大小为capacity的byte数组作为缓冲区的byte数据存储器 |
allocateDirect |
不使用JVM堆栈而是通过操作系统来创建内存块用作缓冲区,使用的内存为共享内存 |
wrap |
数据会存放在byte数组中,bytes数组或buff缓冲区任何一方中数据的改动都会影响另一方 |
get |
从buffer里读一个字节,并把postion移动一位。上限是limit,即写入数据的最后位置 |
getInt |
从buffer里读int型的字节,并把postion移动int类型的位数 |
getDouble |
从buffer里读double型的字节,并把postion移动double类型的位数 |
getLong |
从buffer里读long型的字节,并把postion移动long类型的位数 |
| … | … |
put |
写模式下,往buffer里写一个字节,并把postion移动一位。通常limit与capacity相等 |
putInt |
写模式下,往buffer里写int类型的字节,并把postion移动int类型的位数 |
putDouble |
写模式下,往buffer里写double类型的字节,并把postion移动double类型的位数 |
putLong |
写模式下,往buffer里写long类型的字节,并把postion移动long类型的位数 |
| … | … |
| 其他函数(复位函数) | 其他函数说明 |
clear |
一般在把数据写入Buffer前调用(继续写入模式)position = 0limit = capacitymark = -1 |
flip |
一般在从Buffer读出数据前调用(读出模式)limit = positionposition = 0mark = -1 |
rewind |
一般在把数据重写入Buffer前调用(读出模式)position = 0mark = -1 |
compact |
将 position 与 limit之间的数据复制到buffer的开始位置(继续写入模式)position = limit -positionlimit = capacitymark = -1 |
mark&reset |
通过调用mark方法,可以标记Buffer中的一个特定position。通过调用reset方法恢复到这个position |
除了上述的byte,int,double,long,还有char,float,short类型,这里没有列举出来。
NIO特性
在NIO中主要有八种缓冲区抽象类(其中MappedByteBuffer是专门用于内存映射的一种ByteBuffer)。这里除了ByteBuffer和CharBuffer以外,都只能读写「自己类名中的类型」。ByteBuffer可以读写byte,int,char,float,double,short,long类型,CharBuffer可以读写char和String类型。
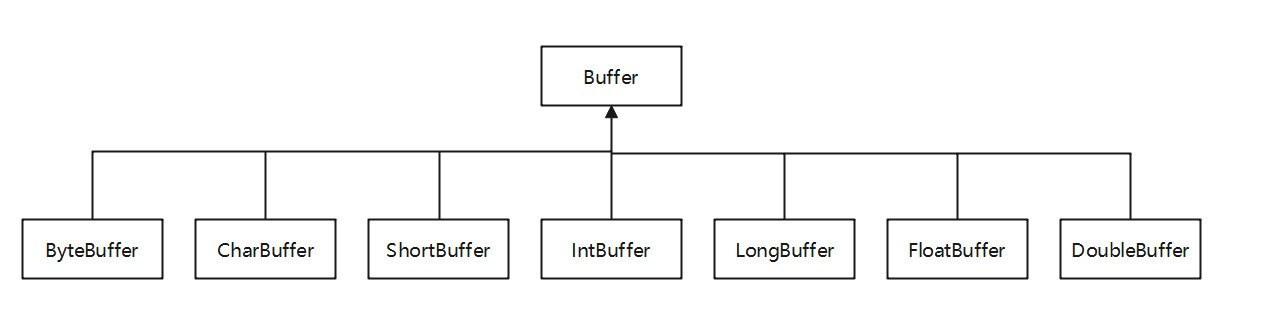 NIO特性图
NIO模型
NIO(JDK1.4)模型是一种同步非阻塞IO,主要有三大核心部分:Channel(通道),Buffer(缓冲区), Selector(多路复用器)。传统IO基于字节流和字符流进行操作,而NIO基于Channel和Buffer(缓冲区)进行操作,数据总是从通道读取到缓冲区中,或者从缓冲区写入到通道中。Selector(多路复用器)用于监听多个通道的事件(比如:连接打开,数据到达)。因此,单个线程可以监听多个数据通道。
NIO和传统IO(一下简称IO)之间第一个最大的区别是,IO是面向流的,NIO是面向缓冲区的。 Java IO面向流意味着每次从流中读一个或多个字节,直至读取所有字节,它们没有被缓存在任何地方。
2.Bytebuffer的NIO特性
为了说明ByteBuffer的NIO特性,本文举一个例子,如下
 1//example
 2//1.初始化(两种方式)
 3//1.1 第一种初始化方式
 4ByteBuffer exampleBuffer = ByteBuffer.alloc(64);
 5//1.2 第二种初始化方式
 6//ByteBuffer exampleBuffer = ByteBuffer.wrap(new byte[64]);
 7
 8//2 切换写数据模式,清除数据
 9exampleBuffer.clear();
10
11//3 写数据
12//3 写入byte数据、int数据、char数据、float数据、double数据、short数据、long数据
13byte[] byteData = new byte[8];
14for(int i = 0; i < 8; i++){
15    byteData[i] = 125 + i;
16}
17exampleBuffer.put(byteData);
18
19char[] charData = new char[2];
20charData[0] = '中';//'\u4e2d';
21charData[1] = '国';//'\u56fd';
22exampleBuffer.putChar(charData[0]);
23exampleBuffer.putChar(charData[1]);
24
25float[] floatData = new float[2];
26floatData[0] = 2.25f;
27floatData[1] = 3.25f;
28exampleBuffer.putFloat(floatData[0]);
29exampleBuffer.putFloat(floatData[1]);
30
31double[] doubleData = new double[2];
32doubleData[0] = 2.25;
33doubleData[1] = 3.25;
34exampleBuffer.putDouble(doubleData[0]);
35exampleBuffer.putDouble(doubleData[1]);
36
37short[] shortData = new short[2];
38shortData[0] = 0x2022;
39shortData[1] = 0x0301;
40exampleBuffer.putShort(shortData[0]);
41exampleBuffer.putShort(shortData[1]);
42
43long[] longData = new long[2];
44longData[0] = 0x31415926;
45longData[1] = 0x20220301;
46exampleBuffer.putLong(longData[0]);
47exampleBuffer.putLong(longData[1]);
48//4 切换读数据模式
49//4.1 第一种方式,推荐
50exampleBuffer.flip();
51//4.2 第二种方式,通常用于完全拷贝
52//exampleBuffer.rewind();
53//5 读数据
54//5 读出byte数据、int数据、char数据
55byte[] byteRes = new byte[8];
56exampleBuffer.get(byteRes);
57exampleBuffer.getChar();
58exampleBuffer.getChar();
59exampleBuffer.getFloat();
60exampleBuffer.getFloat();
61exampleBuffer.getDouble();
62exampleBuffer.getDouble();
63
64//6 切换继续写数据模式
65exampleBuffer.compact();
66//7.继续写数据
67exampleBuffer.putInt(0x20220301);
注:关于通过charData打出中国,原理可详见一篇能看懂unicode的文章。
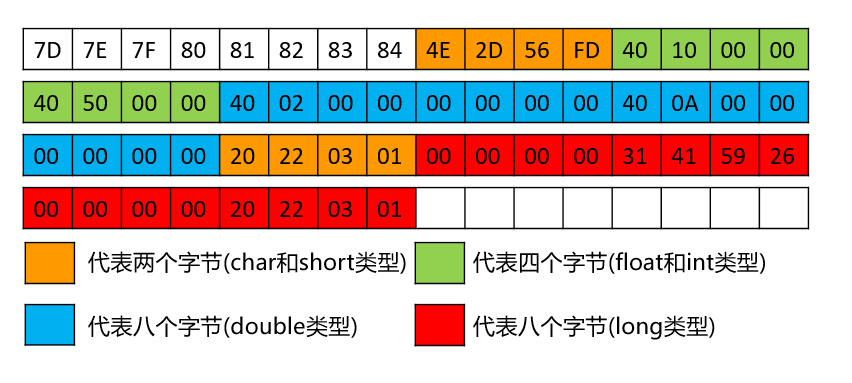
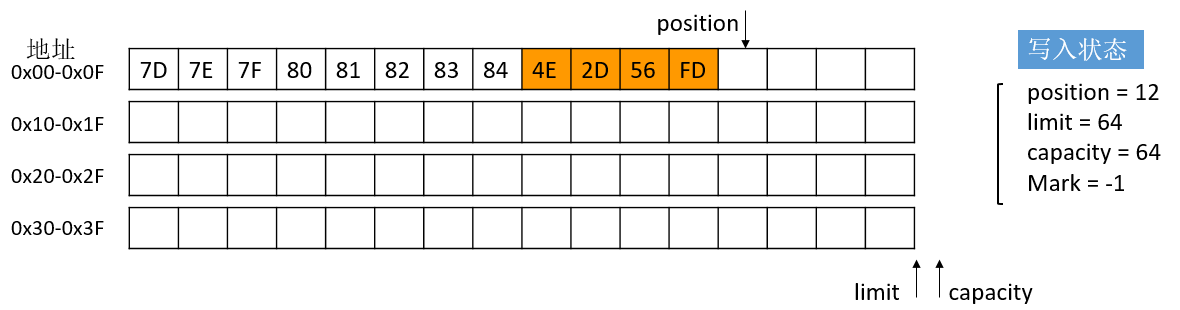
这初始化前,人为规定橘色代表两个字节(char和short类型),浅绿代表四个字节(float和int类型),蓝色代表八个字节(double类型),红色代表八个字节(long类型)。
初始化
1ByteBuffer exampleBuffer = ByteBuffer.alloc(64);
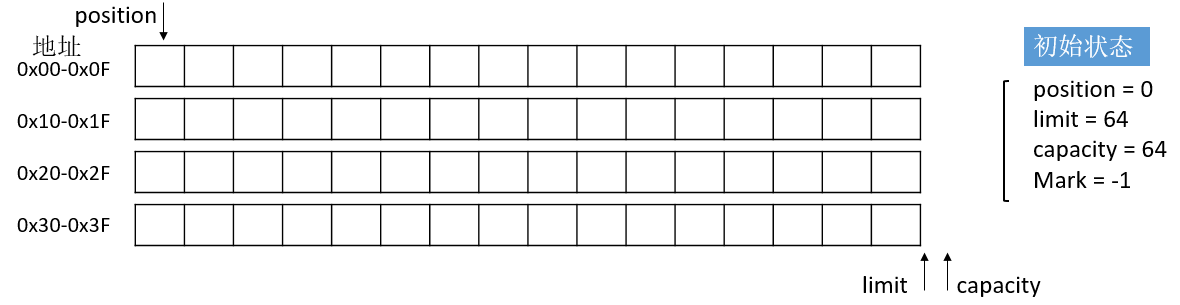 初始化图
初始化图
写数据
写byte类型数据
1byte[] byteData = new byte[8];
2for(int i = 0; i < 8; i++){
3    byteData[i] = 125 + i;
4}
5exampleBuffer.put(byteData);
 写byte类型数据图
写char类型数据
1char[] charData = new char[2];
2charData[0] = '中';//'\u4e2d';
3charData[1] = '国';//'\u56fd';
4exampleBuffer.putChar(charData[0]);
5exampleBuffer.putChar(charData[1]);
 写char类型数据图
写float类型数据
1float[] floatData = new float[2];
2floatData[0] = 2.25f;
3floatData[1] = 3.25f;
4exampleBuffer.putFloat(floatData[0]);
5exampleBuffer.putFloat(floatData[1]);
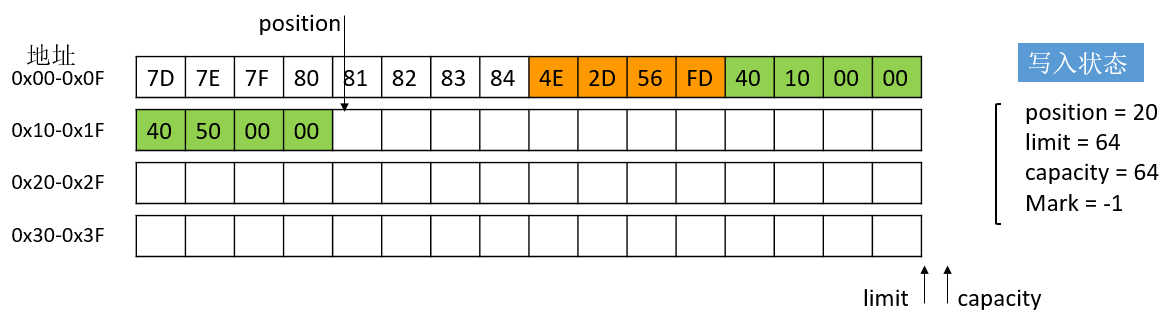 写float类型数据图
写double数据类型
1double[] doubleData = new double[2];
2doubleData[0] = 2.25;
3doubleData[1] = 3.25;
4exampleBuffer.putDouble(doubleData[0]);
5exampleBuffer.putDouble(doubleData[1]);
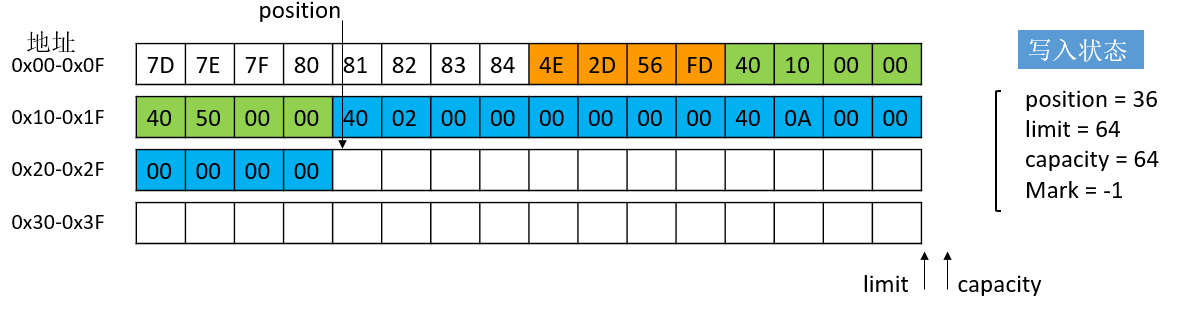 写double类型数据图
写short类型数据
1short[] shortData = new short[2];
2shortData[0] = 0x2022;
3shortData[1] = 0x0301;
4exampleBuffer.putShort(shortData[0]);
5exampleBuffer.putShort(shortData[1]);
 写short类型数据图
写long类型数据
1long[] longData = new long[2];
2longData[0] = 0x31415926;
3longData[1] = 0x20220301;
4exampleBuffer.putLong(longData[0]);
5exampleBuffer.putLong(longData[1]);
 写long类型数据图
复位状态值
clear
clear()方法相当于是所有值复位,用于读取完之后清除数据。
rewind
rewind()方法,该方法仅仅是简单粗暴地将position直接复原到0,limit不变。这样进行读取操作的话,就是从第一个字节开始读取了。
虽然会存在分配大小中有未写入的非法数据。
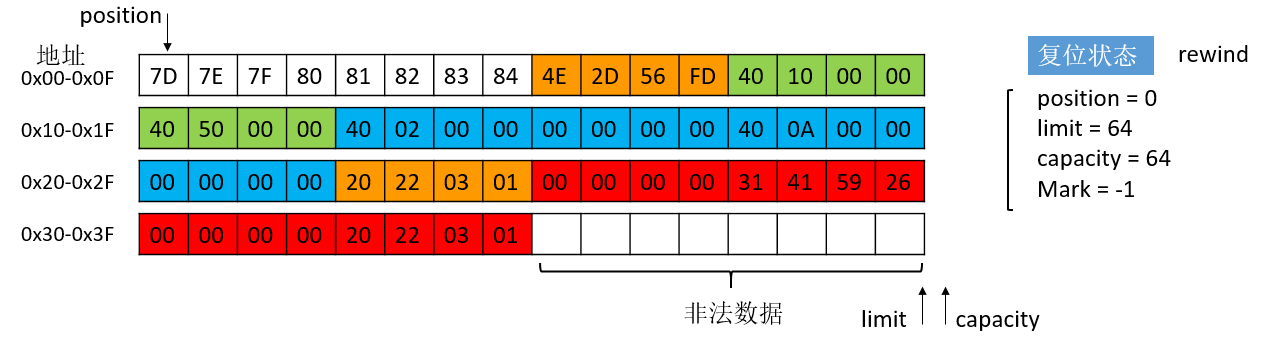 rewind数据图
flip
flip()方法,该方法不仅将position复位为0,同时也将limit的位置放置在了position之前所在的位置上,这样position和limit之间即为新读取到的有效数据。一般来说,这个方法更加常用,不会去访问到非法数据区。
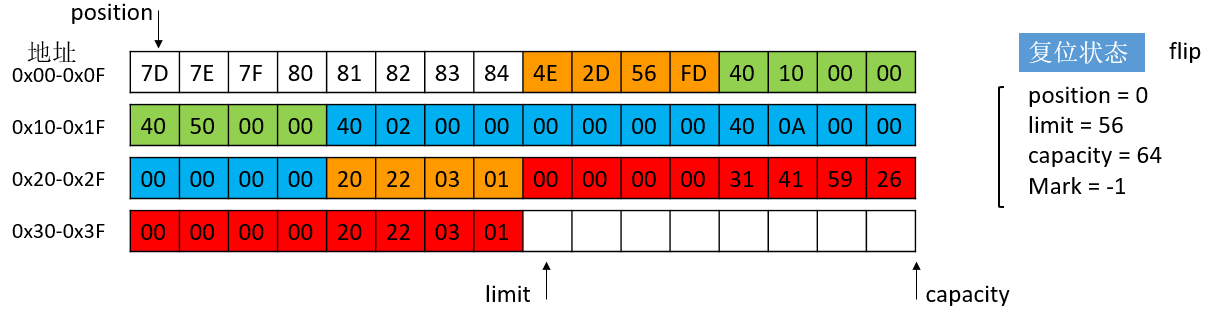 flip数据图
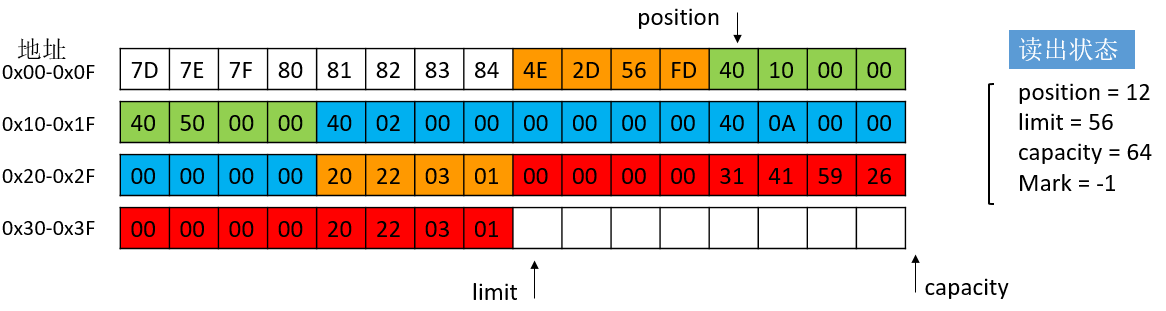
读数据
读数据的起点通常是从0开始,然后按照写入的顺序去读出即可。
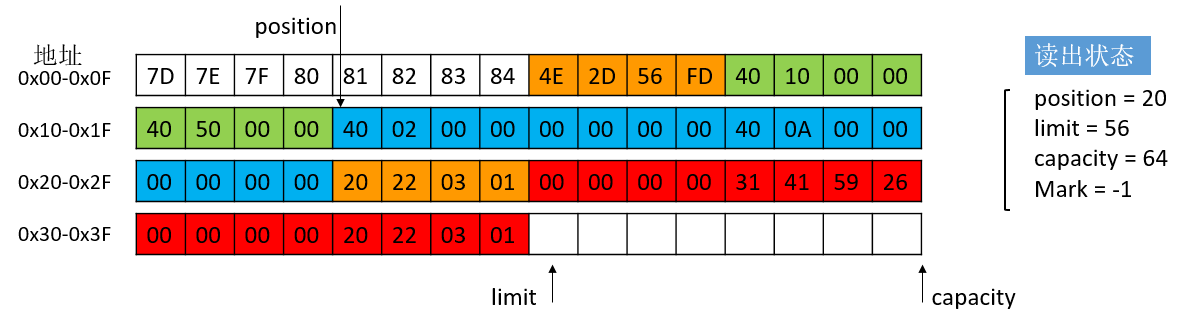
读byte类型数据
1byte[] byteRes = new byte[8];
2exampleBuffer.get(byteRes);
 读byte类型数据图
读char类型数据
1exampleBuffer.getChar();
2exampleBuffer.getChar();
 读char类型数据图
读float类型数据
1exampleBuffer.getFloat();
2exampleBuffer.getFloat();
 读float类型数据图
读double类型数据
1exampleBuffer.getDouble();
2exampleBuffer.getDouble();
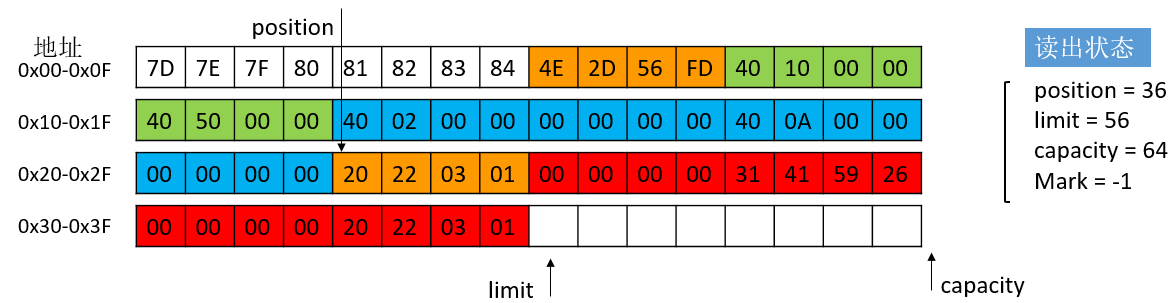 读double类型数据图
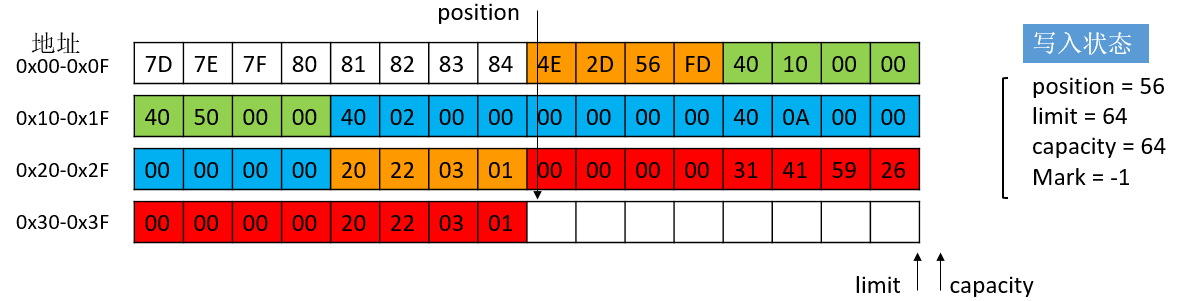
继续写入数据
由于ByteBuffer往往是非阻塞式的,故不能确定新的数据是否已经读完。可以调用ByteBuffer的compact()方法切换到继续写入,模式。该方法就是将 position 到 limit 之间还未读取的数据拷贝到 ByteBuffer 中数组的最前面,然后再将 position 移动至这些数据之后的一位,将 limit 移动至 capacity。
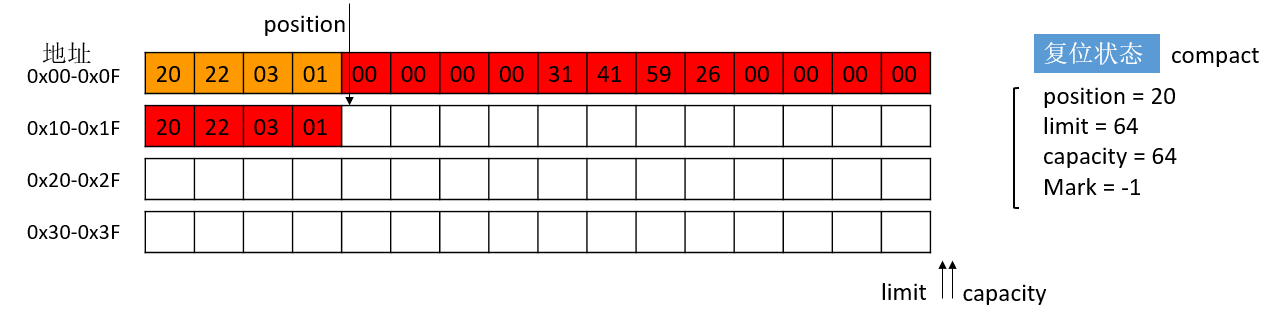 继续写入数据图
可以看到这里的short和long类型并没有读取,把没有读取的数据放到最前面,通过postion来继续在剩下的空间写入。
继续写入int类型数据
1exampleBuffer.putInt(0x20220301);
总结
ByteBuffer的基本用法
复位
clear、rewind、flip
写入数据
putXX
读取数据
getXX
重新写入
compact
2.共享内存
除了上述的NIO特性之外,ByteBuffer实际上有一个实现类,底层原理用到了共享内存。
共享内存,通过allocateDirect实现,举例如下
1private ByteBuffer _recBuffer;
2
3 try{
4    _recBuffer = ByteBuffer.allocateDirect(204800); // Max 10 ms @ 48
5    } catch(Exception e) {
6      Log.d("UVCCamera","can not get _capBuffer");
7    }
allocate和allocateDirect区别
第一种分配方式产生的内存开销是在JVM中的,而另外一种的分配方式产生的开销在JVM之外,以就是系统级的内存分配。当Java程序接收到外部传来的数据时,首先是被系统内存所获取,然后在由系统内存复制复制到JVM内存中供Java程序使用。所以在另外一种分配方式中,能够省去复制这一步操作,效率上会有所提高。可是系统级内存的分配比起JVM内存的分配要耗时得多,所以并非不论什么时候allocateDirect的操作效率都是最高的。
MappedByteBuffer使用虚拟内存,因此分配(map)的内存大小不受JVM的-Xmx参数限制,但是也是有大小限制的。
如果当文件超出1.5G限制时,可以通过position参数重新map文件后面的内容。
MappedByteBuffer在处理大文件时的确性能很高,但也存在一些问题,如内存占用、文件关闭不确定,被其打开的文件只有在垃圾回收的才会被关闭,而且这个时间点是不确定的。 javadoc中也提到:A mapped byte buffer and the file mapping that it represents remain valid until the buffer itself is garbage-collected.
具体原理可参考这按文章【Java8源码分析】NIO包-Buffer类:内存映射文件DirectByteBuffer与MappedByteBuffer(二)
共享内存的实例
Java端创建一个共享内存Bytebuffer实例,可以通过反射或者传入的方式,使得jni层也能够通过C++的方式去操作这个ByteBuffer实例。
两种方式在jni获取
1.通过类似java反射获取到java属性的值
 1//第一种方式
 2void* _javaDirectRecBuffer; // Direct buffer pointer to rec buffer
 3jobject _javaRecBuffer;
 4
 5jclass cls = env->GetObjectClass(thiz);
 6    if(cls == NULL){
 7        LOGE("cls == NULL");
 8    } else {
 9
10    }
11    jfieldID fidRecBuffer = env->GetFieldID( cls, "_recBuffer",  "Ljava/nio/ByteBuffer;");
12    if(fidRecBuffer == NULL){
13        LOGE("fidRecBuffer == NULL");
14    } else {
15
16    }
17    jobject javaRecBufferLocal =  env->GetObjectField(thiz, fidRecBuffer);
18    if(javaPlayBufferLocal == NULL){
19        LOGE("javaPlayBufferLocal == NULL");
20    } else {
21
22    }
23    _javaRecBuffer = env->NewGlobalRef(javaRecBufferLocal);
24    if(_javaRecBuffer == NULL){
25        LOGE("_javaRecBuffer == NULL");
26    } else {
27        _javaDirectRecBuffer =env->GetDirectBufferAddress(_javaRecBuffer);
28    }
2.直接通过java端传入
 1//第二种方式
 2int g_audioQueueLenByAudioRecorder = 0;
 3char* g_audioBufFromJava = nullptr;
 4
 5jint setAudioDirectBuf(JNIEnv* env, jclass cls, jobject audioBuf, jint iLen){
 6    jint ret = -1;
 7    g_audioQueueLenByAudioRecorder = iLen;
 8    g_audioBufFromJava = (char*)env->GetDirectBufferAddress(audioBuf);
 9    return 0;
10}
总结
共享内存是一种优秀的内存分配方式,提供给了开发者新的方式,使得C++可以操控Java分配的共享内存后可以同步到Java端。共享内存通过allocateDirect()方法去实现。
3.关于大小端字节序
本文使用的都是大端字节序,但是为了进一步说明大小端的区别,这里通过图文的形式来说明。
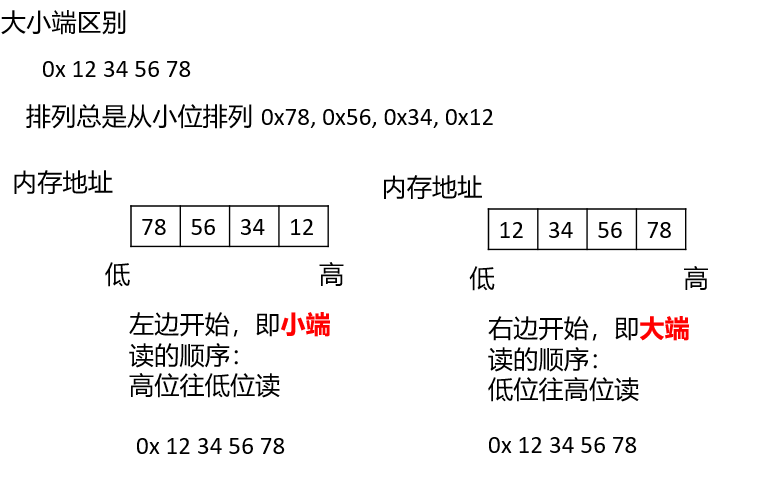 大小端区别图
 1//c++示例
 2//小端排列
 3int main()
 4{
 5    union{
 6        int i;
 7        struct{
 8            char first;
 9            chat second;
10        }half;
11    }number;
12
13    number.i = 0x4241;
14    printf("c %c\n", number.half.first, number.half.second);//AB
15    number.half.first = 'a';
16    number.half.second = 'b';
17    printf("%x\n", number.i);//0x6261
18}
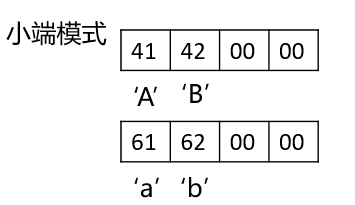
结论
在80X86平台上,系统将多字节中的低位存储在变量起始地址使用小端法。
网络字节序,系统将多字节中的高位存储在变量起始地址使用大端法。
参考文献
[1] 疯狂创客圈. MappedByteBuffer 详解(图解+秒懂+史上最全), 2021.
[2] 东风快递员.Notepad++配置HexEditor插件 , 2019.
[4] TTTTTriM.ByteBuffer详解, 2018.
[5] Lost blog.ByteBuffer常用方法详解, 2018.
[6] java.nio Class ByteBuffer–官方文档
[7] 沧海龙腾LV.JAVA NIO缓冲区(Buffer)——ByteBuffer常用方法详解, 2018.
[9] linxdcn.【Java8源码分析】NIO包-Buffer类:内存映射文件DirectByteBuffer与MappedByteBuffer(二), 2017.